DYISLAND LD-200
DYISLAND LD-200 2-Pistons Hydraulic Disc Brake Set Instruction Manual
Model: LD-200
Introduction
This manual provides essential information for the proper installation, operation, and maintenance of your DYISLAND LD-200 2-Pistons Hydraulic Disc Brake Set. Please read this manual thoroughly before installation and use to ensure optimal performance and safety.
Safety Information
- Always wear appropriate safety gear, including gloves and eye protection, during installation and maintenance.
- Ensure all connections are secure and tightened to the manufacturer's specifications to prevent component failure.
- Brake caliper mounting hole size is 74mm (2.91 inches). Verify compatibility with your bike's frame or mounting bracket before installation.
- The brake hose is pre-filled with environmentally friendly mineral oil. Avoid oil leakage during connection, as this can affect braking performance.
- This hydraulic disc brake kit is designed for bicycles/electric bikes where the brake disc is located on the left side.
- For electric bikes, ensure the 2-pin waterproof connector for the power-off sensor is correctly wired and matches your system's ports. This sensor cuts off motor power during braking for safety.
Kit Contents
The DYISLAND LD-200 Hydraulic Disc Brake Set includes the following components:
- One (1) Brake Lever (Front: Left-hand controlled)
- One (1) 1000mm (39.5 inches) Brake Hose
- One (1) Brake Caliper with 2-Pistons
- Two (2) BH59 Connectors
- Installation Tools (5mm wrench, 4mm wrench, large wrench, small screwdriver, zip ties)
- Mounting Screws
- Extra Brake Pads

Figure 1: Included accessories for the DYISLAND LD-200 Hydraulic Disc Brake Set, showing various wrenches, zip ties, and gaskets.

Figure 2: A detailed view of the tools provided with the brake kit, including a small screwdriver, 5mm and 4mm Allen wrenches, zip ties, and a large wrench.
Setup and Installation
1. Hose Connection
The brake hose is pre-filled with mineral oil. When connecting the hose to the brake lever, ensure no oil leaks out to maintain braking efficiency. Follow the steps in the video below for proper connection.
Video 1: This video demonstrates the correct procedure for connecting the hydraulic hose to the brake lever, highlighting steps to prevent oil leakage and ensure a secure fit.
2. Brake Installation
Install the brake caliper and lever onto your e-bike. Ensure the caliper mounting hole size (74mm / 2.91 inches) matches your bike. The front brake is typically left-hand controlled. Refer to the installation video for a visual guide.
Video 2: This video provides a step-by-step guide for installing the LD-200 hydraulic brake system on an e-bike, covering both the caliper and lever mounting.
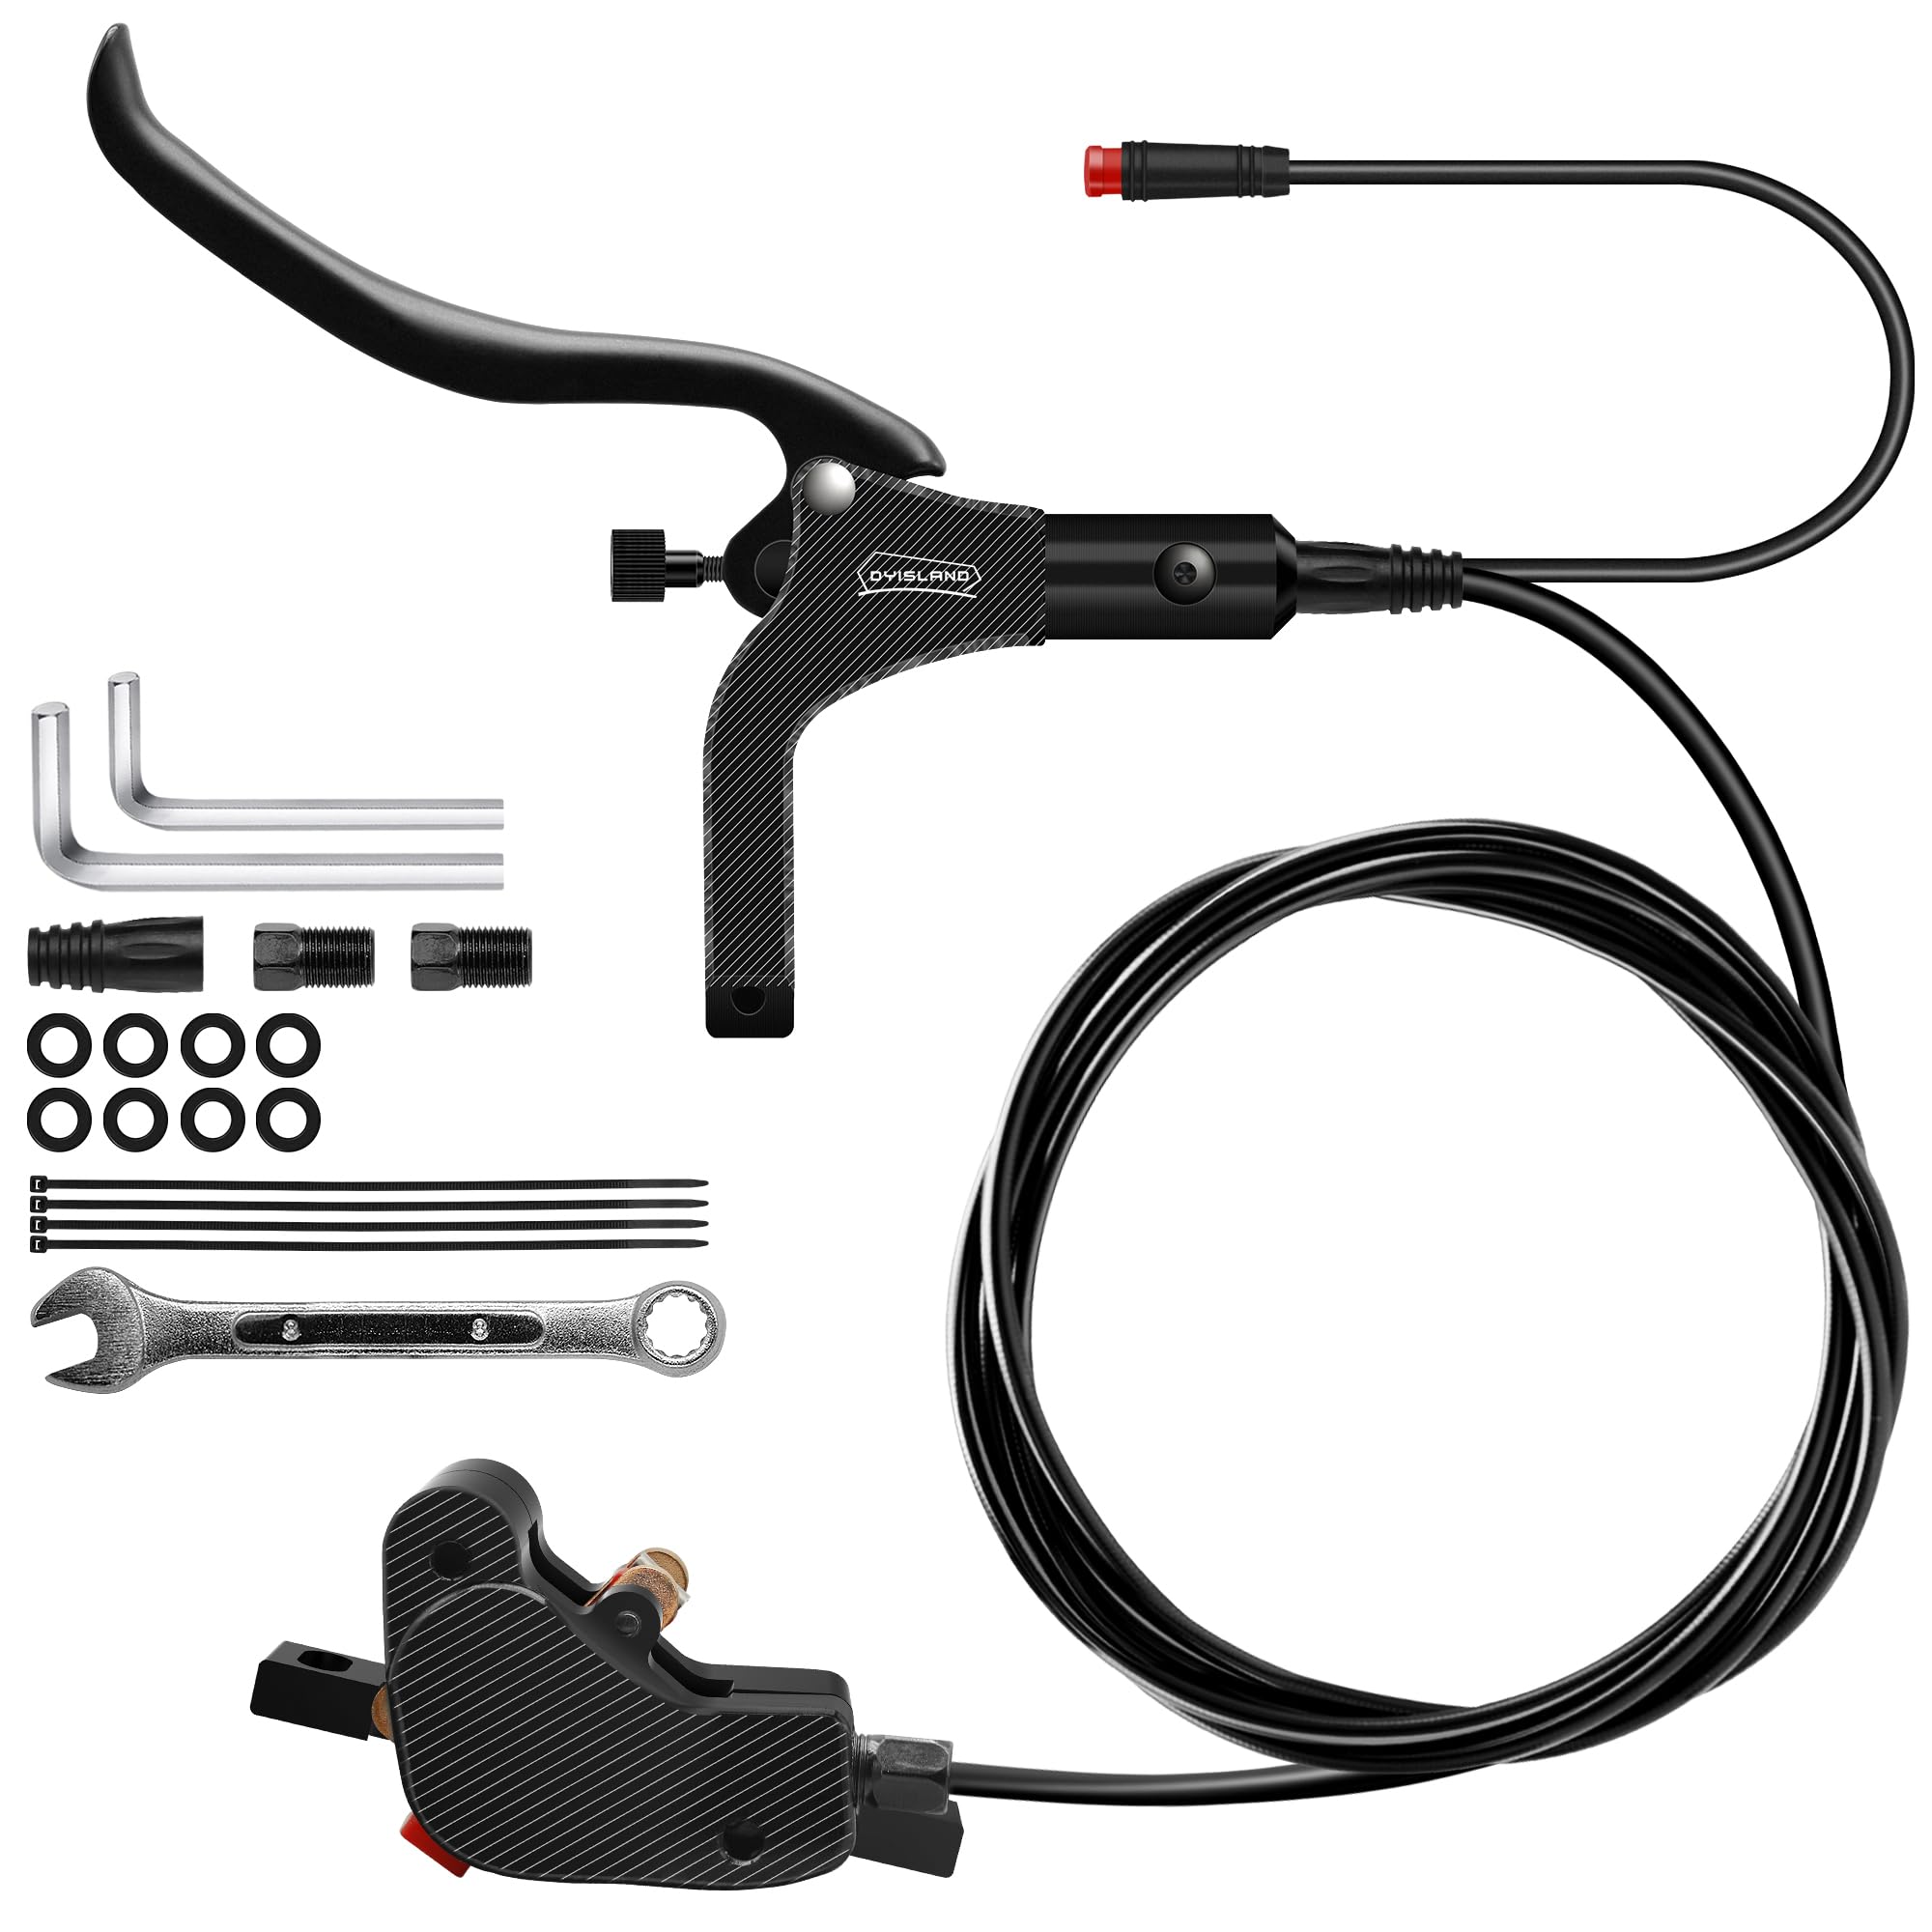
Figure 3: The DYISLAND LD-200 hydraulic disc brake caliper shown installed on the front wheel of a bicycle, demonstrating its compact design and placement.

Figure 4: An important compatibility note indicating that the brake system is designed for bikes with the brake rotor on the left side, and the left brake lever controls the front brake.
3. Electric Induction Control System
The brake system features a detachable power-off sensor with a 300mm (11.8 inches) cable and a 2-pin waterproof connector. This sensor detects braking and cuts off motor power, enhancing riding safety. Ensure the wiring ports match your e-bike's system.

Figure 5: Close-up view of the 2-pin male waterproof connector for the electric power-off sensor, which integrates with the e-bike's motor system.
Operating Instructions
1. Braking Performance
The LD-200 brakes are equipped with dual pistons and high-temperature die-cast sintered-metal brake pads, providing strong and durable braking performance. The hydraulic system ensures a consistent and responsive feel.

Figure 6: A visual representation of the dual-piston design within the brake caliper, illustrating how the two pistons apply even pressure for effective braking.
2. Brake Lever Adjustment
The brake handle features a screw adjustment function, allowing you to customize the travel distance of the brake lever. This provides a more comfortable and flexible braking operation, enabling you to achieve your preferred braking feel.
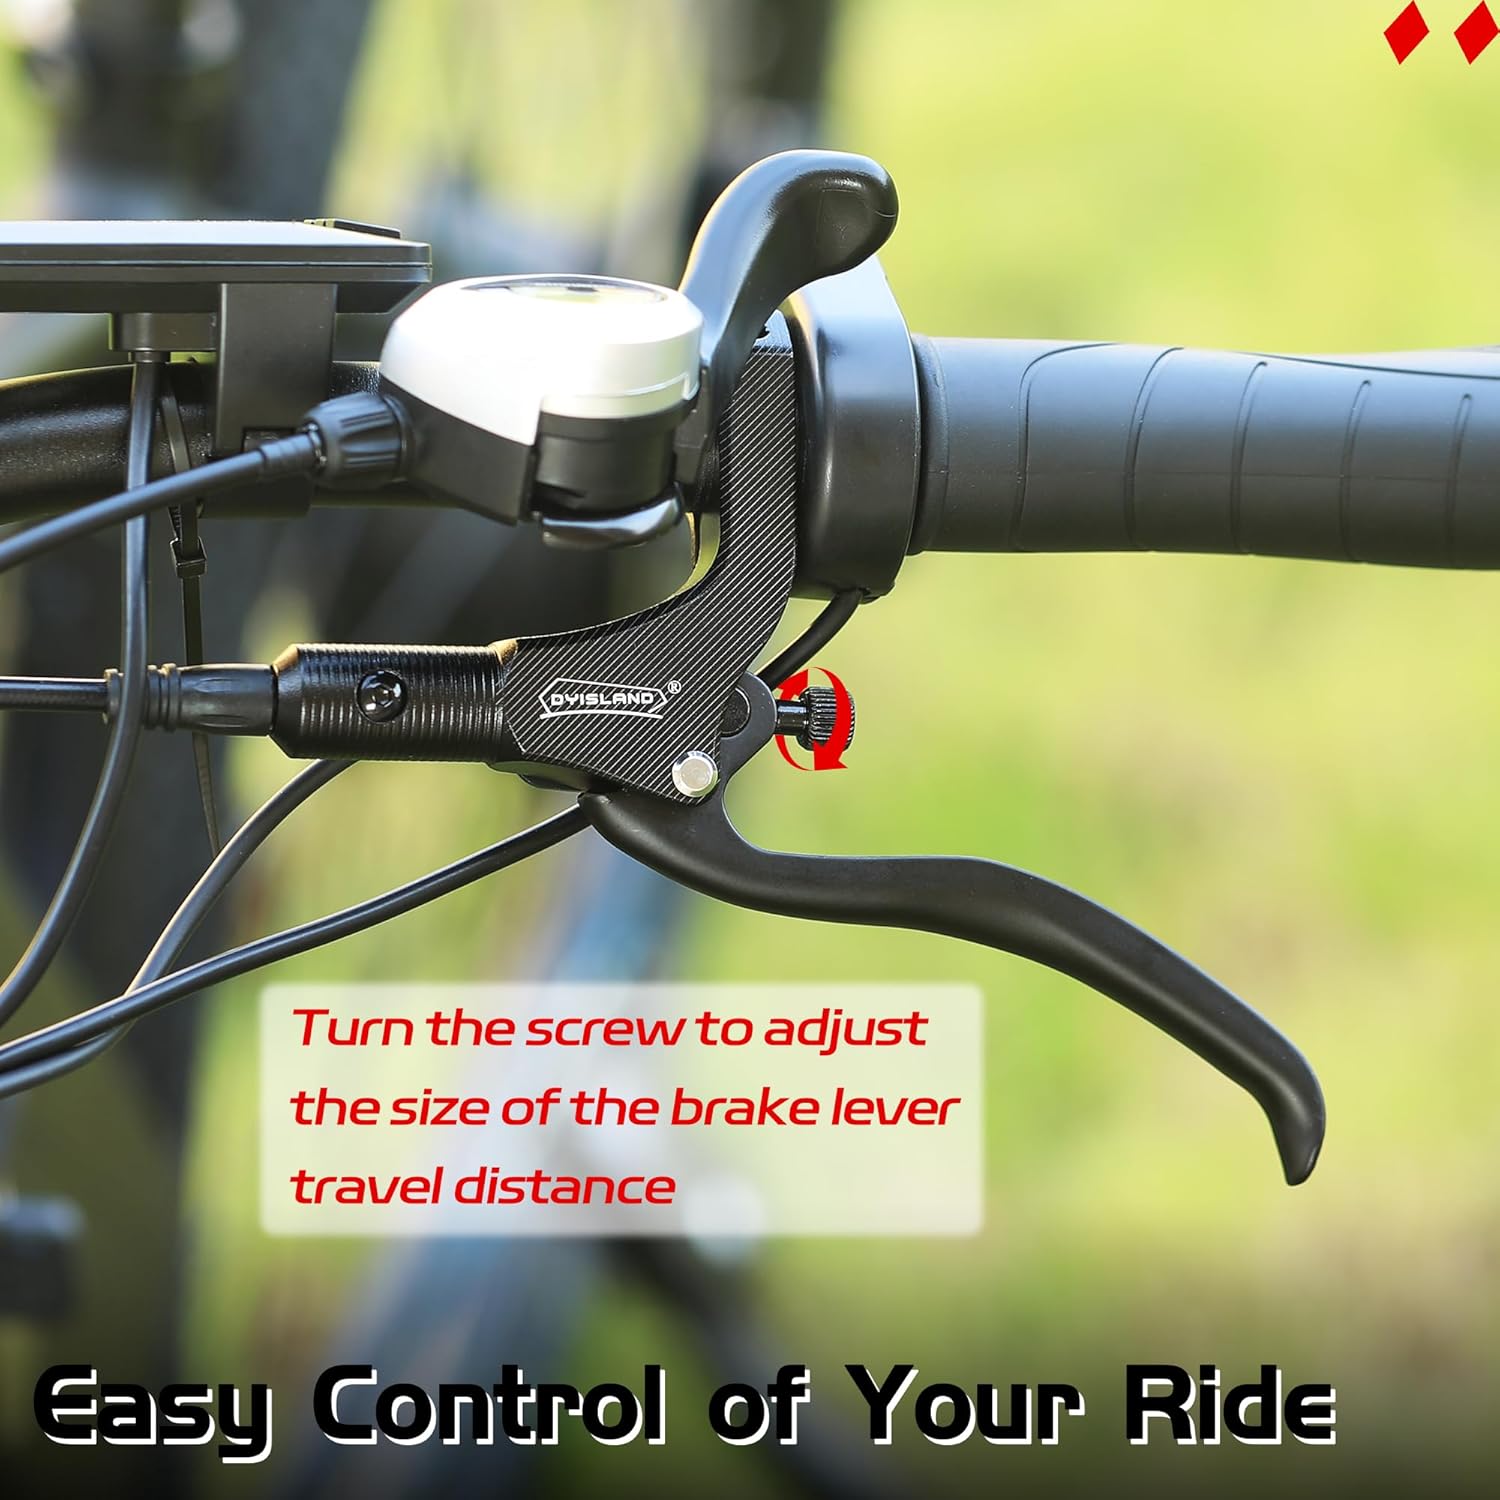
Figure 7: The brake lever with an arrow pointing to the adjustment screw, which allows users to modify the lever's travel distance for personalized comfort and control.

Figure 8: A close-up of the brake lever's adjusting screw, which is used to fine-tune the spacing between the brake pads and discs, ensuring optimal brake engagement.
Maintenance
1. Hydraulic Brake Bleeding Process
Over time, air can enter the hydraulic system, reducing braking performance. Bleeding the brakes removes this air and restores optimal function. The following video demonstrates the hydraulic brake bleeding process.
Video 3: This video illustrates the complete process of bleeding hydraulic brakes, including preparing the system, injecting new fluid, and removing air bubbles to restore brake performance.
2. General Maintenance Tips
- Regularly inspect brake pads for wear and replace them when necessary. The kit includes extra brake pads.
- Keep brake components clean and free from dirt and debris.
- Check brake fluid levels periodically and top up with compatible mineral oil if needed.
- Ensure all bolts and screws are securely tightened.
Troubleshooting
Brake Rubbing Noise
If you experience a rubbing noise from the brake disc, it indicates that the disc is not centered between the brake pads. To resolve this:
- Loosen the caliper mounting bolts slightly.
- Gently squeeze the brake lever to allow the caliper to self-center around the disc.
- While holding the brake lever, tighten the caliper mounting bolts.
- Release the brake lever and check if the rubbing noise has stopped. Adjust as needed.
Reduced Braking Performance
If braking performance feels spongy or weak, it may be due to air in the hydraulic system or worn brake pads. Refer to the Maintenance section for instructions on bleeding the brakes and replacing pads.
Specifications
| Feature | Detail |
|---|---|
| Item Package Dimensions L x W x H | 10.79 x 6.89 x 2.01 inches |
| Package Weight | 0.46 Kilograms |
| Brand Name | DYISLAND |
| Model Name | LD-200 Hydraulic Disc Brake Set |
| Color | Black-Front1000mm-Single Kit |
| Material | Aluminum |
| Suggested Users | unisex-adult |
| Number of Items | 1 |
| Manufacturer | DYISLAND |
| Included Components | One brake lever, one brake, one hose, one set of fittings |
| Size | Front-1000mm |
Warranty
The DYISLAND LD-200 Hydraulic Disc Brake Set comes with a one-year warranty from the date of purchase. Please retain your proof of purchase for warranty claims.
Support
For further assistance, technical support, or warranty inquiries, please visit the official DYISLAND store on Amazon or contact customer service through your purchase platform. You can find more information and products at the DYISLAND Store.