Introduction
This instruction manual provides essential information for the safe and effective use of your ILIHOME Dual Lens Borescope. Please read this manual thoroughly before operating the device and retain it for future reference. This industrial endoscope is designed for inspecting hard-to-reach areas, featuring a dual-lens camera, a 4.3-inch IPS display, and a durable, waterproof probe.
Safety Information
- Do not use the borescope in environments with flammable or explosive gases.
- Keep the device away from strong electromagnetic fields.
- Ensure the probe is clean and dry before and after use, especially when inspecting liquids.
- Do not attempt to disassemble or modify the device. Repairs should only be performed by authorized personnel.
- Store the borescope in a cool, dry place, away from direct sunlight and extreme temperatures.
Package Contents
Verify that all items are present in the package:
- ILIHOME Dual Lens Borescope Unit (with 4.3" IPS Screen)
- Semi-Rigid Camera Cable (16.5ft / 5 meters)
- USB Charging Cable
- Hook Attachment
- Magnet Attachment
- Side Mirror Attachment
- User Manual

Image: The ILIHOME Dual Lens Borescope unit with its display and coiled semi-rigid cable.
Setup
1. Charging the Device
Before first use, fully charge the borescope. Connect the provided USB charging cable to the Type-C port on the device and to a 5V/2A USB power adapter (not included). The charging indicator will show the charging status. A full charge typically provides up to 3 hours of operation.
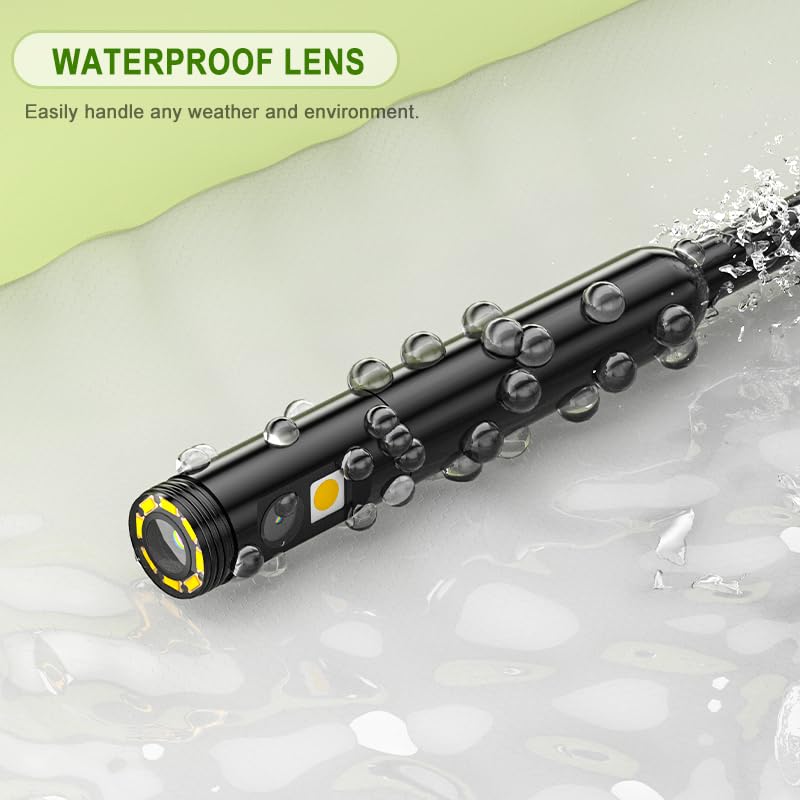
Image: The borescope's USB-C port connected for charging.
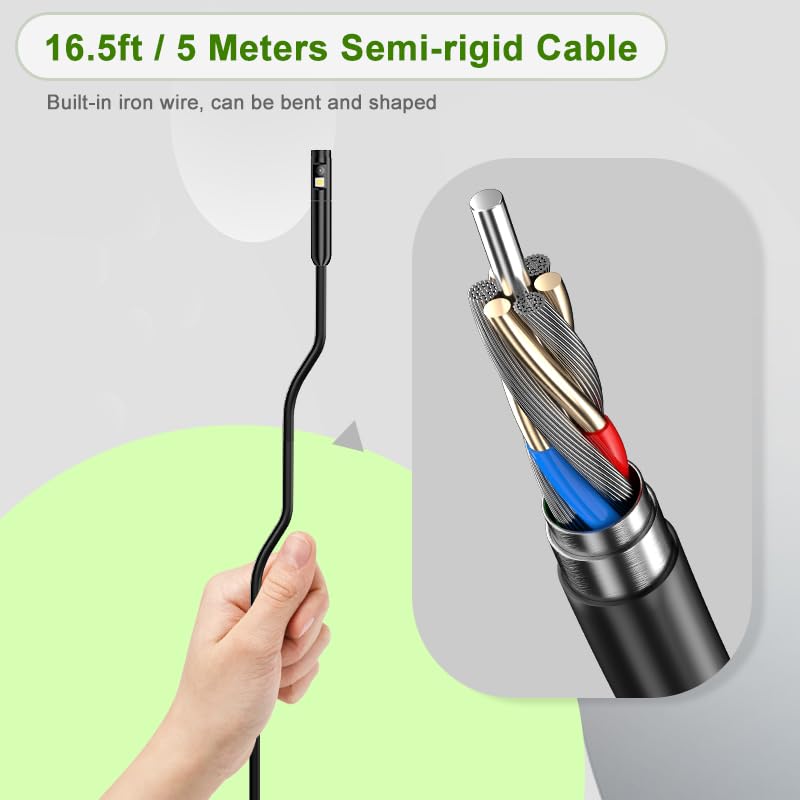
Image: An internal diagram showing the 2600mAh battery being charged within the borescope unit.
2. Attaching the Camera Cable
The semi-rigid camera cable is detachable. Align the connector of the camera cable with the port on the main display unit and push firmly until it clicks into place. To detach, gently pull the connector while pressing any release buttons if present.
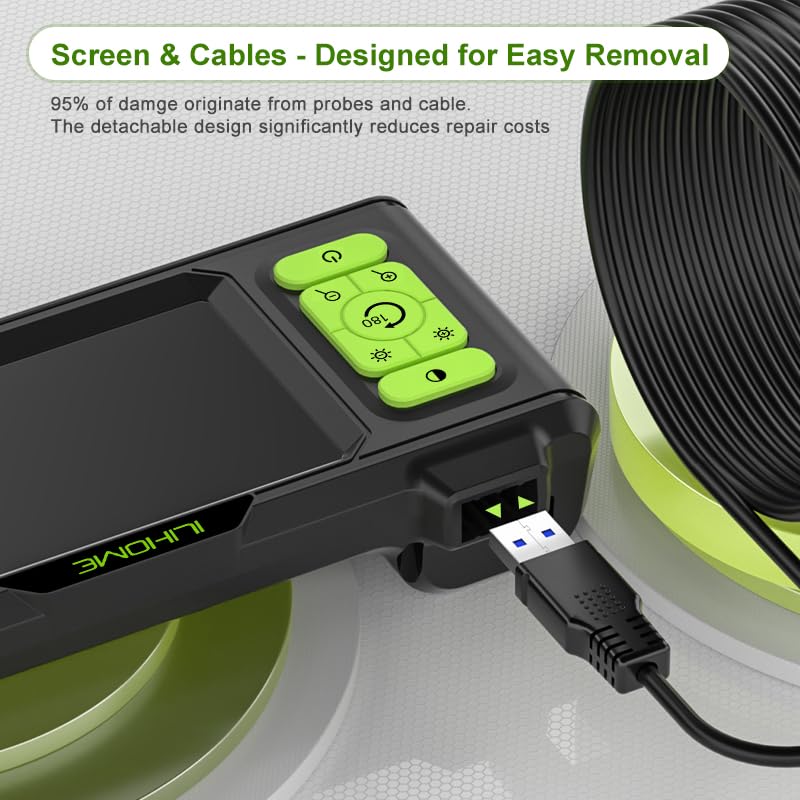
Image: The detachable camera cable being connected to the main display unit.
3. Inserting a MicroSD Card (Optional)
To save photos and videos, insert a MicroSD (TF) card into the designated slot on the side of the display unit. The device supports various MicroSD card standards (e.g., MicroSDHC, MicroSDXC). Ensure the card is inserted correctly until it clicks. A card is not included with the product.
4. Attaching Accessories
The borescope includes a hook, magnet, and side mirror attachment. These can be screwed onto the tip of the camera probe for specific inspection tasks. The 360° rotatable hook is useful for retrieving small objects, and the wide-angle mirror helps view blind spots.
Operation
1. Device Layout and Controls

Image: A diagram illustrating the control buttons on the borescope display unit.
- Black & White Mode Button: Toggles between color and black & white display modes.
- LED Brightness + Button: Increases the brightness of the camera's LED lights.
- LED Brightness - Button: Decreases the brightness of the camera's LED lights.
- Image Rotation/Camera Toggle Button (180°): Rotates the image on the screen by 180 degrees. Also used to switch between front and side cameras on dual-lens models.
- Digital Zoom (2x max) Button: Zooms in on the image.
- Zoom Out Button: Zooms out from the image.
- Power On/Off Button: Press and hold to power the device on or off.
- Metal Hook: A built-in metal hook for hanging the device.
2. Powering On/Off
Press and hold the Power On/Off Button (7) for a few seconds to turn the borescope on. The 4.3-inch IPS screen will illuminate. To power off, press and hold the same button until the screen shuts down.
3. Using the Dual Lens Camera
The ILIHOME Dual Lens Borescope features both a front-facing camera and a side-facing camera. To switch between these views, press the Image Rotation/Camera Toggle Button (4). This allows for comprehensive inspection without needing to reorient the probe.
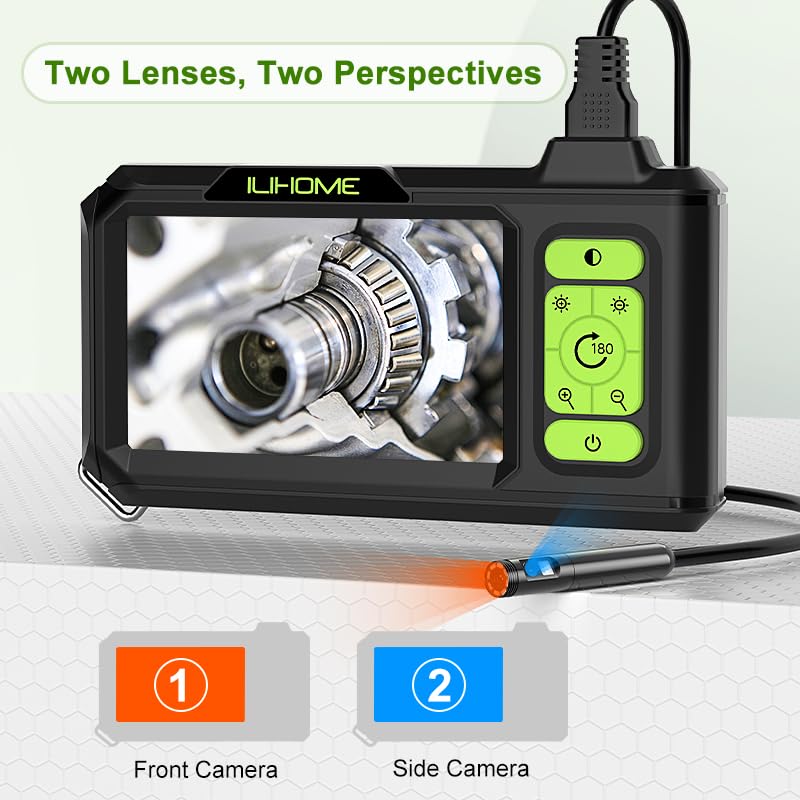
Image: Illustration of the dual-lens system, showing both front and side camera perspectives.
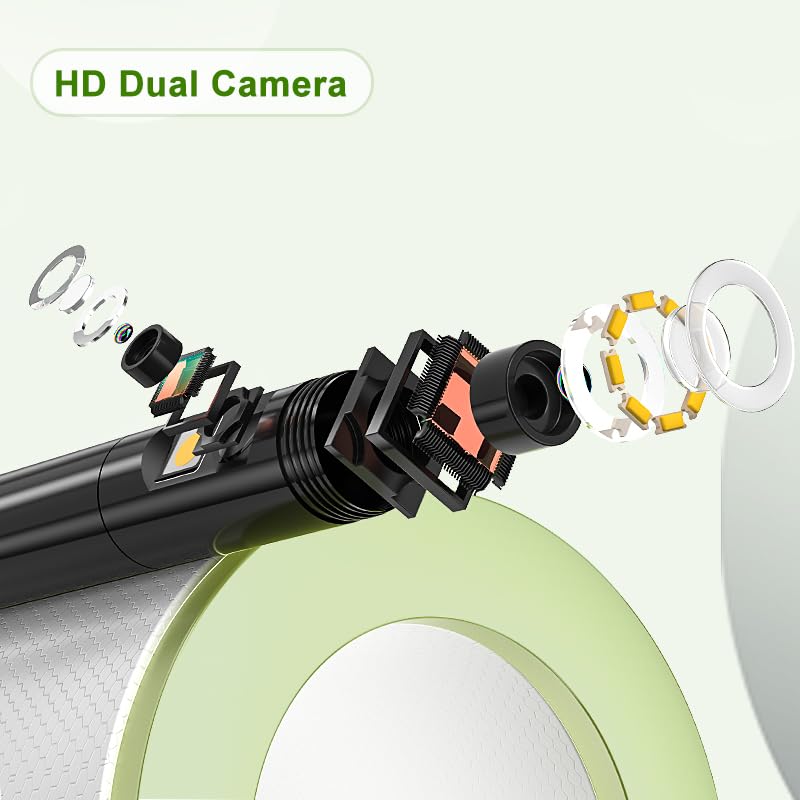
Image: An exploded diagram detailing the components of the HD dual camera at the probe tip.
4. Adjusting LED Brightness
The camera probe is equipped with 8 adjustable LED lights. Use the LED Brightness + Button (2) and LED Brightness - Button (3) to adjust the illumination level for optimal viewing in various lighting conditions.
5. Image Rotation and Zoom
Press the Image Rotation/Camera Toggle Button (4) to rotate the image on the screen by 180 degrees, which is useful when navigating in confined spaces. Use the Digital Zoom Button (5) to magnify the image up to 2x, and the Zoom Out Button (6) to return to the original view.
6. Capturing Photos and Videos
If a MicroSD card is inserted, you can capture still images and record video footage. Refer to the on-screen menu or specific buttons (often labeled with camera/video icons) for these functions. The captured media will be stored on the MicroSD card.
7. Screen Features
The 4.3-inch IPS screen offers a 178° ultra-wide viewing angle and 1:1 true scene restoration for accurate color representation. It also features an eye-protection mode to reduce blue light and minimize eye fatigue during extended use.

Image: The 4.3-inch IPS screen displaying a high-definition image, highlighting its clarity and color reproduction.
Maintenance
1. Cleaning the Probe and Lens
The camera probe is IP67 waterproof, allowing it to be used in damp or wet environments. After use, especially in dirty or oily conditions, gently wipe the probe and lens with a soft, damp cloth. For stubborn grime, a mild detergent can be used, followed by a clean, damp cloth. Ensure the probe is completely dry before storage.
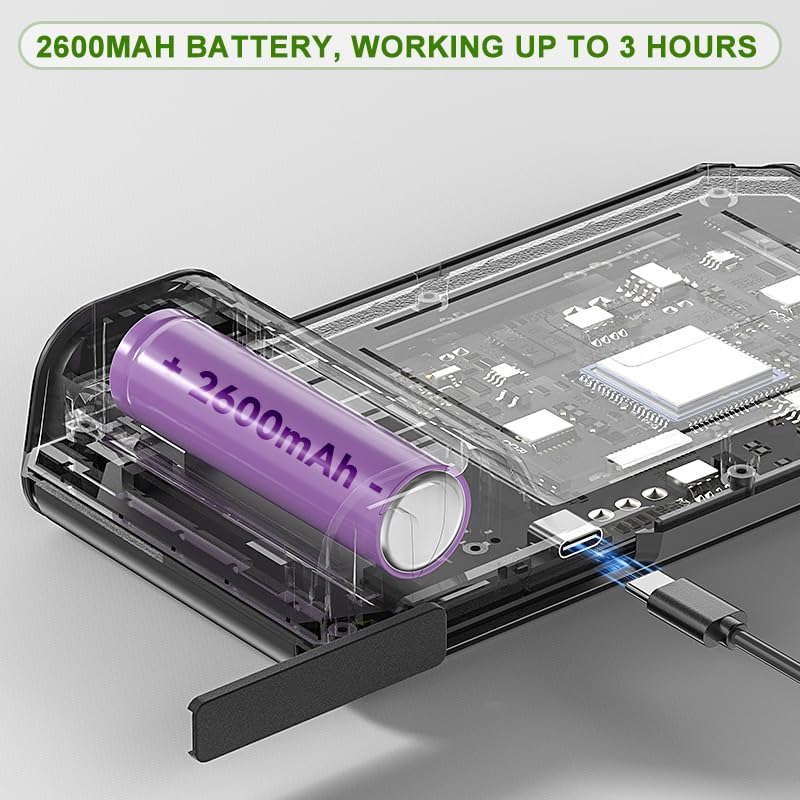
Image: The waterproof lens of the borescope probe, shown with water droplets, indicating its IP67 rating.
2. Cleaning the Display Unit
Wipe the display unit with a soft, dry cloth. Avoid using abrasive cleaners or solvents that could damage the screen or casing.
3. Cable Care and Replacement
The semi-rigid cable contains an internal iron wire, allowing it to be bent and shaped for various inspection angles. Avoid sharp bends or excessive force that could damage the internal wiring. The detachable design allows for easy replacement of worn or damaged cables, extending the lifespan of your borescope.

Image: The 16.5ft semi-rigid cable, demonstrating its flexibility and showing a cutaway view of its internal structure.
4. Battery Maintenance
To prolong battery life, avoid fully discharging the battery frequently. Recharge the device when the battery indicator is low. If storing the device for an extended period, charge it to approximately 50% every few months.
Troubleshooting
| Problem | Possible Cause | Solution |
|---|---|---|
| Device does not power on. | Low battery; Power button not pressed correctly. | Charge the device fully. Press and hold the power button for several seconds. |
| No image on screen. | Camera cable not connected securely; Damaged cable. | Ensure the camera cable is firmly connected. If damaged, replace the cable. |
| Image is too dark or too bright. | Incorrect LED brightness setting. | Adjust the LED brightness using the '+' and '-' buttons. |
| Cannot save photos/videos. | No MicroSD card inserted; MicroSD card full or corrupted. | Insert a compatible MicroSD card. Check card capacity or try a different card. |
| Image is blurry. | Lens is dirty; Object is outside focal range. | Clean the camera lens. Adjust the distance to the object being inspected. |
Specifications
| Feature | Detail |
|---|---|
| Model | Dual Lens |
| Screen | 4.3-inch IPS Display |
| Camera Diameter | 7.9mm |
| Camera Type | Dual Lens (Front & Side) |
| Video Capture Resolution | 1080p (1920x1080) |
| Waterproof Rating | IP67 (Probe) |
| Cable Length | 16.5ft / 5 Meters (Semi-Rigid) |
| LED Lights | 8 Adjustable LEDs |
| Battery | Lithium Polymer (2600mAh, included) |
| Battery Life | Up to 3 hours (approx.) |
| Charging Port | Type-C (5V/2A) |
| Storage Media | MicroSD (TF) Card (not included) |
| Package Dimensions | 8.5 x 5.67 x 2.72 inches |
| Item Weight | 1.1 Pounds |
Warranty & Support
Warranty Information
The ILIHOME Dual Lens Borescope typically comes with a manufacturer's warranty. Please refer to the warranty card included in your package or contact ILIHOME customer support for specific details regarding warranty duration and coverage. One customer review mentioned a "Free two year warranty" which may apply to your product.
Customer Support
For technical assistance, troubleshooting not covered in this manual, or warranty claims, please contact ILIHOME customer support. Contact information can usually be found on the product packaging, the official ILIHOME website, or through your purchase platform.


