
1. Introduction
Welcome to the Trato TKA12 Airbrush Kit. This comprehensive 17-piece set is designed for both professional artists and hobbyists, offering precision and versatility for various aerography applications. This manual provides essential information for the safe and effective use, setup, operation, and maintenance of your new airbrush kit. Please read it thoroughly before first use.
The Trato TKA12 kit features a dual-action airbrush, a mini compressor, and multiple accessories to enhance your artistic projects. Its robust design and user-friendly features make it suitable for detailed work and broader coverage.

Image 1.1: Scope of Application for the Trato TKA12 Airbrush Kit. This kit is versatile for body art, automotive detailing, nail art, commercial art, painting on canvas, scale models, cake decoration, and tattoos.
2. Product Overview and Components
The Trato TKA12 Airbrush Kit includes the following main components:
- Dual-Action Airbrush: Precision tool for controlled paint and air flow.
- Mini Compressor: Provides consistent air pressure for the airbrush.
- Air Hose: Connects the airbrush to the compressor.
- Paint Cups: Three capacities (9ml, 20ml, 50ml) for different project sizes.
- Nozzles and Needles: Three sizes (0.3mm, 0.4mm, 0.5mm) for varying line widths and detail levels.
- Power Adapter: Bivolt (12V output) for versatile power supply.
- Cleaning Tools: Brushes and other accessories for maintenance.
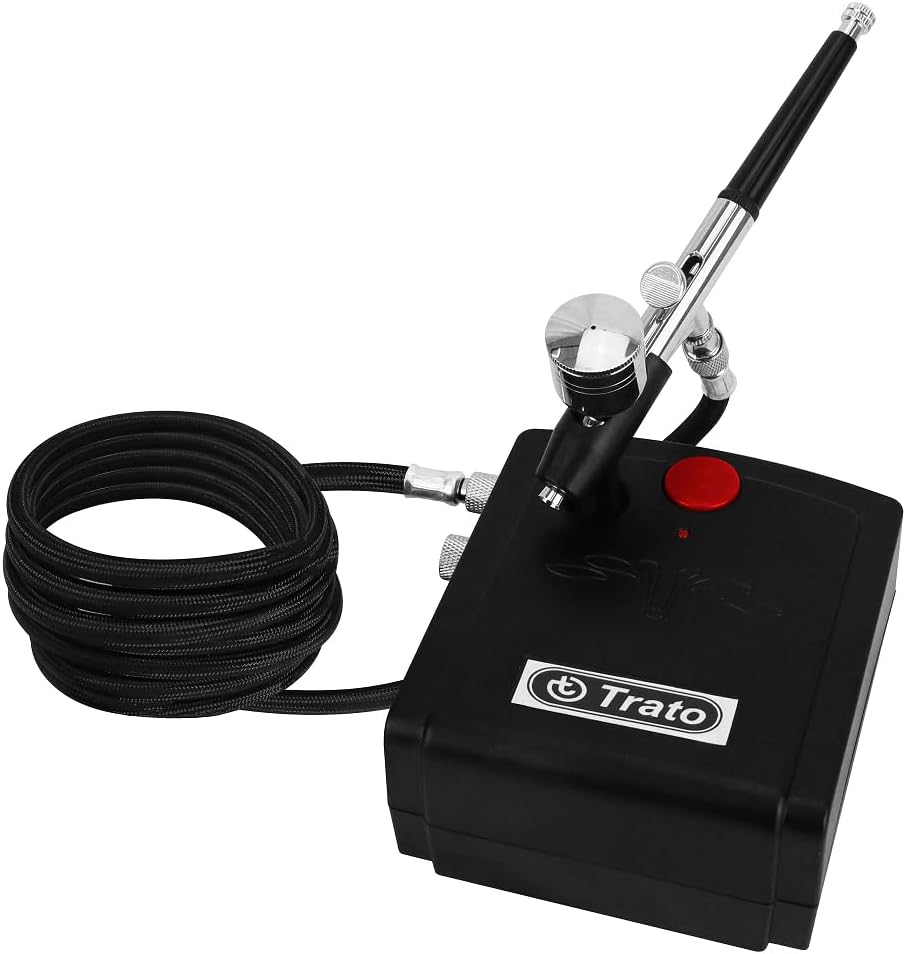
Image 2.1: Main components of the Trato TKA12 Airbrush Kit, including the mini compressor and dual-action airbrush.
3. Setup Instructions
- Unpack Components: Carefully remove all items from the packaging. Inspect for any damage.
- Connect Air Hose: Screw one end of the air hose securely to the air outlet port on the mini compressor. Screw the other end of the air hose to the air inlet of the airbrush. Ensure connections are tight to prevent air leaks.
- Attach Paint Cup: Select the desired paint cup (9ml, 20ml, or 50ml) and screw it onto the airbrush body.
- Select Nozzle/Needle: The airbrush comes with a 0.3mm nozzle and needle pre-installed. If you need a different size (0.4mm or 0.5mm), carefully replace them following the maintenance instructions for disassembly and reassembly.
- Connect Power: Plug the power adapter into the mini compressor's power input. Then, plug the adapter into a suitable electrical outlet. The adapter is bivolt, compatible with various voltages.
- Initial Test: Before adding paint, turn on the compressor using the power button. Test the air flow from the airbrush by pressing down on the trigger. Ensure a steady stream of air.
4. Operating Instructions
The Trato TKA12 airbrush features a dual-action trigger for precise control over both air and paint flow.
- Prepare Paint: Thin your paint to the appropriate consistency for airbrushing. Most airbrush paints require thinning to a milk-like consistency. Refer to your paint manufacturer's recommendations.
- Fill Paint Cup: Carefully pour the prepared paint into the attached paint cup. Do not overfill.
- Power On Compressor: Press the power button on the mini compressor to turn it on. The compressor will start generating air pressure.
- Control Air Flow: Press down on the airbrush trigger to release air. This should be done before pulling back for paint to prevent splattering.
- Control Paint Flow: While holding the trigger down for air, gently pull the trigger back to release paint. The further you pull back, the more paint will be released.
- Adjust Spray Pattern: Practice on a scrap surface to get a feel for the airbrush. Adjust the distance from the surface and the trigger control to achieve desired line thickness and coverage.
- Stop Painting: To stop painting, release the trigger forward to cut off paint flow, then release the trigger upwards to stop air flow. Always release paint first, then air.
- Clean After Use: Thoroughly clean the airbrush immediately after each use to prevent paint from drying and clogging. Refer to the Maintenance section.
5. Maintenance
Proper maintenance is crucial for the longevity and optimal performance of your Trato TKA12 Airbrush Kit.
5.1 Airbrush Cleaning
- Flush with Cleaner: Empty any remaining paint from the cup. Pour a small amount of appropriate airbrush cleaner or thinner into the cup. Spray it through the airbrush until the spray runs clear.
- Back-Flush: Cover the nozzle cap with your finger or a cloth and press down on the trigger for air. This will force air back into the paint cup, creating bubbles that help clean the cup and internal passages.
- Disassemble for Deep Cleaning: For thorough cleaning, especially after using thicker paints or if clogging occurs, disassemble the airbrush.
- Remove the handle, needle chucking nut, and needle. Carefully pull the needle straight out from the front.
- Unscrew the nozzle cap and then the nozzle itself. Be extremely gentle as the nozzle is delicate.
- Clean all components with airbrush cleaner and the provided cleaning brushes. Pay close attention to the nozzle and needle tip.
- Reassemble: Carefully reassemble the airbrush in reverse order. Ensure the needle is inserted gently to avoid bending the tip. Do not overtighten components.
5.2 Compressor Care
- Keep the compressor's air vents clear of dust and debris to ensure proper cooling.
- Store the compressor in a dry, clean environment when not in use.
- Do not operate the compressor in excessively dusty or humid conditions.
6. Troubleshooting
If you encounter issues with your Trato TKA12 Airbrush Kit, refer to the following common problems and solutions:
| Problem | Possible Cause | Solution |
|---|---|---|
| No air flow from airbrush | Compressor off; hose disconnected; trigger not pressed down. | Ensure compressor is on; check hose connections; press trigger down fully. |
| No paint flow | Clogged nozzle/needle; paint too thick; needle bent; trigger not pulled back. | Clean nozzle/needle; thin paint; inspect/replace needle; pull trigger back while pressing down. |
| Paint splattering | Paint too thick; air pressure too low; not pressing air trigger before paint. | Thin paint; ensure compressor is running at full pressure; always press air trigger down before pulling back for paint. |
| Uneven spray pattern | Partially clogged nozzle; damaged nozzle/needle. | Perform deep cleaning of airbrush; inspect nozzle and needle for damage and replace if necessary. |
| Compressor not turning on | Power adapter disconnected; faulty outlet. | Check power connections; try a different electrical outlet. |
7. Specifications
Detailed technical specifications for the Trato TKA12 Airbrush Kit:
- Model: TKA12
- Brand: Trato
- Cup Capacity: 9 ml, 20 ml, 50 ml
- Frequency: 60 Hz
- Output Voltage: 12 V
- Mini Compressor:
- Working Pressure: 15 psi
- Air Consumption: 10.5 L/min
- Hose Length: 1.8 m
- Airbrush:
- Air Consumption: 2 L/min
- Maximum Working Pressure: 18 psi
- Air Inlet Thread: 1/8" BSP
- Nozzle Diameters: 0.3 mm, 0.4 mm, 0.5 mm
- Action: Dual Action
- Pistol Material: Copper
- Voltage: Bivolt
- Noise Level: 4 Decibels
- Product Dimensions: 20 x 13 x 12 cm
- Product Weight: 1.15 kg
8. Warranty and Support
For warranty information, please refer to the documentation provided at the time of purchase or contact your retailer. Warranty terms typically cover manufacturing defects for a specified period.
For technical support, spare parts, or further assistance, please contact the Trato customer service department or your authorized retailer. Keep your purchase receipt and product model number (TKA12) handy when seeking support.