Introduction
This manual provides detailed instructions for the safe and efficient operation of your Denver MRD-51BT MK2 9-in-1 Bluetooth Radio Disc Player. Please read this manual thoroughly before using the device and retain it for future reference. This versatile music center combines modern technology with a vintage aesthetic, allowing you to enjoy various audio formats.
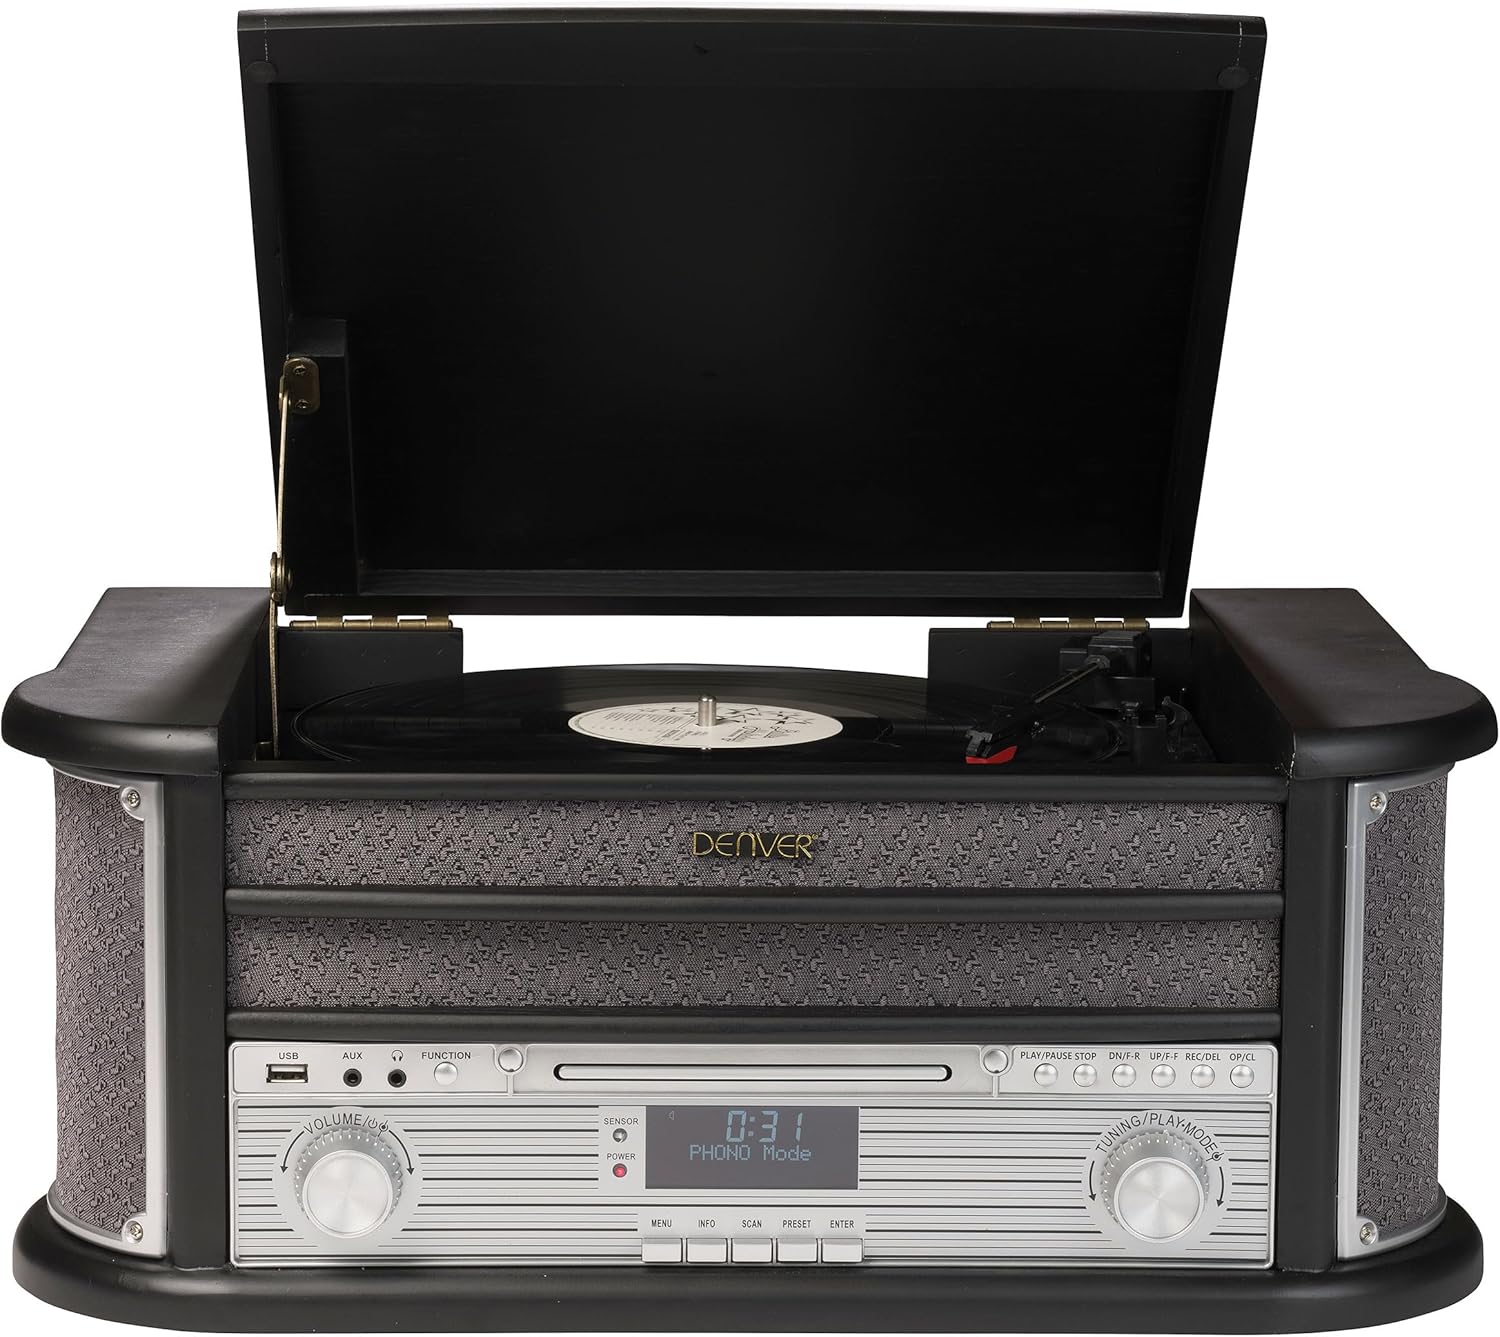
Figure 1: Front view of the Denver MRD-51BT MK2 music center.
Product Features
The Denver MRD-51BT MK2 is a comprehensive audio system designed to play various media types. Key features include:
- 9-in-1 Audio System: Integrates a turntable, cassette player, CD player, DAB/DAB+ radio, FM radio, USB MP3 playback, Bluetooth connectivity, AUX input, and Line output.
- 3-Speed Turntable: Supports 33, 45, and 78 RPM vinyl records.
- Digital Radio: DAB/DAB+ tuner for access to digital radio stations.
- Analog Radio: FM tuner for traditional radio broadcasts.
- Bluetooth Connectivity: Wirelessly stream audio from compatible smartphones, tablets, or other Bluetooth-enabled devices.
- USB MP3 Playback & Recording: Play MP3 files from a USB drive and record audio from vinyl, cassette, or CD directly to MP3 format on a USB drive.
- Auxiliary Input (AUX IN): Connect external audio devices via a 3.5mm jack.
- Line Output (LINE OUT): Connect the unit to an external amplifier or powered speakers.
- Headphone Jack: For private listening.
- Integrated Speakers: Built-in stereo speakers for immediate audio playback.
- Remote Control: Full-function remote for convenient operation.
Setup
1. Unpacking
Carefully remove the unit from its packaging. Retain the packaging materials for future transport or storage. Ensure all components are present:
- Denver MRD-51BT MK2 Music Center
- Remote Control
- User Manual (this document)
- Power Adapter

Figure 2: Product packaging.
2. Placement
Place the unit on a stable, flat surface away from direct sunlight, heat sources, and excessive dust or moisture. Ensure adequate ventilation around the unit.
3. Connecting Power
Connect the supplied power adapter to the DC IN jack on the rear of the unit, then plug the adapter into a standard wall outlet.
4. Antenna Connection
For optimal FM and DAB/DAB+ radio reception, extend the FM wire antenna located at the rear of the unit. Position it for the best signal reception.
5. External Device Connections
- AUX IN: To connect an external audio device (e.g., an MP3 player or smartphone without Bluetooth), use a 3.5mm audio cable (not supplied) to connect the device's headphone or line-out jack to the AUX IN jack on the front panel.
- LINE OUT: To connect the music center to an external amplifier or powered speakers, use RCA audio cables (not supplied) to connect the L/R LINE OUT jacks on the rear panel to the corresponding audio input jacks on your external audio system.
- Headphones: For private listening, plug 3.5mm stereo headphones into the HEADPHONE jack on the front panel.

Figure 3: Rear panel connections.
Operating Instructions
1. General Controls

Figure 4: Front control panel details.
- POWER Button: Press to turn the unit ON or OFF.
- VOLUME Knob: Rotate to adjust the audio output level.
- FUNCTION Button: Press repeatedly to cycle through different modes (PHONO, CD, USB, DAB, FM, BT, AUX).
- TUNING/PLAYMODE Knob: Used for tuning radio stations or navigating tracks/folders in CD/USB mode.
- LCD Display: Shows current mode, track information, radio frequency, etc.
2. Turntable Operation (PHONO Mode)
This unit supports 33, 45, and 78 RPM records.
- Lift the turntable lid.
- Place a vinyl record on the turntable platter. If playing a 45 RPM single, place the included adapter over the spindle.
- Select the appropriate speed (33/45/78) using the speed selector switch located on the turntable deck.
- Gently release the tone arm lock.
- Lift the tone arm using the cueing lever and position it over the desired track on the record.
- Lower the cueing lever to gently place the stylus onto the record. Playback will begin.
- At the end of the record, the turntable may stop automatically (if auto-stop is enabled). Manually return the tone arm to its rest and secure it with the lock.

Figure 5: Turntable in operation.
3. CD Player Operation (CD Mode)
- Press the FUNCTION button to select CD mode.
- Press the OPEN/CLOSE button to open the CD tray.
- Place a CD with the label side facing up into the tray.
- Press the OPEN/CLOSE button again to close the tray. The unit will read the CD.
- Press PLAY/PAUSE to start playback. Use the SKIP buttons to navigate tracks.
4. Cassette Player Operation (TAPE Mode)
The cassette deck is located on the side of the unit.
- Insert a cassette tape into the cassette slot.
- Press the FUNCTION button to select TAPE mode.
- Use the cassette deck controls (PLAY, STOP/EJECT, F.FWD, REW) to operate the tape.
5. Radio Operation (DAB/DAB+ and FM Modes)
- Press the FUNCTION button to select DAB or FM mode.
- For DAB: The unit will automatically scan for available DAB stations on first use. To manually scan, refer to the full manual for specific instructions. Use the TUNING knob or PRESET buttons to navigate stations.
- For FM: Use the TUNING knob to manually tune to a station or press and hold the SCAN button for automatic scanning.
- Saving Presets: To save a station, tune to the desired station, then press and hold the PRESET button until the display prompts you to save. Use the TUNING knob to select a preset number, then press ENTER to confirm.
6. Bluetooth Operation (BT Mode)
- Press the FUNCTION button to select BT mode. The display will show "BT" and the unit will enter pairing mode.
- On your Bluetooth-enabled device (smartphone, tablet), enable Bluetooth and search for available devices.
- Select "MRD-51BT" from the list of devices. Once paired, the unit will emit a confirmation sound.
- You can now stream audio from your device to the music center.
7. USB MP3 Playback (USB Mode)
- Insert a USB flash drive containing MP3 files into the USB port on the front panel.
- Press the FUNCTION button to select USB mode. The unit will automatically begin playing MP3 files.
- Use the SKIP buttons to navigate tracks and the PLAY/PAUSE button to control playback.
8. USB Recording
You can record audio from vinyl, cassette, or CD directly to a USB drive in MP3 format.
- Insert a USB flash drive into the USB port.
- Select the desired source mode (PHONO, CD, or TAPE).
- Start playback of the source audio (e.g., play a record, CD, or cassette).
- Press the REC button on the control panel or remote control. The unit will begin recording the audio to the USB drive.
- Press the STOP button to end the recording. The recorded file will be saved on the USB drive.
Maintenance
1. Cleaning
- Always unplug the unit from the power outlet before cleaning.
- Use a soft, dry cloth to clean the exterior surfaces. Do not use abrasive cleaners, waxes, or solvents.
- For the turntable platter and stylus, use specialized cleaning tools and solutions designed for vinyl record players.
- Keep the CD tray and cassette deck free of dust and debris.
2. Stylus Replacement
The turntable stylus (needle) is a consumable part and will wear out over time. A worn stylus can damage your records and degrade sound quality. Replace the stylus after approximately 300-500 hours of playback, or if you notice a significant drop in sound quality or distortion.
- Gently remove the old stylus by pulling it downwards and forwards from the cartridge.
- Carefully insert the new stylus by pushing it upwards and backwards into the cartridge until it clicks into place.
- Avoid touching the tip of the new stylus.
Troubleshooting
If you experience issues with your Denver MRD-51BT MK2, please consult the following table before seeking professional service.
| Problem | Possible Cause | Solution |
|---|---|---|
| No power | Power cord not connected; Power outlet not active | Ensure power cord is securely plugged in; Try a different outlet |
| No sound | Volume too low; Incorrect function mode selected; Headphones connected | Increase volume; Press FUNCTION to select correct mode; Disconnect headphones |
| Poor radio reception | Antenna not extended or positioned correctly; Weak signal | Extend and reposition the FM antenna; Try auto-scan for DAB/FM |
| Turntable not spinning or sound distorted | Speed setting incorrect; Stylus worn or damaged; Tone arm locked | Select correct speed (33/45/78 RPM); Replace stylus; Release tone arm lock |
| Bluetooth pairing failure | Unit not in pairing mode; Device too far; Bluetooth disabled on external device | Ensure unit is in BT mode; Move device closer; Enable Bluetooth on your device |
| USB recording not working | USB drive full or incompatible format; Source not playing | Use a formatted USB drive with sufficient space; Ensure source (vinyl, CD, tape) is playing |
Specifications
Product specifications are subject to change without notice.
- Brand: Denver
- Model Number: MRD-51BT-Black
- Color: Black Wood MK2
- Dimensions (L x W x H): 51.5 x 35 x 22 cm (approximately 20.3 x 13.8 x 8.7 inches)
- Weight: 8 Kilograms (approximately 17.6 lbs)
- Power Source: Cable Electric
- Connectivity Technology: USB, Bluetooth, AUX In, Line Out, Headphone Socket
- Compatible Devices: Headphones, Speakers, Tablet
- Number of Speakers: 2 (Built-in)
- Turntable Speeds: 33, 45, 78 RPM
- Radio Tuner: DAB+, FM
Warranty and Support
This product comes with a 12-month warranty from the date of purchase. For warranty claims or technical support, please contact the dedicated support center. Details for contacting support are typically provided with your purchase documentation or on the manufacturer's official website.
Please retain your proof of purchase for warranty validation.


