EnhanBili CMS260
CMS260 LED Screen All-in-One Controller LED Video Processor
Model: CMS260
1. Introduction
The CMS260 is an advanced all-in-one controller designed for LED screens, integrating both video processing and video control functionalities within a single unit. This device is equipped with four Ethernet output ports, enabling it to drive up to 2.6 million pixels. It supports a maximum output width and height of 3840 pixels, making it suitable for a wide range of LED display applications.
2. Product Overview
The CMS260 features a robust design with clearly labeled input and output interfaces, as well as intuitive control elements on its front panel. Understanding the layout of the device is crucial for proper setup and operation.
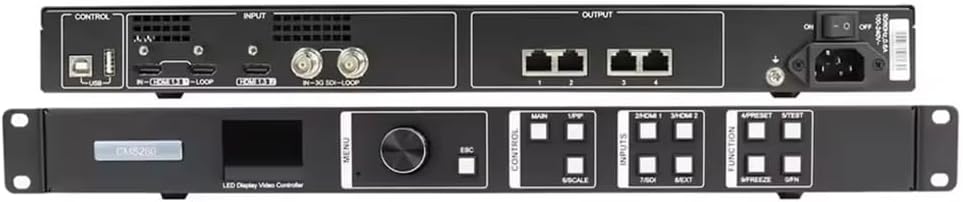
Figure 2.1: Front and Rear Panels of the CMS260 LED Video Controller. The top image shows the rear panel with control, input (USB, HDMI, SDI), and output (Ethernet) ports. The bottom image displays the front panel with navigation buttons, an LCD screen, and function keys for control and input selection.
2.1. Key Components and Interfaces
- Front Panel: Features an LCD display, a rotary encoder for menu navigation, ESC button, and dedicated buttons for control, input selection (MAIN, PIP, HDMI 1, HDMI 2, SDI 1, SDI 2), and functions (PRESET, TEST, FREEZE, GFN).
- Rear Panel - Control Section: Includes a USB-B port for PC control and an Ethernet port for network control.
- Rear Panel - Input Section: Provides multiple input options including HDMI (with loop-through), SDI (with loop-through), and DVI.
- Rear Panel - Output Section: Equipped with four RJ45 Ethernet output ports for connecting to LED receiving cards.
- Power Input: Standard AC power inlet with an ON/OFF switch.
3. Setup and Connections
Proper connection of the CMS260 is essential for optimal performance. Follow the steps below to set up your device.

Figure 3.1: Connection Diagram for the CMS260 LED Video Controller. This diagram illustrates how to connect various input sources (HDMI, SDI), a control PC via USB, and the output to an LED screen using RJ45 Ethernet cables. It also shows the power connection.
3.1. Connection Steps
- Power Connection: Connect the supplied AC power cable to the power inlet on the rear panel of the CMS260 and then to a suitable power outlet (AC 100-240V, 50/60Hz). Ensure the power switch is in the OFF position before connecting.
- Input Source Connection:
- For HDMI sources (e.g., laptop, media player), connect HDMI cables to the HDMI input ports on the rear panel.
- For SDI sources (e.g., professional cameras), connect SDI cables to the SDI input ports.
- LED Screen Connection: Connect RJ45 Ethernet cables from the four output ports on the rear panel of the CMS260 to the input ports of your LED receiving cards on the LED screen.
- Control PC Connection (Optional): For advanced configuration and control, connect a USB cable from your computer to the USB-B control port on the rear panel. Alternatively, use an Ethernet cable for network control.
- Power On: Once all connections are secure, switch the power button on the rear panel to the ON position.
4. Operating Instructions
The CMS260 offers various functionalities for managing your LED display. Basic operations involve input selection, screen configuration, and display mode adjustments.
4.1. Basic Operation
- Input Switching: Use the dedicated input buttons on the front panel (e.g., HDMI 1, SDI 1) to switch between connected video sources.
- Menu Navigation: Use the rotary encoder and ESC button on the front panel to navigate through the on-screen menu displayed on the integrated LCD.
- Screen Configuration: Access the menu to configure the LED screen parameters, including resolution, refresh rate, and mapping of the LED modules. This typically involves setting up the output resolution to match your LED screen's pixel count.
- Picture-in-Picture (PIP) / Main Layer: The CMS260 supports advanced display modes like Picture-in-Picture. Use the 'MAIN' and 'PIP' buttons to activate and configure these display layers.
- Pixel Capacity: The unit can drive up to 2.6 million pixels. Ensure your screen's total pixel count does not exceed this limit for optimal performance.
- Output Resolution: The maximum output width and height are both 3840 pixels. Configure your screen resolution within these limits.
4.2. Advanced Features (via PC Software)
For detailed screen configuration, calibration, and advanced display settings, it is recommended to use the manufacturer's dedicated control software on a connected PC. This software provides a graphical interface for precise control over pixel mapping, color correction, and multi-screen management.
5. Maintenance
Regular maintenance helps ensure the longevity and reliable operation of your CMS260 controller.
- Cleaning: Use a soft, dry cloth to clean the exterior of the unit. Avoid using liquid cleaners or abrasive materials, which can damage the surface or internal components.
- Ventilation: Ensure that the ventilation openings on the unit are not blocked to prevent overheating. Maintain adequate space around the device for proper airflow.
- Environmental Conditions: Operate the device within the specified temperature range of -20℃ to 60℃. Avoid exposing the unit to excessive dust, humidity, or direct sunlight.
- Firmware Updates: Periodically check the manufacturer's website for firmware updates. Keeping the firmware updated can improve performance, add new features, and resolve potential issues.
6. Troubleshooting
This section provides solutions to common issues you might encounter with the CMS260.
| Problem | Possible Cause | Solution |
|---|---|---|
| No display on LED screen. |
|
|
| Image flickering or unstable. |
|
|
| Control PC cannot connect. |
|
|
7. Specifications
Detailed technical specifications for the CMS260 LED Video Processor.
| Feature | Specification |
|---|---|
| Model Number | CMS260 |
| Input Power | AC 100-240V, 50/60Hz |
| Operating Temperature | -20℃ ~ 60℃ |
| Overall Consumption | 28W |
| Net Weight | 3.2 Kg (7.04 pounds) |
| Gross Weight | 5.3 Kg |
| Product Dimensions (L x W x H) | 48.5 x 25.0 x 5.0 cm (19.09 x 9.84 x 1.97 inches) |
| Max Pixel Capacity | 2.6 million pixels |
| Max Output Width/Height | 3840 pixels |
| Country of Origin | China |
| Manufacturer | Novastar |

Figure 7.1: Detailed dimensions of the CMS260 unit in millimeters. The diagram provides various measurements including overall length (e.g., 482.6 mm), depth (e.g., 250.0 mm), and height (e.g., 50.1 mm), along with specific mounting hole and chassis dimensions.
8. Warranty and Support
For warranty information, technical support, or service inquiries regarding your CMS260 LED Video Processor, please contact the manufacturer, Novastar, or the seller, EnhanBili, directly. Refer to your purchase documentation for specific warranty terms and contact details.
It is recommended to register your product with the manufacturer, if applicable, to receive updates and support notifications.
Ask a question about this manual
Ask about setup, troubleshooting, compatibility, parts, safety, or missing instructions. Manuals+ will review the question and use this page’s manual context to help answer it.