1. Product Overview
The Prolux RS7 PRO is a versatile cordless handheld stick vacuum designed for efficient cleaning in both home and office environments. It features a powerful motor, advanced HEPA filtration, and a modular design for ease of use and maintenance. This manual provides essential information for the safe and effective operation of your vacuum cleaner.
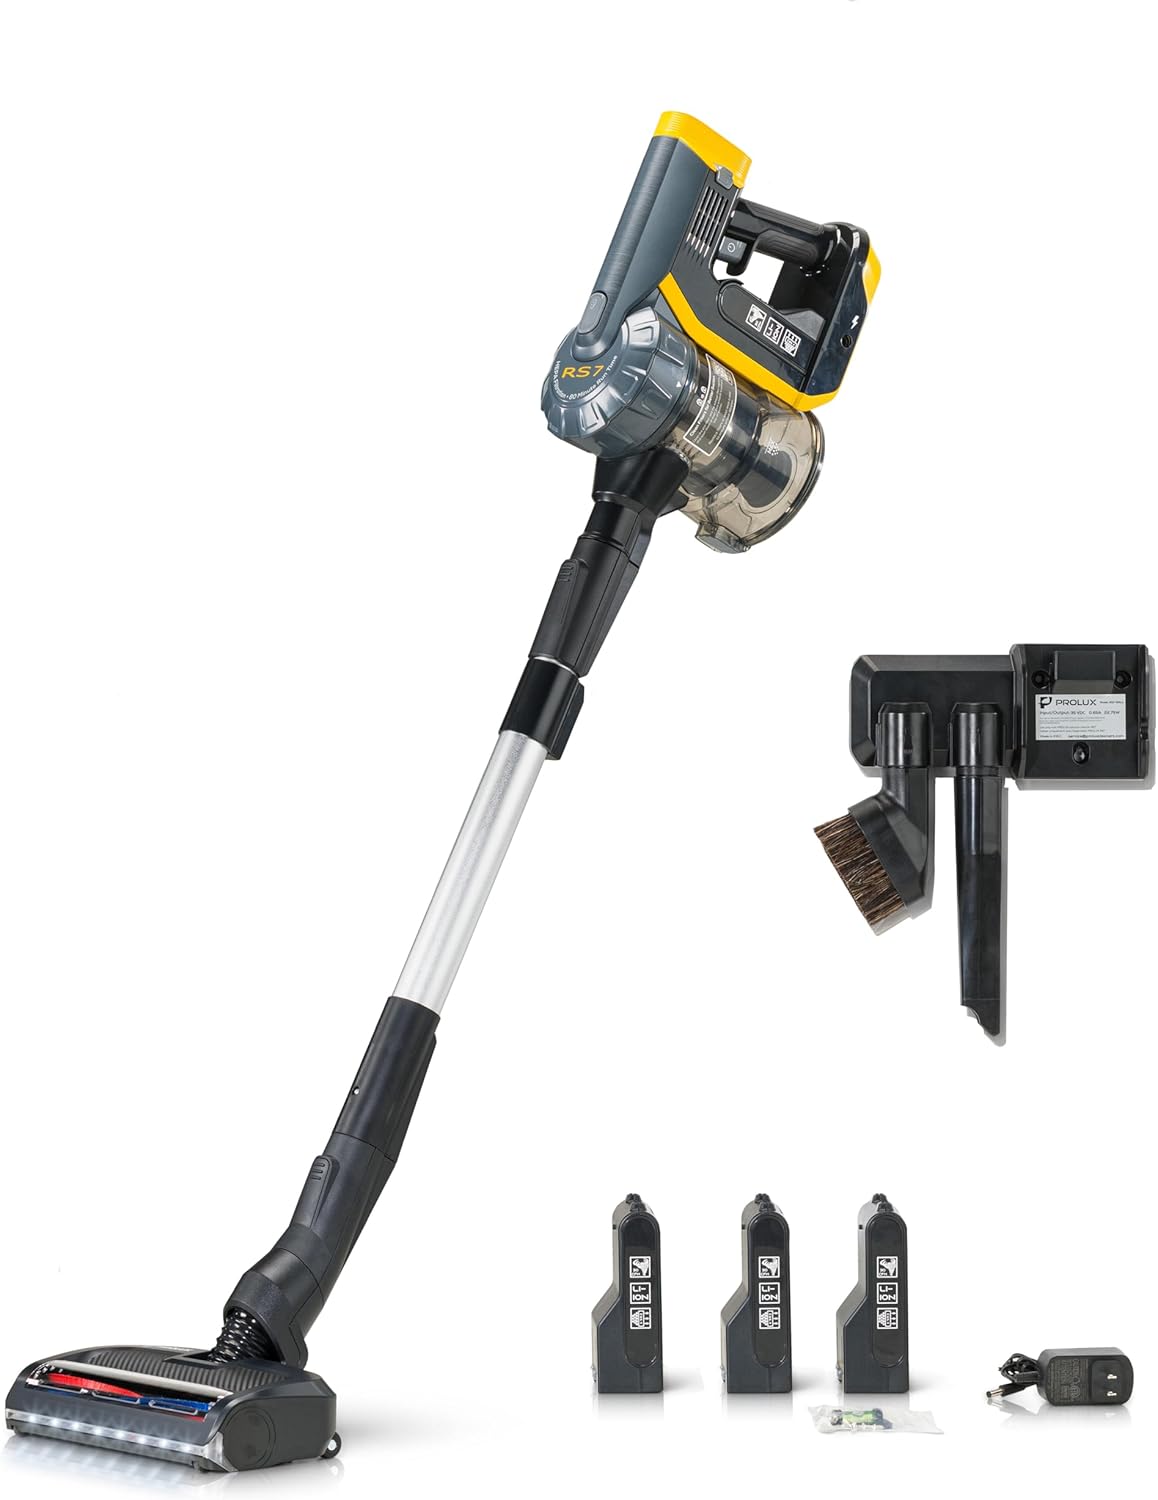
Image: The Prolux RS7 PRO Cordless Handheld Stick Vacuum shown fully assembled with its main body, extension wand, powerhead, three batteries, charger, wall mount, crevice tool, and dusting brush.
Included Components
Your Prolux RS7 PRO package includes the following items:

Image: A detailed diagram labeling the main components: 1. RS7-vac (main unit), 2. Extendable Wand, 3. Wessel Werk EBK250 Electric Powerhead, 4. RS7-Crevice Tool, 5. RS7-Duster, 6. RS7-Wall Mount, 7. RS7-Charger, 8. RS7-Battery (3 included), 9. HEPA Filter Cartridge.
- RS7-vac (Main Handheld Unit)
- Extendable Wand
- Wessel Werk EBK250 Electric Powerhead
- Crevice Tool
- Duster Brush
- Wall Mount
- Charger
- Three (3) Lithium-Ion Batteries
- HEPA Filter Cartridges (pre-installed and spares)
2. Setup
2.1 Initial Battery Charge
Before first use, fully charge all three batteries. Connect the charger to a power outlet and insert a battery. The charging indicator on the battery will show its status. A full charge typically takes approximately 4 hours per battery.
2.2 Assembling the Vacuum
- Attach the Wand: Insert the extendable wand into the main handheld unit (RS7-vac) until it clicks securely into place.
- Attach the Powerhead: Connect the Wessel Werk EBK250 Electric Powerhead to the other end of the extendable wand until it locks. For handheld use, attachments can be connected directly to the main unit.
- Insert Battery: Slide a fully charged battery into the battery slot on the main handheld unit until it clicks.
2.3 Wall Mount Installation
The included wall mount provides a convenient storage and charging solution. Select a suitable location near a power outlet. Use the provided screws to securely fasten the wall mount to a sturdy wall surface. The wall mount is designed to hold the vacuum and store accessories.

Image: The Prolux RS7 PRO wall mount, designed to hold the vacuum and its accessories like the crevice tool and dusting brush, shown mounted on a wall.
3. Operating Instructions
3.1 Powering On and Suction Modes
Press the power button on the main unit to turn the vacuum on. The RS7 PRO features three power levels for varying cleaning needs. Press the mode selection button to cycle through the suction settings: Low, Medium, and High. The current power level will be indicated on the display.

Image: A close-up view of the vacuum's control panel, displaying the battery charge percentage and the selected suction power level.
3.2 Using Attachments
- Electric Powerhead: Ideal for carpets and hard floors. The integrated LED lights illuminate the cleaning path.
- Crevice Tool: Use for narrow spaces, corners, and edges.
- Duster Brush: Suitable for delicate surfaces, upholstery, and removing dust from blinds or shelves.
All attachments lock securely onto the wand or directly onto the main handheld unit.
3.3 Battery Management
The RS7 PRO includes three 2500mAh Lithium-Ion batteries. Each battery provides up to 35 minutes of uninterrupted cleaning power, depending on the power mode and surface. By rotating the batteries, a total continuous runtime of up to 105 minutes can be achieved. Monitor the battery indicator on the display and swap batteries as needed.

Image: The Prolux RS7 PRO vacuum cleaner displayed alongside its three removable batteries and two HEPA filters, highlighting its extended runtime capability.
4. Maintenance
Regular maintenance ensures optimal performance and extends the lifespan of your Prolux RS7 PRO vacuum.
4.1 Emptying the Dust Bin
When the dust bin is full, or suction power decreases, empty the contents. Detach the dust bin from the main unit, open the latch, and dispose of the debris. Close the latch securely before reattaching.
4.2 Cleaning the HEPA Filter
The HEPA filter traps 99.97% of dust and allergens. For best performance, clean the HEPA filter regularly. Remove the filter from the dust bin and gently tap it to dislodge dust. If necessary, rinse the filter under cool running water. Ensure the filter is completely dry before reinserting it into the vacuum. Do not use detergents or hot water.

Image: A close-up of the Prolux RS7 PRO's HEPA filter and smaller pre-filters, illustrating the multi-stage filtration system.
4.3 Cleaning the Brushroll
Hair and debris can become entangled in the powerhead's brushroll, affecting performance. The RS7 PRO features a quick-release brushroll for easy maintenance.
- Remove Powerhead: Detach the powerhead from the wand or main unit.
- Release Brushroll: Locate the quick-release dial or lever on the side of the powerhead. Turn or slide it to unlock and remove the brushroll.
- Clean: Use the integrated cutting tool (if available on the powerhead) or scissors to remove tangled hair and fibers. Wipe the brushroll and its housing clean.
- Reinstall: Insert the clean brushroll back into the powerhead and secure it by turning or sliding the quick-release mechanism until it locks.

Image: A detailed view of the Prolux RS7 PRO's powerhead, illustrating the quick-release mechanism for easy removal and cleaning of the brushroll.
5. Troubleshooting
If you encounter issues with your Prolux RS7 PRO, refer to the following common problems and solutions:
- No Power/Vacuum Not Turning On:
- Ensure the battery is fully charged and correctly inserted.
- Try a different charged battery.
- Reduced Suction Power:
- Check if the dust bin is full and empty it.
- Inspect and clean the HEPA filter.
- Check for blockages in the wand, powerhead, or attachments.
- Ensure all connections (wand to main unit, powerhead to wand) are secure.
- Brushroll Not Spinning:
- Check for tangled hair or debris obstructing the brushroll. Clean as described in Section 4.3.
- Ensure the powerhead is correctly attached and locked.
- Battery Not Charging:
- Verify the charger is properly connected to both the power outlet and the battery.
- Ensure the power outlet is functional.
- Check for any visible damage to the charger or battery.
If the problem persists after attempting these solutions, please contact Prolux customer support.
6. Specifications
| Feature | Specification |
|---|---|
| Brand | Prolux |
| Model Name | RS7 Pro |
| Special Features | Bagless, Cordless, HEPA Filtration |
| Filter Type | HEPA Filter |
| Included Components | Accessory Kit (Wand, Powerhead, Crevice Tool, Duster, Wall Mount, Charger, 3 Batteries, HEPA Filters) |
| Power Source | Battery Powered (Lithium-Ion) |
| Battery Capacity | 3 x 2500mAh |
| Max Continuous Runtime | Up to 105 minutes (with 3 batteries) |
| Charging Time | Approx. 4 hours per battery |
| Wattage | 360 watts |
| Capacity (Dust Bin) | 1.2 Liters |
| Noise Level | 82 dB |
| Number of Power Levels | 3 |
| Cleaning Path Width | 10 Inches |
| Product Dimensions | 12"L x 12"W x 32"H |
| Item Weight | 9 pounds |
| Recommended Uses | Home / Office |
7. Warranty and Support
7.1 Warranty Information
For detailed warranty information regarding your Prolux RS7 PRO Cordless Handheld Stick Vacuum, please refer to the warranty card included with your purchase or visit the official Prolux website. Warranty terms and conditions may vary.
7.2 Customer Support
If you have any questions, require technical assistance, or need to order replacement parts, please contact Prolux customer support:
- Website: Visit the Prolux Store on Amazon (for general inquiries and product information)
- Refer to your product packaging or the official Prolux website for direct contact information (phone number, email).
8. Important Safety Information
Always read and follow all safety instructions before using this appliance to reduce the risk of fire, electric shock, or injury.
- Do not use outdoors or on wet surfaces.
- Do not allow to be used as a toy. Close attention is necessary when used by or near children.
- Use only as described in this manual. Use only manufacturer’s recommended attachments.
- Do not use with damaged cord or plug. If appliance is not working as it should, has been dropped, damaged, left outdoors, or dropped into water, return it to a service center.
- Do not pull or carry by cord, use cord as a handle, close a door on cord, or pull cord around sharp edges or corners. Do not run appliance over cord. Keep cord away from heated surfaces.
- Do not unplug by pulling on cord. To unplug, grasp the plug, not the cord.
- Do not handle plug or appliance with wet hands.
- Do not put any object into openings. Do not use with any opening blocked; keep free of dust, lint, hair, and anything that may reduce air flow.
- Keep hair, loose clothing, fingers, and all parts of body away from openings and moving parts.
- Do not pick up anything that is burning or smoking, such as cigarettes, matches, or hot ashes.
- Do not use to pick up flammable or combustible liquids, such as gasoline, or use in areas where they may be present.
- Do not pick up toxic material (e.g., chlorine bleach, ammonia, drain cleaner).
- Do not use without dust bag and/or filters in place.
- Turn off all controls before unplugging.
- Use extra care when cleaning on stairs.
- Do not use to pick up large, hard, or sharp objects such as glass, nails, screws, coins, etc.