
GasDog Data Logging 0-500ppm
GasDog Portable O3 Gas Detector User Manual
Model: Data Logging 0-500ppm
1. Introduction
This user manual provides essential information for the safe and effective operation of your GasDog Portable O3 Gas Detector. This device is designed for high-precision ozone gas monitoring, offering real-time LCD display, sound, light, and vibration alarms, and data logging capabilities for the 0-500ppm range. Please read this manual thoroughly before using the detector.
2. Safety Information
Always adhere to the following safety precautions to prevent injury or damage to the device:
- Do not attempt to open or modify the detector. This may void the warranty and pose safety risks.
- Ensure the device is used within its specified operating temperature and humidity ranges.
- Avoid exposing the sensor to extreme concentrations of gas, which may damage it.
- Regularly check the device for any signs of damage or malfunction. Do not use if damaged.
- Keep the device away from strong electromagnetic fields.
- Perform regular calibration as recommended to ensure accuracy.
3. Package Contents
Verify that all items are present in the package:
- GasDog Portable O3 Gas Detector
- Charging Cable
- Sampling Tube
- Filter
- User Manual (this document)
- Carrying Case
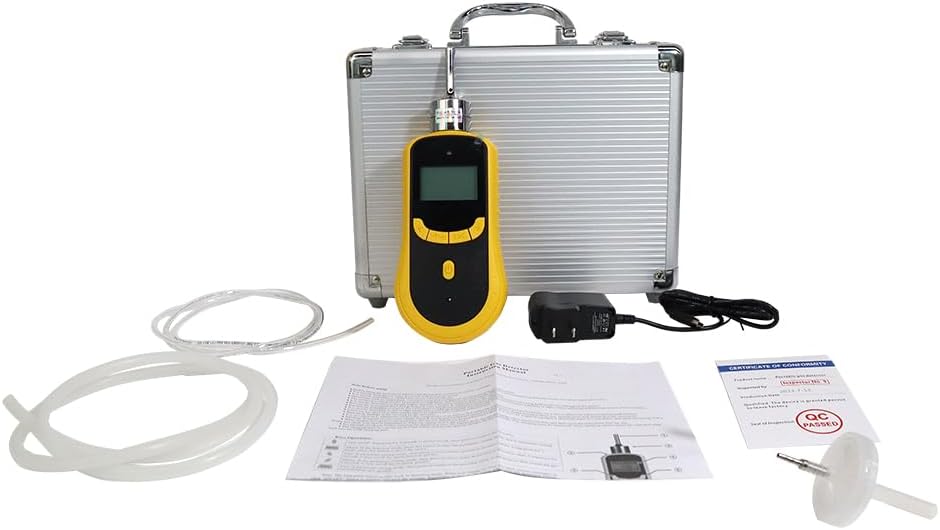
Figure 3.1: Contents of the GasDog Portable O3 Gas Detector package, including the detector, charging cable, sampling tube, filter, and carrying case.
4. Product Features
The GasDog Portable O3 Gas Detector offers the following key features:
- High-Precision Sensor: Equipped with an advanced gas sensor for accurate Ozone (O3) gas monitoring.
- Real-Time LCD Display: Provides instant readings of O3 concentration.
- Multiple Alarms: Features sound, light, and vibration alarms for immediate alerts.
- Wide Detection Range: Monitors O3 concentration from 0 to 500 ppm.
- Data Logging: Capable of recording and storing measurement data.
- Portability: Compact design with a high-strength ABS engineering plastic casing, suitable for various environments and easy to carry.
- Fast Response Time: Ensures quick detection of gas leaks.
5. Parts and Controls
Familiarize yourself with the components and controls of your O3 gas detector:
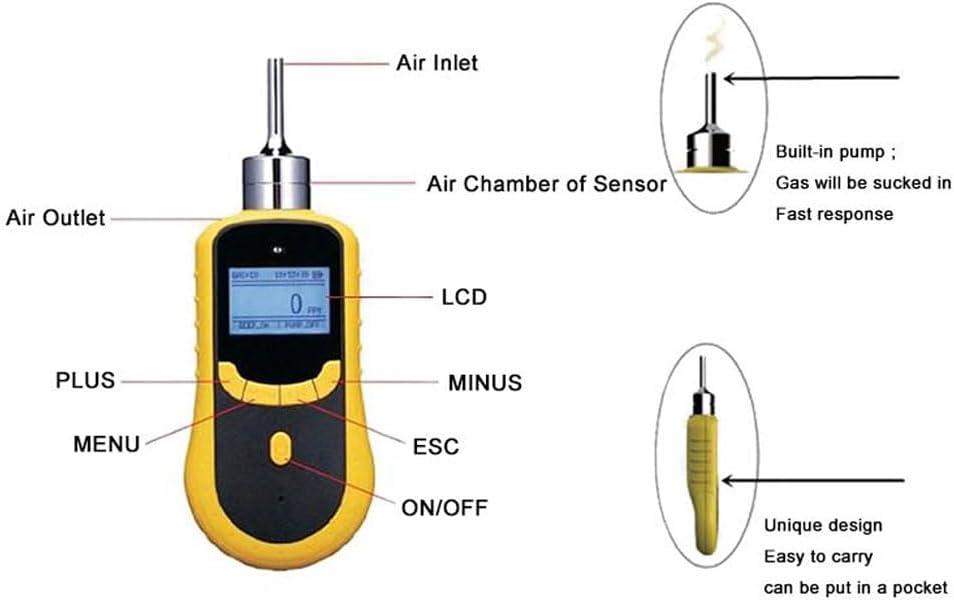
Figure 5.1: Front view of the detector with key components labeled.
- Air Inlet: Point where ambient air is drawn into the sensor.
- Air Chamber of Sensor: Internal component housing the O3 sensor.
- Air Outlet: Point where processed air exits the device.
- LCD: Liquid Crystal Display for real-time readings and menu navigation.
- PLUS Button: Used for increasing values or navigating up in menus.
- MINUS Button: Used for decreasing values or navigating down in menus.
- MENU Button: Accesses the device's main menu and confirms selections.
- ESC Button: Exits current menu or cancels an operation.
- ON/OFF Button: Powers the device on or off.
- Built-in Pump: Actively draws gas into the sensor for fast response.


Figure 5.2: Various views of the GasDog Portable O3 Gas Detector.
6. Setup
Follow these steps to prepare your detector for first use:
- Charging the Battery: Connect the provided charging cable to the detector's charging port and plug it into a suitable power source. The battery indicator on the LCD will show charging status. Ensure the device is fully charged before initial use.
- Power On: Press and hold the ON/OFF button until the LCD screen illuminates. The device will perform a self-test and warm-up sequence.
- Initial Calibration Check: It is recommended to perform an initial zero-point calibration in a clean air environment to ensure accurate readings. Refer to the "Maintenance" section for calibration procedures.
7. Operating Instructions
Operating the GasDog O3 Gas Detector for gas detection:
- Power On: Press and hold the ON/OFF button to turn on the device. Wait for the self-test to complete and the main measurement interface to appear.
- Gas Detection: Position the air inlet near the area where O3 gas detection is required. The built-in pump will draw air for analysis.
- Reading Display: The real-time O3 concentration (in ppm) will be displayed on the LCD. The display also shows maximum (MAX) and average (AVE) readings.
- Alarm Activation: If the O3 concentration exceeds the preset alarm thresholds, the device will activate its sound, light, and vibration alarms. Take immediate action to address the gas leak or move to a safe area.
- Pump Control: The pump status (PUMP ON/OFF) is indicated on the display. You can typically control the pump via the menu settings if needed.
- Power Off: Press and hold the ON/OFF button until the device powers down.
7.1. Menu Navigation
Use the MENU, PLUS, MINUS, and ESC buttons to navigate through the device's settings and functions. Common menu options include:
- Alarm Settings: Adjust high and low alarm thresholds.
- Unit Selection: Change measurement units (e.g., ppm).
- Data Logging: Access logged data or configure logging intervals.
- Calibration: Initiate zero-point or span calibration.
- System Information: View device details, software version, etc.
7.2. Data Logging
The detector is equipped with data logging capabilities. To access or manage logged data, navigate to the "Data Logging" section within the device's menu. Data can typically be reviewed on the device or exported to a computer via a compatible interface (cable not specified, assume standard USB if available).
Video 7.1: An overview of the GasDog GD200 gas detector, demonstrating its appearance and basic display functions.
8. Maintenance
Proper maintenance ensures the longevity and accuracy of your detector:
- Cleaning: Wipe the exterior of the detector with a soft, damp cloth. Do not use abrasive cleaners or solvents. Keep the air inlet and outlet free from dust and debris.
- Storage: Store the detector in its carrying case in a cool, dry place away from direct sunlight and extreme temperatures when not in use.
- Battery Care: Recharge the battery regularly, even if the device is not in frequent use, to maintain battery health.
- Calibration: Regular calibration is crucial for maintaining measurement accuracy. Consult a qualified technician or the manufacturer for recommended calibration intervals and procedures.
9. Troubleshooting
Common issues and their potential solutions:
| Problem | Possible Cause | Solution |
|---|---|---|
| Device does not power on. | Low battery; power button not held long enough. | Charge the battery; press and hold the ON/OFF button for 3-5 seconds. |
| Inaccurate readings. | Sensor contamination; need for calibration; extreme environmental conditions. | Clean the sensor area; perform calibration; ensure use within specified operating conditions. |
| Alarms activate frequently without gas presence. | False alarm due to interference; sensor malfunction; alarm thresholds set too low. | Move away from potential interference sources; check sensor status; adjust alarm thresholds in settings. |
| Pump not working. | Blocked air inlet/outlet; pump malfunction. | Clear any obstructions; contact support if problem persists. |
If you encounter issues not listed here or if the suggested solutions do not resolve the problem, please contact GasDog customer support.
10. Specifications
Key technical specifications for the GasDog Portable O3 Gas Detector:
| Specification | Detail |
|---|---|
| Brand | GasDog |
| Model | Data Logging 0-500ppm |
| Gas Detected | Ozone (O3) |
| Detection Range | 0-500 ppm |
| Power Source | Battery Powered (Li-ion 3.7V 2300 mAh) |
| Display | Real-time LCD Display |
| Alarms | Sound, Light, Vibration |
| Operating Humidity | 95% (non-condensing) |
| Material | High-strength ABS engineering plastic casing |
11. Warranty and Support
GasDog is committed to providing quality products and customer satisfaction. While specific warranty details are not provided in this manual, if you have any inquiries or encounter issues with your gas detector, please feel free to contact GasDog customer support. We aim to provide a satisfactory response and assistance.
For additional resources, you may refer to the official Instructions for Use (IFU) PDF available online.
Related documentsData Logging 0-500ppm


Ask a question about this manual
Ask about setup, troubleshooting, compatibility, parts, safety, or missing instructions. Manuals+ will review the question and use this page’s manual context to help answer it.