
Introduction
This manual provides detailed instructions for the installation, operation, and maintenance of your Warming Systems 10 Sqft 120V Electric Tile Radiant Floor Heating Mat with WiFi Touch Screen Programmable Thermostat. This system is designed to provide comfortable radiant heat for various floor types, including tile. Please read this manual thoroughly before installation and use to ensure safe and efficient operation.

Image: The complete Warming Systems 10 Sqft Electric Tile Radiant Floor Heating Mat kit, showing the rolled heating mat, the WiFi touch screen programmable thermostat, the yellow installation monitor, and the black floor temperature sensor.
Safety Information
WARNING: This product contains electrical components. Always follow proper installation and usage guidelines to prevent electrical shock, fire, or other hazards. Do not install or use if damaged. Keep away from children and pets. Always use with a GFCI protected outlet.
- Installation must be performed by a qualified electrician in accordance with local electrical codes.
- Ensure the power supply is disconnected before any installation or maintenance.
- The heating mat must be fully embedded in mortar or self-leveling compound.
- Do not cut the red heating wire. The white fiberglass mesh can be cut to shape.
- The included Installation Warning Monitor must be used during installation to detect wire damage.
- This system is UL Listed for USA and Canada and is safe for wet areas.
Package Contents
Your Warming Systems Electric Tile Radiant Floor Heating Mat kit includes the following components:
- 10 Square Foot Electric Floor Warming Mat (20" Wide x 6' Long)
- WIFI Touch Screen GFCI Protected Digital Programmable Thermostat (Model UWG4-4999)
- Floor Temperature Sensor
- Installation Warning Monitor (alarms if wire is damaged during installation)

Heating Mat

WiFi Thermostat

Installation Monitor

Floor Sensor
Installation Guide
1. Pre-Installation Planning
Before beginning installation, carefully plan the layout of the heating mat. Ensure the correct voltage (120V) is available for your system. Measure the area to be heated, keeping in mind the following clearances:
- At least 2 inches from walls and permanent fixtures.
- At least 6 inches to the center of toilet wax rings.
- At least 3 inches to HVAC vents or other heating appliances.
- Do not install under fixed objects such as cabinets, bathtubs, or toilets that are permanently fixed to the floor.

Image: A diagram showing a bathroom layout with the heating mat installed, indicating required clearances from walls, fixtures, and the toilet wax ring. It also highlights that the wire must be fully embedded and the red wire should not be cut.
2. Mat Placement
The electric radiant floor heating mat is designed for easy installation. It can be flipped and turned to fit various room shapes. The mat features double-sided tape on both sides to adhere securely to the sub-floor, ensuring it lays flat.
- Unroll the mat and position it according to your planned layout.
- The white fiberglass mesh can be cut to navigate around obstacles or change direction. Do not cut the red heating wire.
- Use the double-sided tape to secure the mat to the sub-floor.

Image: Hands demonstrating the use of the double-sided tape to secure the heating mat to the floor, emphasizing its flat-laying design.
3. Wiring and Sensor Placement
Connect the heating mat's cold lead and the floor temperature sensor to the thermostat. The thermostat requires a 120V power supply and is rated for 16 Amps. Ensure all electrical connections are made by a qualified professional.
- The mat has a 10-foot single cold lead to easily reach the thermostat.
- Place the floor temperature sensor equidistant between two heating wires, ensuring it is fully embedded in the mortar/compound and does not cross any heating wires.
- Connect the Installation Warning Monitor to the heating mat during installation. This monitor will sound an alarm if the heating wire is damaged, allowing for immediate repair before the floor covering is installed.
4. Embedding the System
Once the mat and sensor are securely in place and tested with the Installation Monitor, the entire system must be fully covered with mortar or a self-leveling compound before installing the final floor covering (e.g., tile).

Image: A close-up view of the heating mat partially covered by mortar, illustrating the embedding process for a durable and effective installation.
Operating the WiFi Touch Screen Thermostat (UWG4-4999)
The UWG4-4999 WiFi Touch Screen Thermostat provides precise control over your radiant floor heating system for maximum comfort and energy savings. It is easy to operate and features GFCI protection.
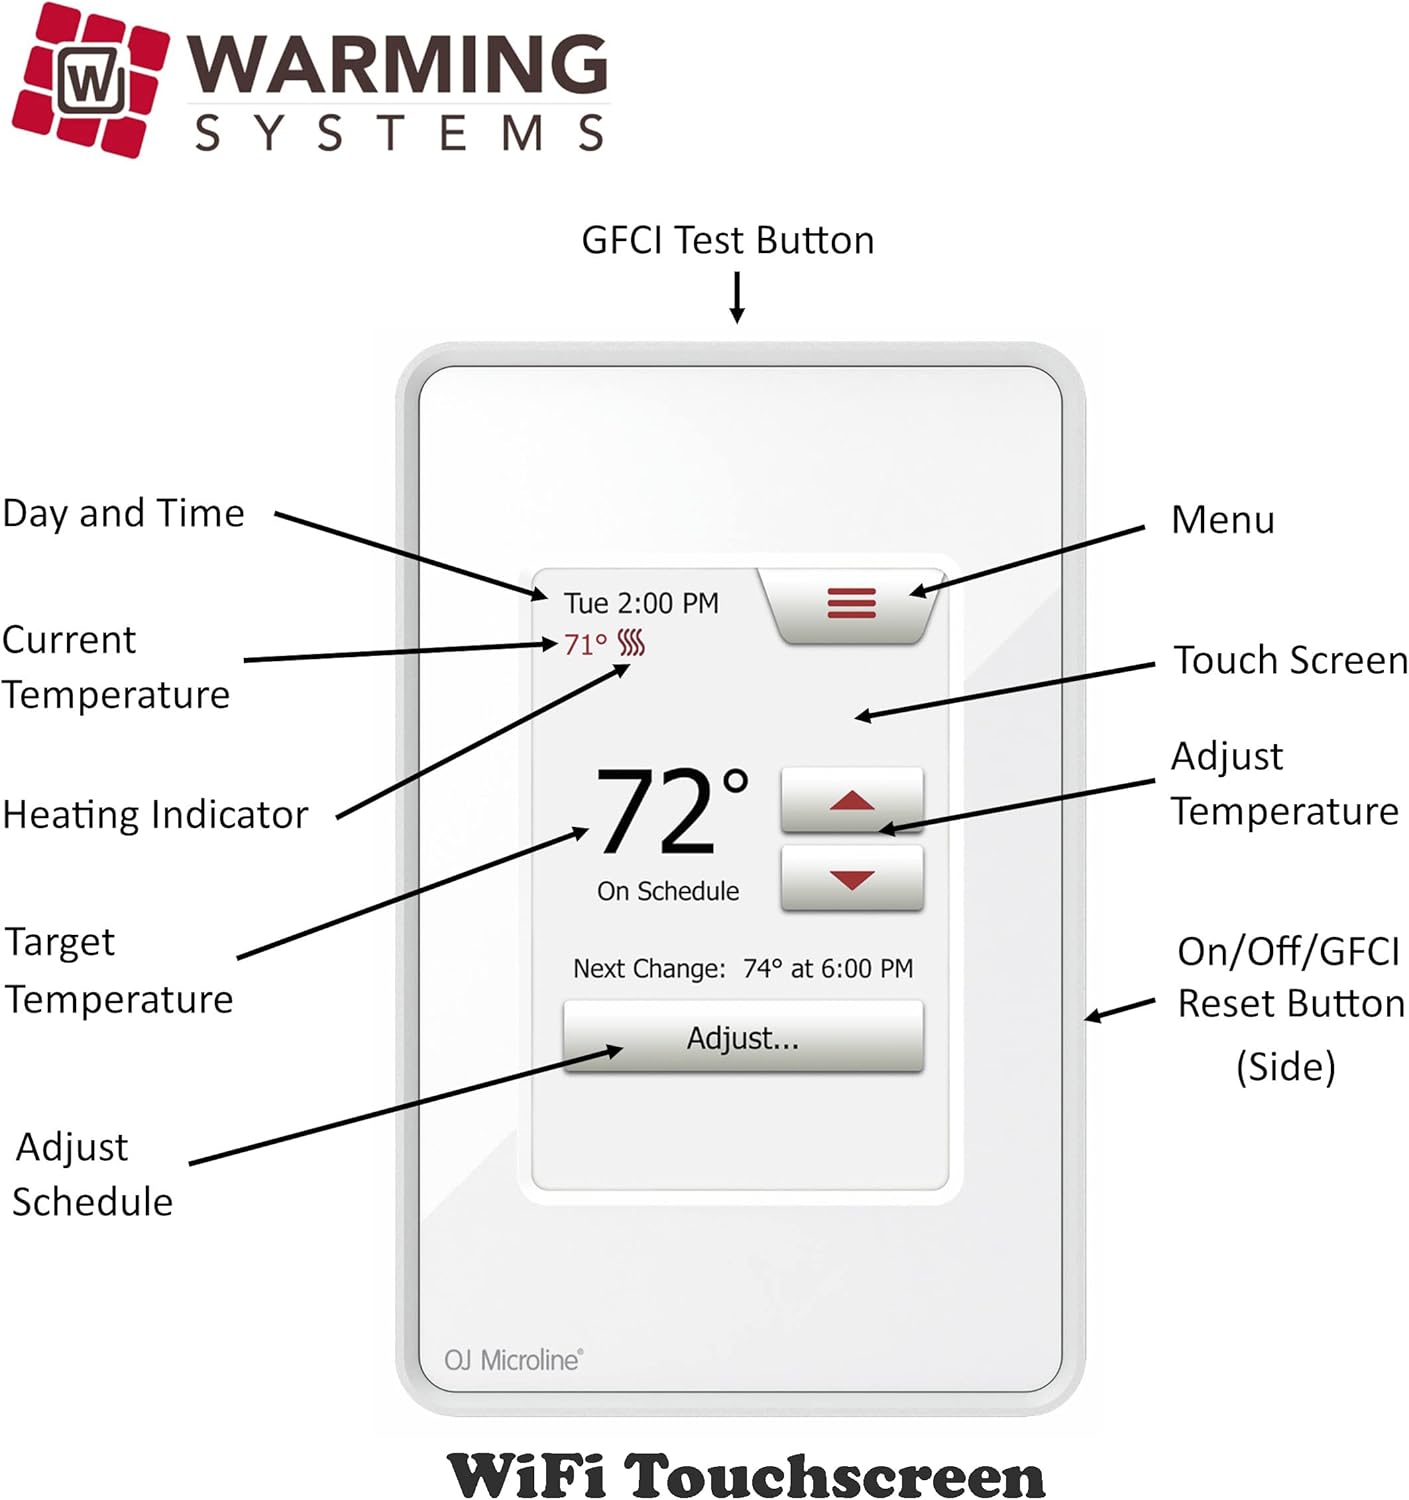
Image: A detailed diagram of the WiFi Touch Screen Thermostat, highlighting the Day and Time display, Current Temperature, Heating Indicator, Target Temperature, Adjust Temperature buttons, Adjust Schedule button, Menu button, and the On/Off/GFCI Reset Button on the side.
- Power On/Off: Use the side button to turn the thermostat on or off.
- Adjust Temperature: Use the up and down arrows on the touch screen to set your desired floor temperature.
- Scheduling: Access the "Adjust Schedule" option to program heating times and temperatures for different periods of the day or week.
- Menu: The "Menu" button provides access to advanced settings, including WiFi configuration, sensor calibration, and system information.
- GFCI Test: Regularly test the Ground Fault Circuit Interrupter (GFCI) by pressing the "GFCI Test Button" (usually located on the top or side of the thermostat). The power should trip, and you should reset it using the On/Off/GFCI Reset Button.
- WiFi Connectivity: Follow the thermostat's on-screen instructions to connect it to your home WiFi network for remote control via a compatible application.
Maintenance
The Warming Systems radiant floor heating mat requires minimal maintenance once installed. However, regular checks ensure continued safe and efficient operation.
- GFCI Testing: Test the GFCI function of your thermostat monthly to ensure it is operating correctly. Refer to the "Operating the WiFi Touch Screen Thermostat" section for instructions.
- Cleaning: Keep the thermostat screen clean using a soft, dry cloth. Avoid abrasive cleaners or solvents.
- System Check: If you notice any unusual behavior, such as inconsistent heating or error messages on the thermostat, refer to the troubleshooting section or contact support.
Troubleshooting
This section addresses common issues you might encounter with your radiant floor heating system.
| Problem | Possible Cause | Solution |
|---|---|---|
| No heat from the floor. | Thermostat is off, GFCI tripped, or power supply issue. | Ensure thermostat is on. Reset GFCI. Check circuit breaker. |
| Floor is not heating to the set temperature. | Incorrect schedule, sensor issue, or insufficient insulation. | Verify thermostat schedule. Check sensor connection. Ensure proper floor insulation. |
| Thermostat display is blank. | No power to the thermostat. | Check circuit breaker. Ensure wiring connections are secure. |
| Installation Monitor alarm sounds. | Heating wire damage during installation. | Locate and repair the damaged wire before proceeding with floor covering. Contact support for guidance. |
For issues not listed here, or if solutions do not resolve the problem, please contact Warming Systems customer support.
Specifications
| Brand | Warming Systems |
| Model Number | B0CKS48RK1 |
| Mat Size | 10 sq ft (20" Wide x 6' Long) |
| Voltage | 120 Volts (AC) |
| Wattage | 120 watts |
| Amperage Capacity | 1 Amps |
| Watts/Sqft | 12 Watts/Sqft |
| Mat Thickness | 1/8 inch |
| Installation Method | Floor-Mounted |
| Certifications | UL Listed for USA and Canada |
| Special Features | Easy to Install, WiFi Touch Screen Programmable Thermostat, GFCI Protected, Installation Monitor, Floor Temperature Sensor |
Warranty
Warming Systems stands behind the quality of its products. This Electric Tile Radiant Floor Heating Mat comes with a 25-year warranty. Please retain your proof of purchase for warranty claims. For detailed warranty terms and conditions, refer to the documentation provided with your product or contact Warming Systems directly.
Support
Warming Systems is committed to providing excellent customer support. We offer engineering support for any questions you may have regarding your electric floor heating system.
- Technical Assistance: Our engineers are available to answer your installation and technical questions.
- Design and Layout Assistance: We can provide assistance with planning your heating mat layout.
- Contact Information: Please refer to the Warming Systems website or product packaging for the most current contact details for customer service and technical support.
Warming Systems is a family-run business with over 20 years of experience in electric floor heating, manufacturing in Spring Grove, Illinois, USA.