
Introduction
This instruction manual provides detailed guidance for the installation, operation, and maintenance of your BATHLAVISH 5-in-1 Black Shower Panel Tower System. Please read this manual thoroughly before installation and use to ensure proper function and longevity of your product. Keep this manual for future reference.

Image: The BATHLAVISH 5-in-1 Black Shower Panel Tower System featuring a rainfall head, handheld shower, body jets, and tub spout, elegantly installed in a modern bathroom setting.
Setup and Installation
Proper installation is crucial for the optimal performance of your shower panel. If you are unsure about any steps, it is recommended to consult a qualified plumber.
Safety Precautions
- Ensure the main water supply is turned off before beginning installation.
- Wear appropriate safety gear, including gloves and eye protection.
- Verify that all components are present and undamaged before installation.
Installation Video Guide
Video: This video demonstrates the step-by-step installation process for the BATHLAVISH Shower Panel Tower System. It covers unpacking, preparing the unit, connecting water lines, and mounting the panel.
Components and Dimensions

Image: All components included in the package for the shower panel system, laid out for inspection.

Image: Diagram illustrating the precise dimensions of the shower panel for accurate installation planning.
Step-by-Step Installation
- Unpack and Inspect: Carefully remove all items from the packaging. Verify that all parts listed in the package contents are present and free from damage.
- Prepare the Wall: Mark the desired mounting height for the shower panel on your wall. Ensure the marked line is level. Use the provided mounting brackets to mark drilling points. Drill holes and insert wall anchors suitable for your wall type.
- Connect Water Supply Lines: Attach the hot and cold water supply hoses to the corresponding inlets on the back of the shower panel. Use thread seal tape on all threaded connections to prevent leaks. Connect the other ends of the hoses to your wall's hot and cold water outlets.
- Mount the Shower Panel: Secure the mounting brackets to the wall using screws. Carefully hang the shower panel onto the installed brackets. Ensure it is securely seated and level.
- Install Handheld Shower: Connect the handheld shower hose to the designated outlet on the panel. Secure the handheld shower to its holder.
- Test for Leaks: Slowly turn on the main water supply. Check all connections for leaks. If leaks are detected, tighten connections as necessary.
Operating Instructions
Your BATHLAVISH shower panel offers multiple functions for a customized showering experience.
Features Overview Video
Video: This video provides an overview of the BATHLAVISH LED Black Shower Panel's features, including the LED temperature display, various spray functions (rainfall, handheld, body jets, tub spout), and the integrated storage shelf.
Functional Components
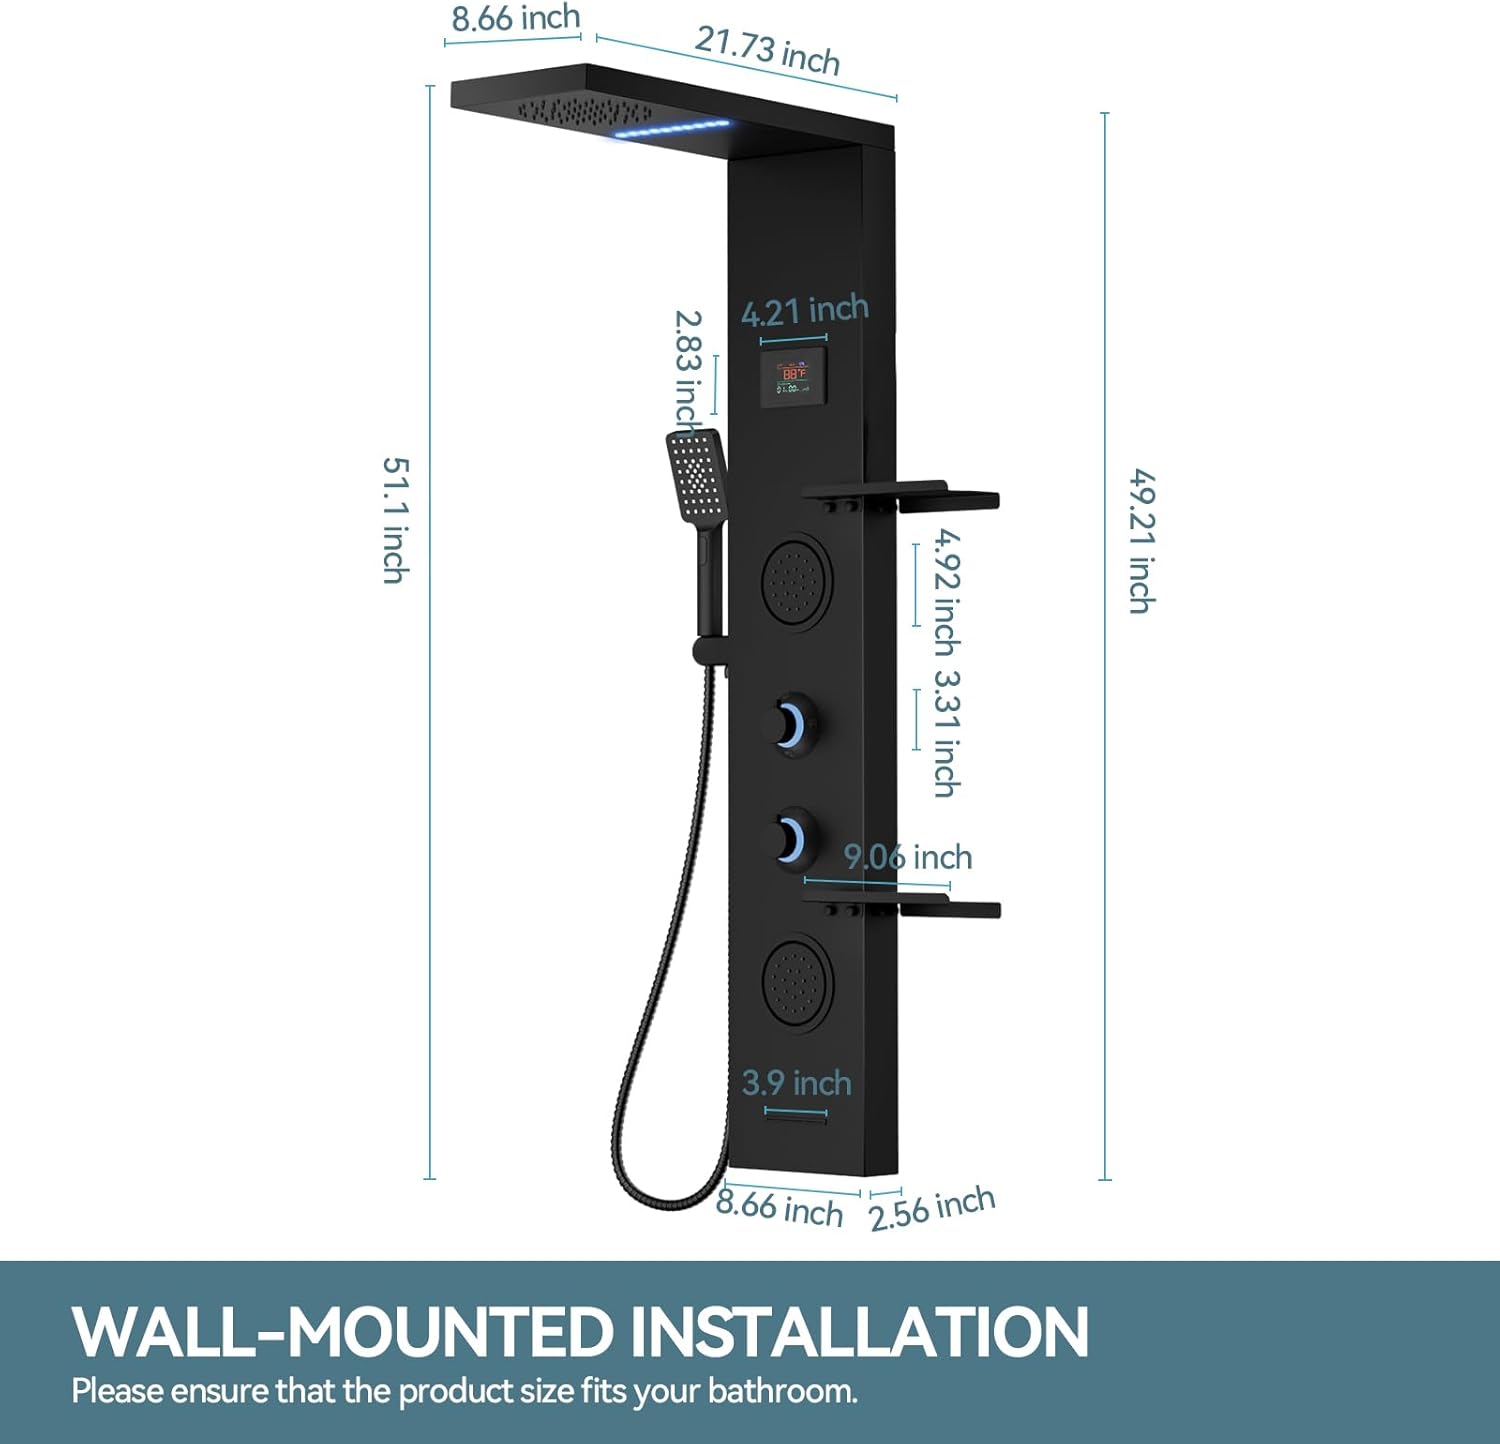
Image: Visual guide highlighting the different functions and components of the shower panel, such as the rainfall head, LED display, handheld shower, body jets, and tub spout.
Water Flow and Temperature Control
- Temperature Control Knob: Rotate the lower knob to adjust the water temperature from cold to hot.
- Function Adjustment Knob: Rotate the upper knob to select between the different shower functions: Rainfall Head, Handheld Shower, Body Jets, or Tub Spout. Only one function can be active at a time.
Rainfall Shower Head
The overhead rainfall shower provides a wide, gentle water flow for a relaxing experience. Select this function using the Function Adjustment Knob.

Image: Close-up of the rainfall shower head with integrated blue LED mood lighting and silicone rubber nozzles for easy cleaning.
Handheld Shower
The handheld shower offers flexibility for targeted rinsing. Select this function using the Function Adjustment Knob.

Image: Three distinct spray patterns available from the handheld shower: a wide spray, a concentrated spray, and a mixed spray.
Body Jets
The powerful body jets provide a massaging sensation. Select this function using the Function Adjustment Knob.

Image: Close-up view of the adjustable body jets and the function and temperature control knobs on the shower panel.
Tub Spout
The integrated tub spout provides a waterfall flow for filling a bathtub. Select this function using the Function Adjustment Knob.
LED Temperature Display
The LED display shows the current water temperature and shower duration. This feature is hydraulically powered by water flow, eliminating the need for batteries or external power.

Image: Close-up of the LED display screen, clearly showing the current water temperature and shower time. The image also highlights that it is hydraulically powered.
Care and Maintenance
Regular cleaning and proper care will help maintain the appearance and functionality of your shower panel.
- Cleaning: Use a soft cloth and mild soap or a non-abrasive bathroom cleaner. Avoid harsh chemicals, abrasive cleaners, or scouring pads, as these can damage the matte black finish and stainless steel surface.
- Nozzle Maintenance: The silicone nozzles on the rainfall head and handheld shower are designed for easy cleaning. Gently rub the nozzles with your finger to dislodge any mineral buildup.
- Water Spots: To prevent water spots, wipe the panel dry after each use, especially in areas with hard water.
- Inspection: Periodically check all connections for tightness and signs of wear.
Troubleshooting Guide
Refer to the table below for common issues and their solutions.
| Problem | Possible Cause | Solution |
|---|---|---|
| Low Water Pressure | Clogged nozzles; partially closed shut-off valves; low household water pressure. | Clean nozzles by rubbing them; ensure shut-off valves are fully open; check household water pressure. |
| LED Display Not Working | Insufficient water flow to power the hydraulic generator; internal component issue. | Ensure adequate water flow; if issue persists, contact customer support. |
| Water Leaks from Panel | Loose connections; damaged seals or internal components. | Tighten all water connections; inspect seals for damage and replace if necessary; if internal leak, contact customer support. |
| No Hot or Cold Water | Incorrect temperature knob setting; blocked water supply line; issue with household water heater. | Adjust temperature knob; check hot/cold water supply valves; consult a plumber for household water heater issues. |
Product Specifications
| Feature | Detail |
|---|---|
| Brand | BATHLAVISH |
| Model Number | B-6YTP22-B |
| Color | Matte Black |
| Material | 304 Stainless Steel |
| Finish Type | Matte Black |
| Handle Material | Plastic |
| Mounting Type | Wall Mount |
| Included Components | Hardware, Hose, Valve |
| Maximum Pressure | 1 Bar |
| Special Feature | LED Temperature Display (Hydraulically Powered) |
Warranty Information
BATHLAVISH products are manufactured to high-quality standards. This product is covered by a standard manufacturer's warranty against defects in materials and workmanship. Please retain your proof of purchase for warranty claims. For specific warranty terms and conditions, refer to the documentation included with your purchase or contact customer support.
Customer Support
If you have any questions, require assistance with installation, or need to report a missing part, please contact BATHLAVISH customer support. Our team is available to help you with any product-related inquiries.
Contact Information:
- Website: Visit the official BATHLAVISH store on Amazon for support resources and contact options.
- Email: Refer to your product packaging or purchase confirmation for direct email support.
- Phone: Consult your product documentation for a customer service phone number.