
1. Product Overview
The GuliTech VICTOR 890H+ is a high-precision digital multimeter designed for measuring various electrical parameters. It features an auto-ranging function, a large LCD display with backlight, and robust overload protection, making it suitable for both professional and DIY applications.
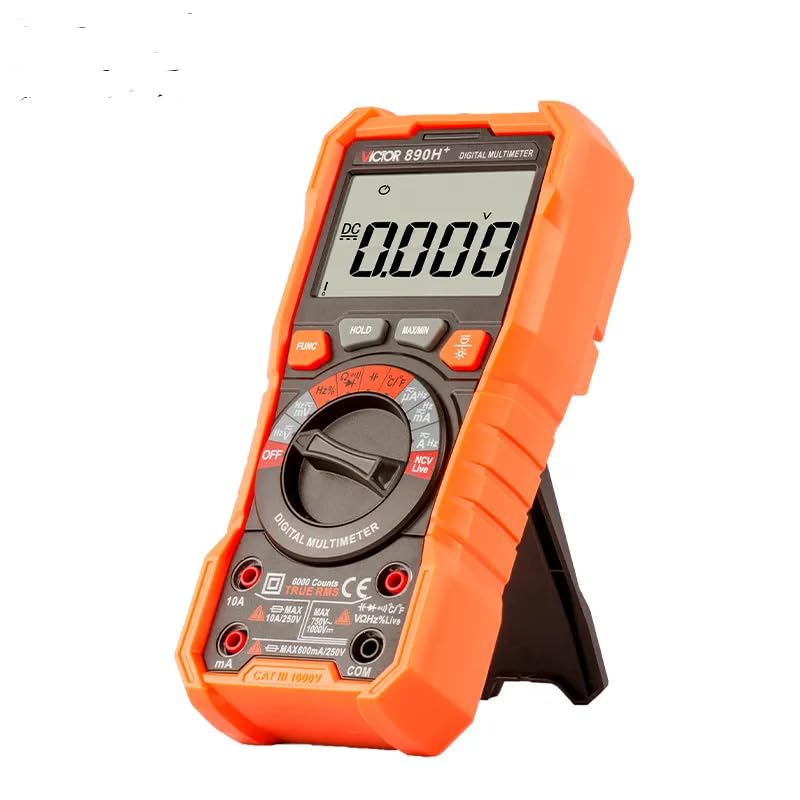
Figure 1: Front view of the VICTOR 890H+ Digital Multimeter.
Key Features:
- Wide Measuring Range: Measures DC/AC voltage, DC/AC current, Resistance, Capacitance, Diode test, NCV test, Live test, Frequency, and Temperature.
- 2.7" Large LCD Display: 59x36mm screen with large digital readout and backlight for clear visibility.
- Auto Power-off: Automatically shuts down after 15 minutes of inactivity to conserve battery life.
- Overload Protection: Built-in double fuse provides comprehensive protection for safe operation.
- Portable Design: Includes a bracket for support and can be hung on a wall.
- Additional Functions: Bargraph, Max/Min hold, Data hold, Continuity, True RMS, Low battery indication, Double color backlight, Input jack LED indicator, and work light.
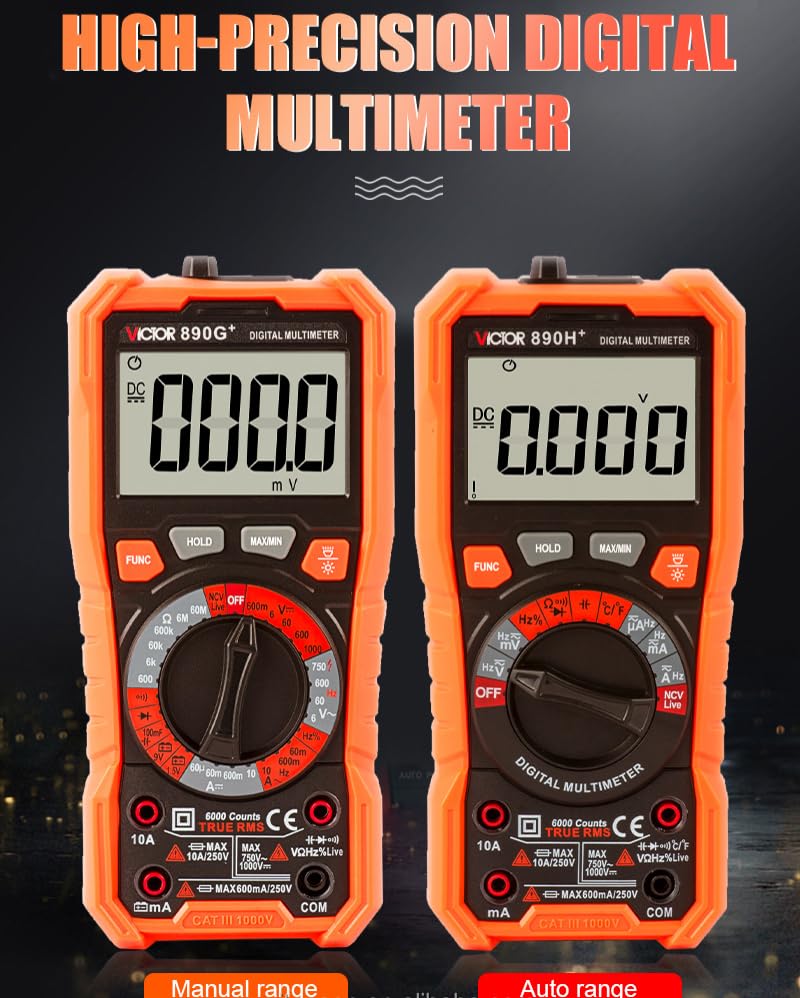
Figure 2: The VICTOR 890H+ (right) features auto-ranging and temperature measurement, while the 890G+ (left) is manual range.
2. Setup
2.1 Battery Installation
The multimeter requires 1 Lithium Ion battery (included). Ensure correct polarity when installing or replacing the battery.
- Locate the battery compartment on the back of the multimeter.
- Open the battery cover using a screwdriver if necessary.
- Insert the Lithium Ion battery, observing the polarity markings (+/-).
- Securely close the battery cover.
2.2 Test Lead Connection
Connect the test leads to the appropriate input jacks for your desired measurement.
- Insert the black test lead into the "COM" (Common) jack.
- For most voltage, resistance, frequency, capacitance, and diode measurements, insert the red test lead into the "VΩHz%Live" jack.
- For current measurements (mA), insert the red test lead into the "mA" jack.
- For high current measurements (10A), insert the red test lead into the "10A" jack.

Figure 3: The multimeter features a test pen storage design and a built-in flashlight on the back.
3. Operating Instructions
3.1 Power On/Off
Rotate the central range knob from the "OFF" position to any desired measurement function to power on the multimeter. To power off, rotate the knob back to the "OFF" position.
3.2 Function Selection (Auto Range)
The VICTOR 890H+ features auto-ranging, simplifying operation. Select the desired measurement type (e.g., V∼ for AC Voltage, V− for DC Voltage, Ω for Resistance) using the central range knob. The multimeter will automatically select the appropriate range.
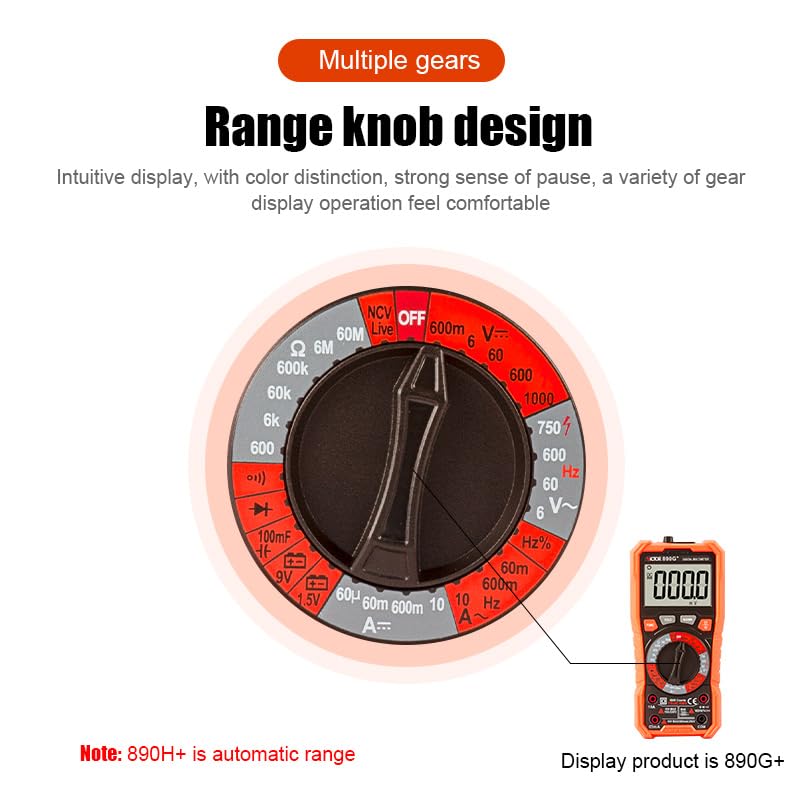
Figure 4: The intuitive range knob allows selection of various measurement functions.
3.3 Non-Contact Voltage (NCV) Measurement
The NCV function allows detection of AC voltage without direct contact with wires, enhancing safety.
- Rotate the range knob to the "NCV" position.
- Bring the top part of the multimeter close to the conductor being tested.
- If AC voltage is detected (range 48-220V), the red indicator light will flash, and an audible beep will sound.
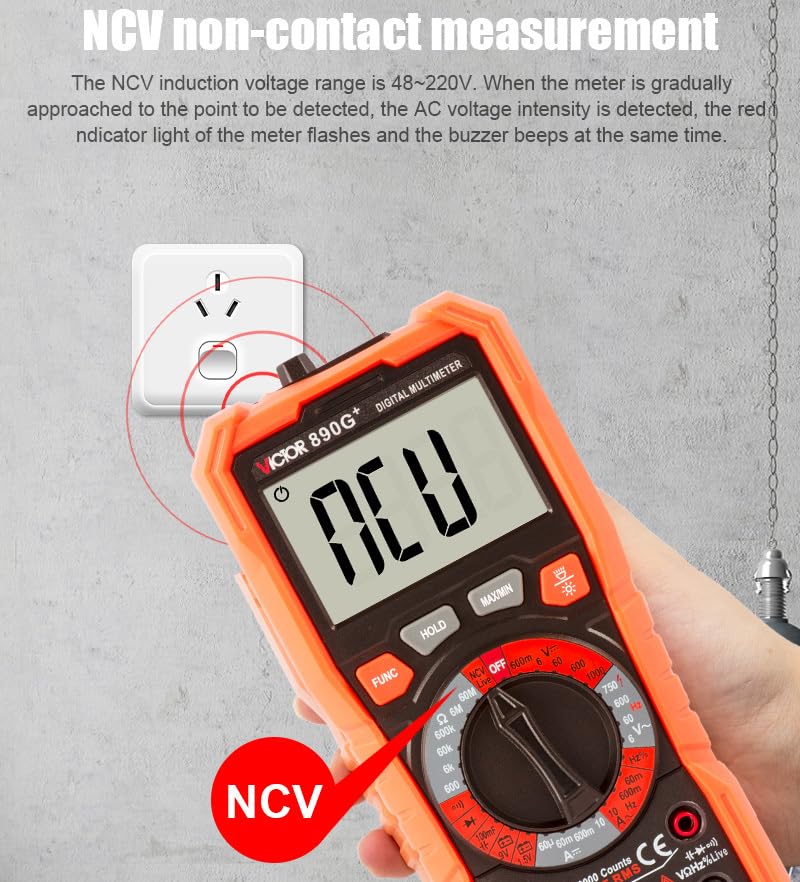
Figure 5: Demonstrating the NCV function for detecting AC voltage.
3.4 Data Hold (HOLD)
Press the "HOLD" button to freeze the current reading on the display. Press it again to release and resume live readings.
3.5 Maximum/Minimum Value (MAX/MIN)
Press the "MAX/MIN" button to record and display the maximum or minimum measured value. Press again to cycle through MAX, MIN, and current readings.
3.6 Backlight and Work Light
Press the backlight button (often combined with the flashlight icon) to turn on the display backlight. A long press may activate the work light (flashlight) located on the back of the device.
4. Maintenance
4.1 Cleaning
To clean the multimeter, use a soft, damp cloth. Do not use abrasive cleaners or solvents, as these may damage the casing or display. Ensure the device is powered off and disconnected from any circuits before cleaning.
4.2 Battery Replacement
When the low battery indicator appears on the display, replace the battery promptly to ensure accurate measurements. Refer to section 2.1 for battery installation instructions.
4.3 Safety Precautions
- Always ensure the multimeter is set to the correct function and range before making measurements.
- Do not exceed the maximum input values specified for each function.
- Inspect test leads for damage before each use. Replace if insulation is compromised.
- The built-in double fuse provides overload protection. If a fuse blows, it must be replaced with a fuse of the same type and rating.
- Adhere to safety ratings: CAT III 1000V, CAT IV 600V.
5. Troubleshooting
5.1 "OL" Displayed
If "OL" (Overload) is displayed, it indicates that the measured value exceeds the selected range or the maximum input capacity of the multimeter. In auto-ranging mode, this typically means the value is beyond the device's overall measurement capability for that function. Disconnect the test leads immediately and verify the circuit's expected value or switch to a higher capacity meter if available.
5.2 No Display or Faint Display
- Check if the multimeter is powered on (range knob not in "OFF" position).
- Verify battery charge. Replace the battery if the low battery indicator is present or if the display is faint.
- Ensure the display backlight is not off in dark conditions.
5.3 Incorrect Readings
- Ensure test leads are correctly inserted into the appropriate jacks for the selected function.
- Verify that the range knob is set to the correct measurement type.
- Check for damaged test leads or poor connections.
- Ensure the battery has sufficient charge.
6. Specifications

Figure 6: Detailed technical specifications for VICTOR 890G+ and 890H+ models.
| Parameter | Specification |
|---|---|
| Display | 6000 counts, LCD digital display |
| DC Voltage (DCV) | 600mV/6V/60V/600V/1000V |
| AC Voltage (ACV) | 6V/60V/600V/750V |
| DC Current (DCA) | 600uA/6000uA/60mA/600mA/10A |
| AC Current (ACA) | 600uA/6000uA/60mA/600mA/10A |
| Resistance | 600Ω/6kΩ/60kΩ/600kΩ/6MΩ/60MΩ |
| Capacitance | 10nF/100nF/1000nF/10uF/100uF/1000uF/10mF/100mF |
| Frequency | 10Hz/100Hz/1000Hz/10kHz/100kHz/1000kHz |
| Duty Cycle | 1%~99% |
| Temperature | -20℃ to 1000℃ (-4℉ to 1832℉) |
| Bandwidth | 1kHz |
| Safety Rating | EN61010-1, -2-030 EN61010-2-033, EN61326-1 CAT III 1000V, CAT IV 600V |
| Dimensions | 22 x 15 x 12 cm |
| Weight | 0.5 kg |
| Power Source | Battery Powered (1 Lithium Ion battery included) |
| Auto Power-off | 15 minutes |
| Backlight | Yes, two-color (White + Orange) |
| True RMS | Yes |
| NCV | Yes |
7. Warranty Information
The GuliTech VICTOR 890H+ Digital Multimeter comes with a 1-year warranty from the date of purchase. This warranty covers manufacturing defects and malfunctions under normal use. Please retain your proof of purchase for warranty claims.
8. Support
For technical assistance, troubleshooting beyond this manual, or warranty inquiries, please contact your retailer or the manufacturer's customer support. Refer to the product packaging or the retailer's website for specific contact details.