Introduction
Thank you for choosing the Yunseity DL001 Trail Camera. This manual provides essential information for the proper setup, operation, and maintenance of your device. Please read this manual thoroughly before using the camera to ensure optimal performance and longevity. This camera is designed for outdoor use, ideal for wildlife monitoring, home security, or general surveillance.
Safety Information
- Do not immerse the camera in water, despite its IP66 rating, as prolonged submersion can cause damage.
- Use only recommended battery types (AA batteries) and ensure correct polarity during installation.
- Do not mix old and new batteries, or different types of batteries.
- Keep the camera away from extreme temperatures and direct sunlight for extended periods.
- Handle the lens and display screen with care to avoid scratches.
- Dispose of batteries according to local regulations.
Package Contents
Please verify that all items are present in your package:
- Yunseity DL001 Trail Camera
- Mounting Strap
- USB Cable
- User Manual
Product Overview
Familiarize yourself with the components of your Yunseity DL001 Trail Camera.

This image displays the front of the trail camera, highlighting the main lens, the passive infrared (PIR) motion sensor at the bottom, and the array of infrared LEDs at the top for night vision.

The trail camera is shown alongside its adjustable mounting strap, used for securing the camera to trees or poles.

A detailed diagram illustrating the key components of the trail camera, such as the infrared lights, main lens, PIR motion sensors, internal display, speaker, lock hole, and the various operation buttons.
Setup
- Battery Installation:
- Open the camera's casing by unlatching the side clips.
- Locate the battery compartment.
- Insert 4 or 8 AA batteries (not included) according to the polarity indicators (+/-). Ensure all batteries are inserted correctly.
- Close the battery compartment securely.
- SD Card Installation:
- With the camera open, locate the SD card slot.
- Insert a Class 10 or higher SD card (up to 32GB, not included) with the metal contacts facing down until it clicks into place.
- To remove, press the card gently until it springs out.
- Mounting the Camera:
- Select a suitable location, such as a tree or pole, ensuring a clear view of the desired monitoring area.
- Thread the provided mounting strap through the slots on the back of the camera.
- Securely fasten the strap around the mounting surface. Adjust the camera angle as needed.
- Alternatively, use a tripod or other mounting accessories with the camera's tripod thread (if available).
Operating Instructions
Powering On/Off
- To power on, open the camera casing and slide the power switch to the 'ON' position. The display will light up.
- To power off, slide the power switch to the 'OFF' position.
Menu Navigation
Use the control buttons inside the camera casing to navigate the menu:
- MENU button: Enters or exits the menu.
- UP/DOWN buttons: Navigate through menu options.
- LEFT/RIGHT buttons: Change settings values or navigate within sub-menus.
- OK button: Confirms selections.
Recording Modes
The camera supports various recording modes:
- Photo Mode: Captures still images.
- Video Mode: Records video clips.
- Photo + Video Mode: Captures a still image followed by a video clip upon trigger.
Adjusting Settings
Access the menu to customize camera settings:
- Resolution: Set photo resolution (e.g., 16MP, 12MP, 8MP) and video resolution (e.g., 1080P, 720P).
- PIR Sensitivity: Adjust the sensitivity of the motion sensor (Low, Medium, High) based on environmental conditions to prevent false triggers.
- Trigger Interval: Define the delay between consecutive triggers (e.g., 5 seconds to 30 minutes).
- Time Stamp: Enable or disable the display of date and time on captured media.
- Time Lapse: Set the camera to capture images at specific intervals regardless of motion.
- Timed Recording: Configure the camera to record video for a set duration (e.g., 10 seconds to 3 minutes).
This image demonstrates the trail camera in action, showing it capturing wildlife, specifically deer, in their natural habitat.

The image illustrates the camera's quick response, capturing running deer, with text indicating a 0.7-second PIR trigger time and a 60-degree viewing angle.

This image shows the camera's 2.0-inch HD display screen, presenting a high-definition image of a leopard, demonstrating the clarity of captured content.

A graphic illustrating the camera's key specifications: 1920x1080P video resolution, 60-degree wide-angle lens, 16-megapixel photo capability, 0.7-second motion-activated trigger, and 38 940nm infrared LEDs for night vision.

A split image demonstrating the camera's ability to capture color photos during the day and clear black-and-white images at night, featuring a fox in both scenarios.

The image depicts the trail camera being sprayed with water, emphasizing its IP66 waterproof and dustproof rating, ensuring durability in various weather conditions.

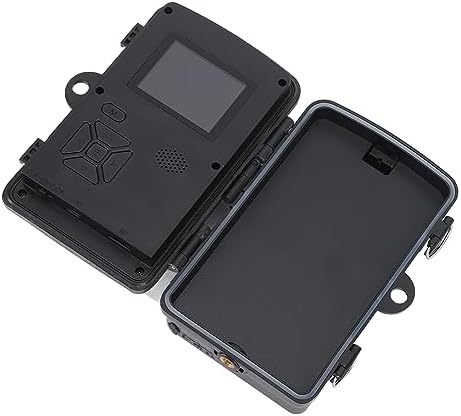
The camera is shown open, with its internal display and control panel, alongside text detailing options for timed video recording (10 seconds to 3 minutes) and interval photo taking (0.3M to 12MP, 5 seconds to 30 minutes interval, up to 3 consecutive shots).
Maintenance
- Cleaning: Use a soft, dry cloth to clean the camera body. For the lens and display, use a specialized lens cleaning cloth and solution to avoid scratches.
- Battery Care: Remove batteries if the camera will not be used for an extended period to prevent leakage.
- Storage: Store the camera in a cool, dry place away from direct sunlight and extreme temperatures.
Troubleshooting
| Issue | Possible Solution |
|---|---|
| Camera not powering on | Check battery installation and polarity. Ensure batteries are fully charged or replace them. Verify the power switch is in the 'ON' position. |
| Poor image/video quality | Clean the camera lens. Ensure sufficient lighting (for day shots) or proper night vision activation (for night shots). Check resolution settings in the menu. |
| PIR sensor not triggering | Adjust PIR sensitivity to 'High'. Ensure there are no obstructions in front of the PIR sensor. Check the trigger interval setting. |
| SD card error | Ensure the SD card is inserted correctly. Try formatting the SD card in the camera's menu (this will erase all data). Try a different SD card. |
| Camera not recording at night | Ensure night vision is enabled in settings. Check if infrared LEDs are functioning (they emit a faint red glow). |
Specifications
| Feature | Detail |
|---|---|
| Model Number | DL001 (Yunseity3deyq5sitx) |
| Effective Still Resolution | 16 MP, 12 MP, 8 MP |
| Video Capture Format | 1080P HD (MPEG-4) |
| Lens Angle | 60 Degree |
| Infrared Lights | 38pcs 940NM (Invisible IR) |
| PIR Motion Sensor | Yes, with adjustable sensitivity |
| PIR Trigger Speed | 0.7 seconds |
| Display Screen | 2.0 Inch HD Display |
| International Protection Rating | IP66 (Dustproof and Water-resistant) |
| Storage | Supports SD card up to 32GB (Class 10 or higher recommended) |
| Power Supply | 4 or 8 AA Batteries (not included) |
| Item Weight | 12.5 ounces |
| Connectivity Protocol | Wi-Fi (for app control, if applicable) |
Warranty and Support
For warranty information or technical support, please refer to the documentation provided with your purchase or contact Yunseity customer service through the retailer's platform or the official brand website. Please have your model number (DL001) and purchase details ready when seeking support.


