1. Product Overview
The Leacco Commercial Slushie Machine, Model XN360A, is a versatile appliance designed for preparing a variety of frozen beverages such as slushies, frozen cocktails, smoothies, and more. Featuring a durable stainless steel construction and multiple tanks, it is suitable for both commercial establishments and large household use. This manual provides essential information for the safe and efficient operation and maintenance of your machine.
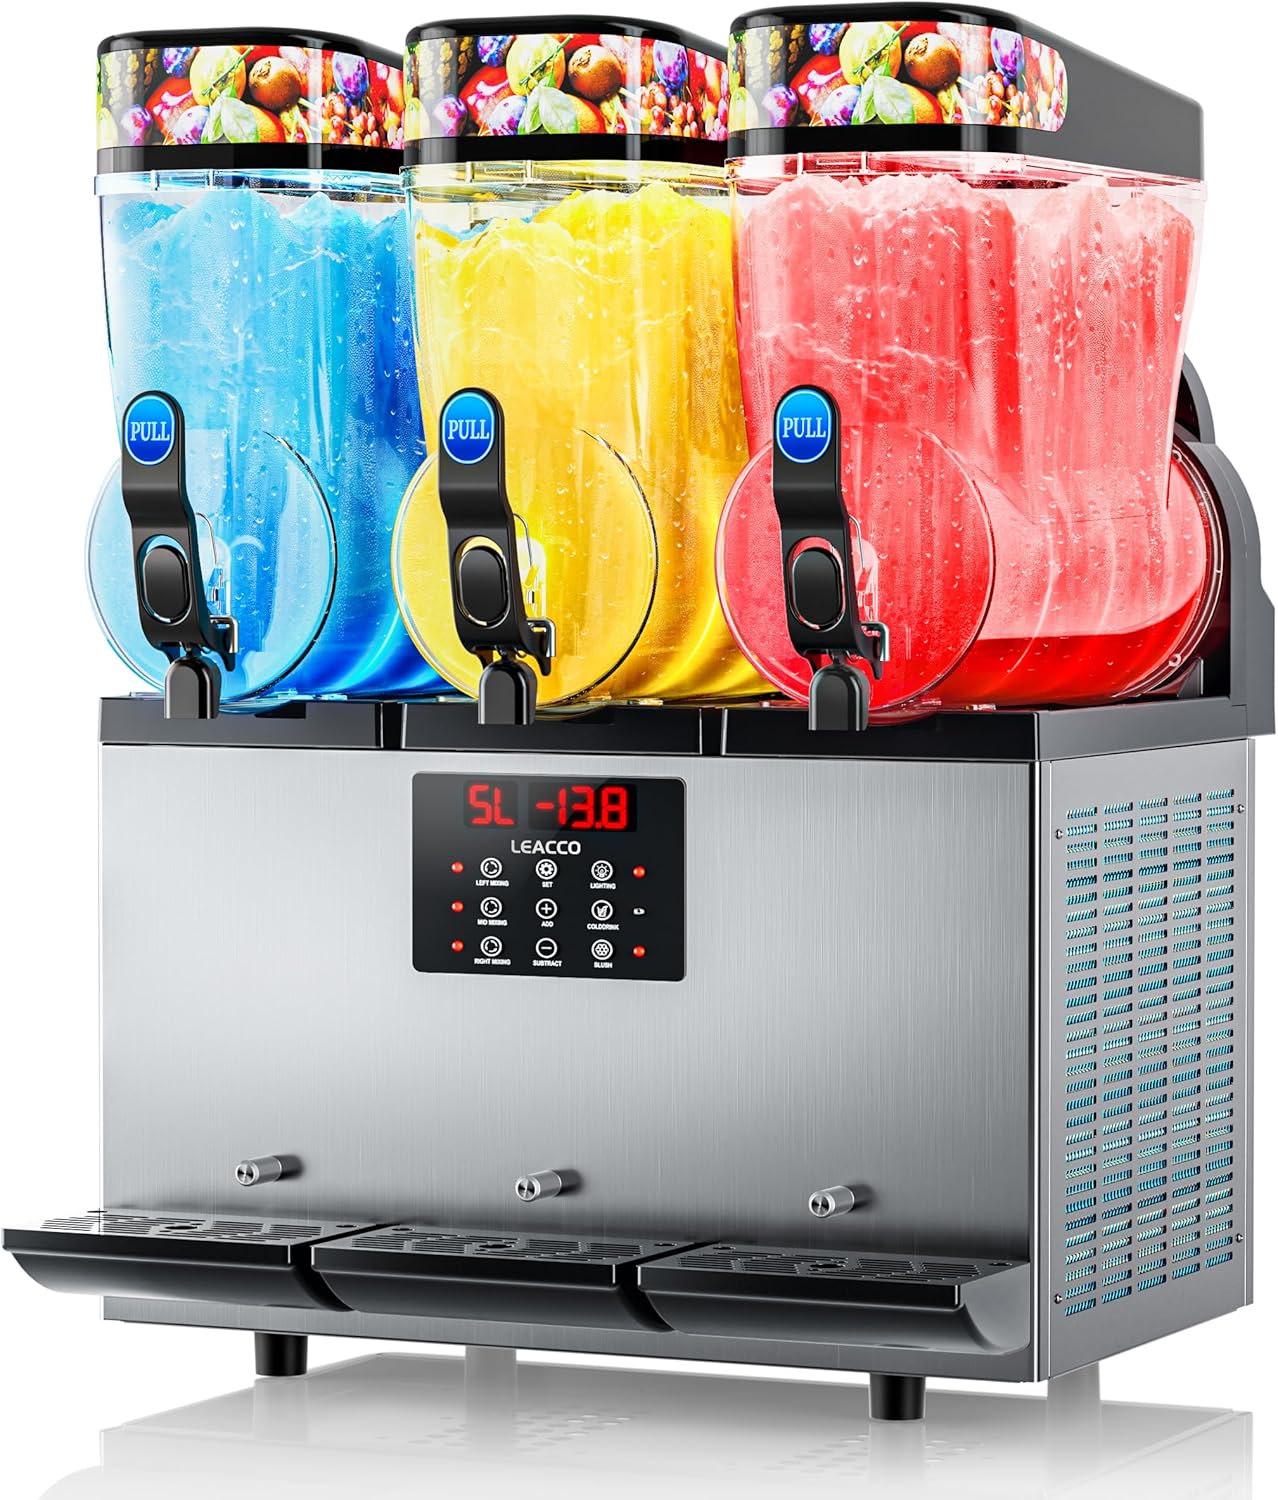
Image 1.1: Front view of the Leacco Commercial Slushie Machine, Model XN360A, showcasing its three transparent tanks and stainless steel base.
Key Features:
- High Capacity: Equipped with three 15-liter food-grade tanks, allowing for a total capacity of 45 liters and the creation of three distinct flavors simultaneously.
- Customizable Temperature Control: Each tank features independent temperature control (0℃ to -9℃) for precise adjustment of beverage hardness, suitable for various frozen drinks including margaritas and cold beverages.
- Efficient Cooling: Utilizes a powerful Embraco compressor for rapid freezing, producing slushie drinks in approximately 30 minutes.
- Enhanced Visibility: Bowls with built-in LED lights illuminate the contents, enhancing product presentation.
- Drip-Free Dispensing: Designed with a large pull handle and drip-free valve for clean and effortless serving.
2. Safety Instructions
To ensure safe operation and prevent damage to the machine or injury, please adhere to the following safety guidelines:
- Always connect the machine to a grounded power outlet with the correct voltage (110V).
- Do not operate the machine with a damaged power cord or plug.
- Keep hands and foreign objects away from moving parts during operation.
- Ensure adequate ventilation around the machine to prevent overheating. Maintain at least 20 cm (8 inches) of clear space on all sides.
- Do not immerse the main unit in water or other liquids.
- Unplug the machine before cleaning, maintenance, or when not in use.
- This appliance is not intended for use by persons (including children) with reduced physical, sensory, or mental capabilities, or lack of experience and knowledge, unless they have been given supervision or instruction concerning use of the appliance by a person responsible for their safety.
3. Setup & Assembly
Before first use, assemble the machine components as instructed. Ensure all parts are clean and dry.
Assembly Steps:
- Unpack all components and verify that all parts are present and undamaged.
- Carefully place the main unit on a stable, level surface.
- Install the mixing augers and sealing rings into the cooling cylinders.
- Attach the transparent tanks to the main unit, ensuring they are securely locked in place.
- Place the lids on top of the tanks.
- Install the drip trays below the dispensing spouts.
Video 3.1: This video demonstrates the reassembly process of the slush machine, starting from 0:00 to 1:18.
4. Operating Instructions
Follow these steps to prepare and dispense your frozen beverages:
4.1 Preparing the Mix:
Prepare your desired beverage mix. For optimal slush consistency and to prevent damage to the machine, ensure the liquid has a minimum sugar content of 13%. Liquids with lower sugar content may freeze too hard and damage the mixing components.
4.2 Filling the Tanks:
Pour the prepared liquid into the transparent tanks. Ensure the liquid level is above the white plastic beater to allow for proper mixing and freezing. Do not overfill the tanks.

Image 4.1: Illustration of the machine's 45L total capacity across three tanks, capable of serving many cups.
4.3 Powering On and Selecting Modes:
Plug in the machine and turn on the main power switch. On the control panel, first activate the mixing function, then press the 'Slush' key to begin the freezing process. The machine will automatically adjust to the set temperature.

Image 4.2: The control panel highlighting the separate temperature control feature for each tank, allowing for different beverage consistencies.
4.4 Temperature Adjustment:
If the slush consistency is not as desired after the initial freezing period (approximately 30 minutes), you can adjust the temperature settings on the control panel. For liquids containing alcohol, the temperature should be set around -9℃ for optimal freezing.
4.5 Dispensing:
To dispense, place a cup under the dispensing spout and pull the handle forward. The drip-free valve ensures a clean serving experience.

Image 4.3: Close-up of the dispensing handle and drip-free valve during operation.
Video 4.4: This video demonstrates how to make slush, including adding liquid and operating the machine, starting from 1:18 to 3:00.
5. Maintenance & Cleaning
Regular cleaning and maintenance are crucial for the longevity and hygienic operation of your slushie machine.
5.1 Daily Cleaning:
After each day of use, empty any remaining liquid from the tanks. Fill the tanks with clean water and run the mixing function for a few minutes to rinse. Drain the water. This helps prevent sugar buildup and keeps the machine fresh.
5.2 Deep Cleaning:
For thorough cleaning, only four main parts need to be disassembled: the tanks, mixing augers, sealing rings, and dispensing spouts. Disassemble these parts and wash them with warm, soapy water. Rinse thoroughly and allow them to air dry completely before reassembly. Ensure all components are dry to prevent mold or mildew growth.

Image 5.1: Visual guide for the parts requiring disassembly for deep cleaning.
Video 5.2: This video demonstrates the cleaning process of the slush machine, including rinsing and disassembly for deep cleaning, starting from 3:00 to 4:55.
6. Troubleshooting
This section addresses common issues you might encounter with your Leacco Slushie Machine.
| Problem | Possible Cause | Solution |
|---|---|---|
| Machine displays "LLL" error code. | Low voltage alert. | Check the operating voltage. If the operating voltage is regular, please contact customer support to cancel the error code. |
| Slush is not freezing or is too watery. | Incorrect temperature setting; insufficient sugar content in mix. | Adjust the temperature to a lower setting. Ensure your mix has at least 13% sugar content. |
| Slush is too hard. | Temperature setting is too low. | Adjust the temperature to a higher setting. |
| Machine is noisy or vibrating excessively. | Improper placement; internal component issue. | Ensure the machine is on a level, stable surface. Check for proper assembly of internal parts. If issue persists, contact customer support. |
7. Product Specifications
| Feature | Detail |
|---|---|
| Brand | Leacco |
| Model Name | XN360A |
| Capacity | 45 Liters (Three 15L tanks) |
| Material | Stainless Steel |
| Special Feature | Bowls with built-in LEDs |
| Operation Mode | Automatic |
| Product Care Instructions | Hand Wash |
| Recommended Uses | Ice cream store, Restaurant, Cafe, Buffets, Milk tea store, Bar, Hotel, Dessert shops, Coffee Shop |
| Package Dimensions | 38.5 x 28 x 23.5 inches |
8. Warranty & Customer Support
Leacco slushie machines come with a 30-day money-back guarantee and a 12-month warranty. For any questions, technical assistance, or warranty claims, please contact our customer support team. Refer to your purchase documentation for specific contact details or visit the official Leacco website.


