1. Product Overview
The Huepar B03CG 3 x 360 Laser Level is a high-precision alignment tool featuring three 360-degree green laser lines: one horizontal and two vertical. These lines can be activated individually or together, providing comprehensive coverage for floors, walls, and ceilings. The laser level utilizes a bright Osram green laser unit, offering enhanced visibility and stability, with a working range of up to 85 feet and an accuracy of ±1/9 inch at 33 feet. For extended range, an outdoor pulse mode can be activated for use with a Huepar Line Laser Detector.
Included with the laser level is the PV10+ Multifunctional Magnetic Pivoting Base, designed to securely position the laser level for various applications. This bracket features a dedicated window adapter, height adjustment graduations in centimeters and inches, and multiple fixing methods including magnetic attachment, tripod mounting, and a versatile back clip. The back clip is compatible with most magnetic bases and can be adjusted to mount on objects up to 5cm thick, with fine-tuning knobs for vertical angle adjustment.
The B03CG laser level is powered by a large capacity 3.7V / 5200mAh Li-ion battery, providing up to 8 hours of continuous operation. The battery features a convenient Type-C charging port, allowing for separate charging. The device can also be operated directly by plugging it into a power source without the battery installed. Battery indicators on the keypad provide real-time battery volume information, and charging protection prevents overcharging.

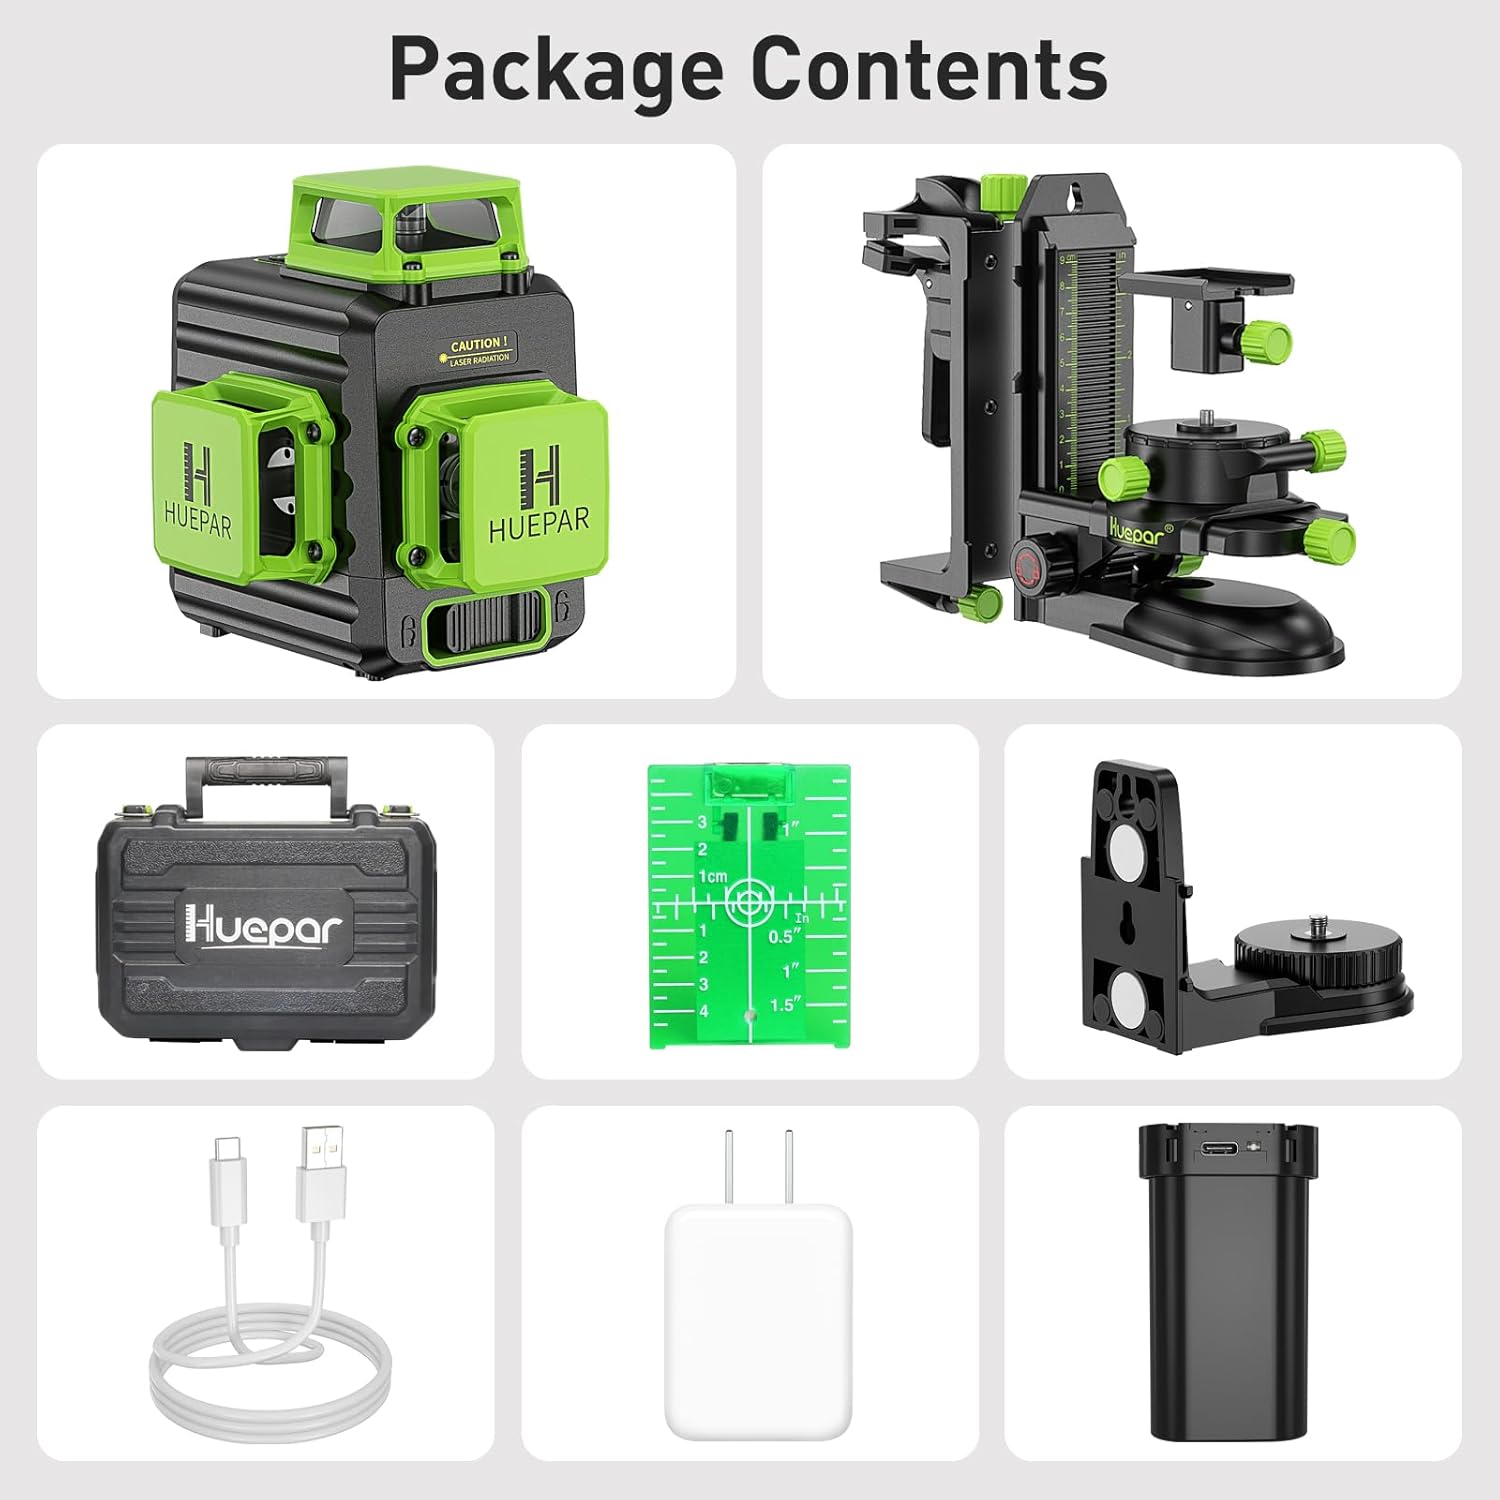
2. Package Contents
Please verify that all items listed below are included in your package:
- Huepar B03CG 3 x 360 Green Laser Level
- Huepar PV10+ Multifunctional Magnetic Pivoting Base
- Rechargeable 3.7V / 5200mAh Li-ion Battery
- Type-C Charging Cable
- Power Adapter
- Multi-function Back Clip with Auxiliary Steel Sheet
- Green Target Plate
- Hard Carry Case
3. Technical Specifications
| Feature | Specification |
|---|---|
| Projection | 3 x 360° Green Laser Lines |
| Laser Class | Class 2 |
| Horizontal / Vertical Accuracy | ±1/9 Inch at 33 Feet |
| Leveling / Compensation Range | ±4° |
| Power Source | 3.7V / 5200mAh Li-ion Battery |
| Mount Size (Laser Level) | 1/4"-20 |
| IP Rating | IP54 (dust-proof, waterproof, shockproof) |
| Material | Metal, Acrylonitrile Butadiene Styrene |
| Product Dimensions (Laser Level) | 6.89"L x 6.1"W (approximate) |
| Male Thread for Laser Level (PV10+) | 1/4"-20 |
| Female Thread for Tripod (PV10+) | 1/4"-20 and 5/8"-11 |
| Load Capacity (PV10+) | 3KG |
| Net Weight (PV10+) | 458g |
| PV10+ Dimensions | 17.5 x 15.5 x 8.5 cm |
4. Setup and Assembly
4.1 Battery Installation and Charging
The Huepar B03CG laser level operates on a rechargeable Li-ion battery. To install, open the battery compartment and insert the battery, ensuring correct polarity. To charge, connect the provided Type-C charging cable to the battery's charging port and then to the power adapter. The battery can be charged separately or while installed in the laser level. The four battery indicators on the keypad will show the current charge level.
For continuous operation without the battery, the laser level can be directly powered by plugging the Type-C cable into the device and connecting it to a power source.

4.2 Attaching the PV10+ Multifunctional Magnetic Pivoting Base
The PV10+ bracket is designed to provide stable and adjustable mounting for your laser level. It features a 1/4"-20 male thread to connect to the laser level's mounting port. Align the threads and gently screw the laser level onto the bracket until secure.
The bracket offers various fixing methods:
- Magnetic Attachment: The base of the PV10+ bracket contains strong magnets, allowing it to be securely attached to metal surfaces.
- Tripod Mounting: The bracket has 1/4"-20 and 5/8"-11 female threads on its base, enabling attachment to standard tripods or poles.
- Multi-function Back Clip: For non-magnetic surfaces or objects, attach the separate back clip to the bracket. This clip can grip objects up to 5cm thick. It also features a nail hole for firm wall mounting.


5. Operating Instructions
5.1 Powering On/Off and Self-Leveling
To power on the laser level, slide the pendulum lock switch to the unlocked position. The laser will automatically self-level within ±4°. If the device is placed on a surface that is beyond this range, the laser lines will flash rapidly to indicate an out-of-level condition. To power off, slide the pendulum lock switch back to the locked position. This also protects the pendulum during transport.
5.2 Switching Laser Modes
The B03CG laser level offers five different laser line compositions. Press the power button (or the dedicated mode button, if present) to cycle through the modes:
- All three 360° laser lines (one horizontal, two vertical)
- Horizontal + Vertical lines (specific combination)
- Single 360° Horizontal Line
- Single 360° Vertical Line
- Two 360° Vertical Lines
Select the mode that best suits your application requirements.

5.3 Pulse Mode Operation
For outdoor use or when working in bright conditions, activate the outdoor pulse mode by pressing the Pulse Mode Button (often indicated by a 'P' or wave icon). This mode allows the laser level to be used with a Huepar Line Laser Detector (sold separately) to extend the working range up to 200 feet.
5.4 Using the PV10+ Bracket for Precise Adjustments
The PV10+ bracket provides fine-tuning capabilities for precise laser positioning. Use the adjustment knobs on the bracket to:
- Height Adjustment: Adjust the vertical position of the laser level using the main height adjustment knob. The bracket features graduations in centimeters and inches for accurate measurement.
- Fine-tuning: The bracket allows for subtle horizontal and vertical adjustments to align the laser lines precisely.
- Angle Adjustment: When using the back clip, the vertical angle of the bracket against the wall can be adjusted.


6. Maintenance
Proper maintenance ensures the longevity and accuracy of your Huepar laser level and bracket.
- Cleaning: Regularly wipe the laser level and bracket with a soft, damp cloth. Do not use harsh chemicals, abrasive cleaners, or solvents, as these can damage the plastic components or laser optics.
- Battery Care: Store the Li-ion battery in a cool, dry place. If storing for extended periods, ensure the battery is partially charged (around 50%) to prolong its lifespan. Avoid fully discharging the battery before recharging.
- Storage: When not in use, store the laser level and bracket in their hard carry case to protect them from dust, moisture, and impact. Ensure the pendulum lock switch is in the locked position before storage or transport.
- IP54 Rating: The B03CG laser level has an IP54 rating, meaning it is dust-proof and resistant to water splashes. While it can withstand light exposure to dust and moisture, it is not designed for submersion or heavy rain. Clean off any dust or water promptly.
7. Troubleshooting
If you encounter issues with your Huepar laser level, refer to the following common troubleshooting steps:
- Laser Lines Not Appearing:
- Check if the pendulum lock switch is in the unlocked position.
- Ensure the battery is charged or the device is connected to a power source.
- Verify the power button has been pressed to turn on the unit.
- Laser Lines Flashing Rapidly:
- This indicates the laser level is out of its self-leveling range (±4°). Place the device on a more level surface.
- Reduced Laser Brightness or Range:
- Ensure the battery is fully charged.
- Clean the laser emission windows if they are dusty or dirty.
- In very bright environments, the laser visibility will naturally decrease. Consider using the pulse mode with a laser detector.
- Bracket Not Holding Securely:
- For magnetic attachment, ensure the surface is clean, flat, and made of a ferromagnetic material.
- When using the back clip, ensure the object is within the 1-5cm thickness range and the clip is securely tightened.
If problems persist, please refer to the support information section.
8. Safety Information
The Huepar B03CG laser level is a Class 2 laser product. Please observe the following safety precautions:
- DO NOT stare directly into the laser beam.
- DO NOT intentionally direct the laser beam at people or animals.
- Avoid positioning the laser beam at eye level.
- Use caution when operating the laser level around reflective surfaces, as reflected beams can also be hazardous.
- Keep the device out of reach of children.
- Only use the specified battery and charging accessories.
- Do not attempt to modify or disassemble the laser level. This could lead to hazardous laser radiation exposure and will void the warranty.
9. Warranty and Support
Specific warranty terms and detailed customer support contact information are not provided within this manual. For warranty claims, technical assistance, or further inquiries, please refer to the product packaging, the official Huepar website, or contact the retailer from whom you purchased the product.
Please have your product model number (B03CG & PV10+) and purchase date ready when contacting support.