1. Safety Information
Please read this manual carefully before using your Volkano Sustain Series Mini UPS. Retain this manual for future reference.
- Do not expose the device to water, moisture, or extreme temperatures.
- Avoid dropping or subjecting the device to severe impact.
- Do not attempt to disassemble, repair, or modify the device. This will void the warranty.
- Ensure proper ventilation around the UPS during operation.
- This device includes overload and short circuit protection to safeguard connected equipment. However, avoid connecting devices that exceed the UPS's rated output.
- Keep out of reach of children.
2. Product Overview
The Volkano Sustain Series Mini UPS provides uninterrupted power to your essential devices during power outages. Its compact design and multiple output options make it versatile for various applications.
Key Features:
- Multi-LED status indicators for power and battery status.
- Integrated overload and short circuit protection.
- Manual power switch for convenient control.
- Compact and portable design.
- PoE output of 24V for compatible devices.
Components and Ports:

Image 1: Top view of the Volkano Sustain Series Mini UPS, showing the Volkano logo and LED indicators.

Image 2: Rear view of the Volkano Sustain Series Mini UPS, displaying the 12V DC output, 9V DC output, 5V USB output, LAN IN, and LAN OUT ports.
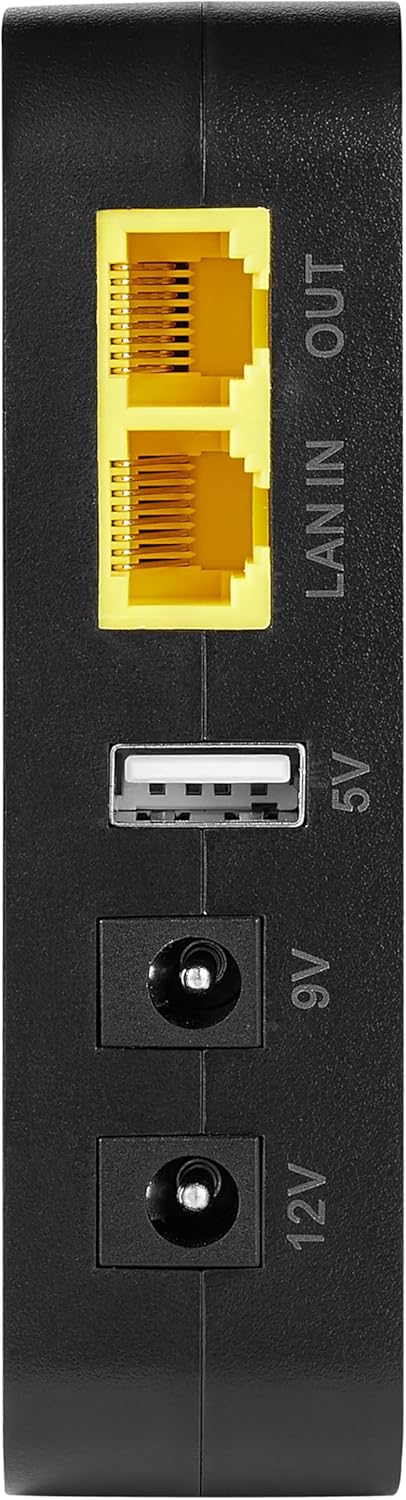
Image 3: Side view of the Volkano Sustain Series Mini UPS, showing the 12V DC output, 9V DC output, 5V USB output, LAN IN, and LAN OUT ports in a vertical orientation.
- AC Input: For connecting the UPS to mains power for charging.
- DC Output (12V): For devices requiring 12V DC power.
- DC Output (9V): For devices requiring 9V DC power.
- USB Output (5V): Standard USB port for charging smartphones and other 5V USB-powered devices.
- LAN IN: Ethernet input port.
- LAN OUT: Ethernet output port, supports 24V PoE.
- Power Button: Manual power switch for turning the UPS on/off.
- LED Indicators: Display battery level and operational status.
3. Setup
3.1 Initial Charging:
- Connect the provided AC power cable to the UPS's AC input port.
- Plug the other end of the AC power cable into a standard wall outlet.
- The LED indicators will illuminate to show the charging status. Allow the UPS to charge fully before first use.
3.2 Connecting Devices:
Identify the correct voltage and connector type for your device before connecting.
- For Routers/Modems (9V/12V DC): Use the appropriate DC output cable (not included, typically supplied with your router/modem) to connect your device to either the 9V or 12V DC output port on the UPS. Ensure the voltage matches your device's requirement.
- For Smartphones/USB Devices (5V USB): Connect your device's USB charging cable to the 5V USB output port on the UPS.
- For Network Devices (LAN/PoE): Connect your incoming network cable to the LAN IN port. Connect your network device (e.g., PoE-compatible router, IP camera) to the LAN OUT port. The LAN OUT port supports 24V Power over Ethernet (PoE).
4. Operating Instructions
4.1 Powering On/Off:
- To Power On: Press and hold the power button for approximately 3 seconds until the LED indicators light up.
- To Power Off: Press and hold the power button for approximately 3 seconds until the LED indicators turn off.
4.2 Understanding LED Indicators:
The multi-LED indicators provide visual feedback on the UPS's status:
- Solid Green LEDs: Indicate the current battery charge level (e.g., 4 LEDs solid green means 75-100% charged).
- Flashing Green LEDs: Indicate the UPS is currently charging.
- No LEDs: The UPS is off or completely discharged.
4.3 Automatic Backup Function:
When the UPS is connected to mains power and turned on, it will automatically switch to battery backup mode in the event of a power failure, providing uninterrupted power to connected devices.
5. Maintenance
5.1 Cleaning:
- Ensure the UPS is powered off and disconnected from all power sources and devices before cleaning.
- Use a soft, dry cloth to wipe the exterior of the device.
- Do not use liquid cleaners or abrasive materials.
5.2 Storage:
- If storing the UPS for an extended period, charge it to at least 50% every three months to maintain battery health.
- Store in a cool, dry place away from direct sunlight and extreme temperatures.
6. Troubleshooting
Common Issues and Solutions:
- UPS not turning on: Ensure the UPS is charged. Connect it to mains power and allow it to charge for a while. Press and hold the power button for 3 seconds.
- Connected device not receiving power:
- Verify the UPS is powered on.
- Check if the connected device's power cable is securely plugged into the correct output port (9V, 12V, or 5V USB).
- Confirm that the voltage output selected on the UPS matches the device's requirement.
- Ensure the connected device is not drawing more power than the UPS can supply (overload protection).
- UPS not charging: Ensure the AC power cable is securely connected to both the UPS and the wall outlet. Try a different outlet.
- LED indicators not working: The UPS might be completely discharged or faulty. Try charging it. If the issue persists, contact customer support.
7. Specifications
| Brand | Volkano |
| Model Number | VK-9101-BK |
| Battery Capacity | 5200mAh |
| DC Output | 9V, 12V |
| USB Output | 5V |
| PoE Output | 24V |
| Special Features | Digital Display, Lightweight |
| Compatible Devices | Smartphone, Routers, Modems, PoE devices |
| Colour | Black |
| Date First Available | 28 September 2023 |
8. Warranty and Support
8.1 Manufacturer's Warranty:
This Volkano Sustain Series Mini UPS comes with a 1 Year Limited Warranty from the date of purchase. This warranty covers manufacturing defects and workmanship under normal use. It does not cover damage caused by misuse, accidents, unauthorized modifications, or natural disasters. Please retain your proof of purchase for warranty claims.
8.2 Customer Support:
For technical assistance, warranty claims, or further information, please contact Volkano customer support through their official website or the retailer where the product was purchased. Please have your model number (VK-9101-BK) and proof of purchase ready when contacting support.


