HASAKEE Q9S
HASAKEE Q9s Drone Instruction Manual
Model: Q9S
Brand: HASAKEE
Introduction
The HASAKEE Q9s Drone is designed for kids and beginners, offering an easy-to-fly experience with vibrant LED lights. This manual provides essential information for setting up, operating, and maintaining your drone to ensure safe and enjoyable flights. Key features include Altitude Hold, Headless Mode, 360-degree flips, and durable propeller guards.
What's in the Box

Image: Contents of the HASAKEE Q9s Drone package, showing the drone, remote control, batteries, and other accessories.
- 1 x Q9s Drone
- 1 x 2.4GHz Transmitter (Remote Control)
- 2 x Drone Batteries (500mAh UL-certified)
- 2 x USB Charging Cables
- 4 x Spare Propellers
- 1 x Screwdriver
- 1 x User Manual
Product Overview
The Q9s Drone features a compact design with integrated propeller guards for enhanced safety. It is equipped with bright LED lights that offer multiple display modes, making it visible and engaging during flight. The drone is constructed from high-quality ABS material for durability.
Key Features:
- Bright LEDs: Neon blue and pink lights provide a vivid flight experience with three different display modes.
- Secure & Long-Life: Structured design with four sturdy propeller guards protects against injuries and withstands crashes.
- User-Friendly Controls: One-button take-off/land/return, three speed modes (Low, Medium, High), Headless Mode for easy direction control, and Altitude Hold for stable hovering.
- Double Flight Time: Includes two 500mAh UL-certified batteries for extended playtime.
- Multiple Funny Tricks: Capable of 360-degree flips and auto-rotation functions.
Setup
1. Battery Installation & Charging:
Insert one of the provided 500mAh batteries into the drone's battery compartment. Use the included USB charging cable to charge the other battery. The charging cable will light up to indicate charging status. Ensure batteries are fully charged before use for optimal flight time.

Image: Underside of the HASAKEE Q9s Drone showing the battery compartment. The battery slides in and out easily without needing tools.

Image: Two USB charging cables connected to drone batteries, indicating charging status with LED lights.
2. Remote Control Battery Installation:
The remote control requires 3 x AAA batteries (not included). Open the battery compartment on the back of the remote and insert the batteries, ensuring correct polarity.
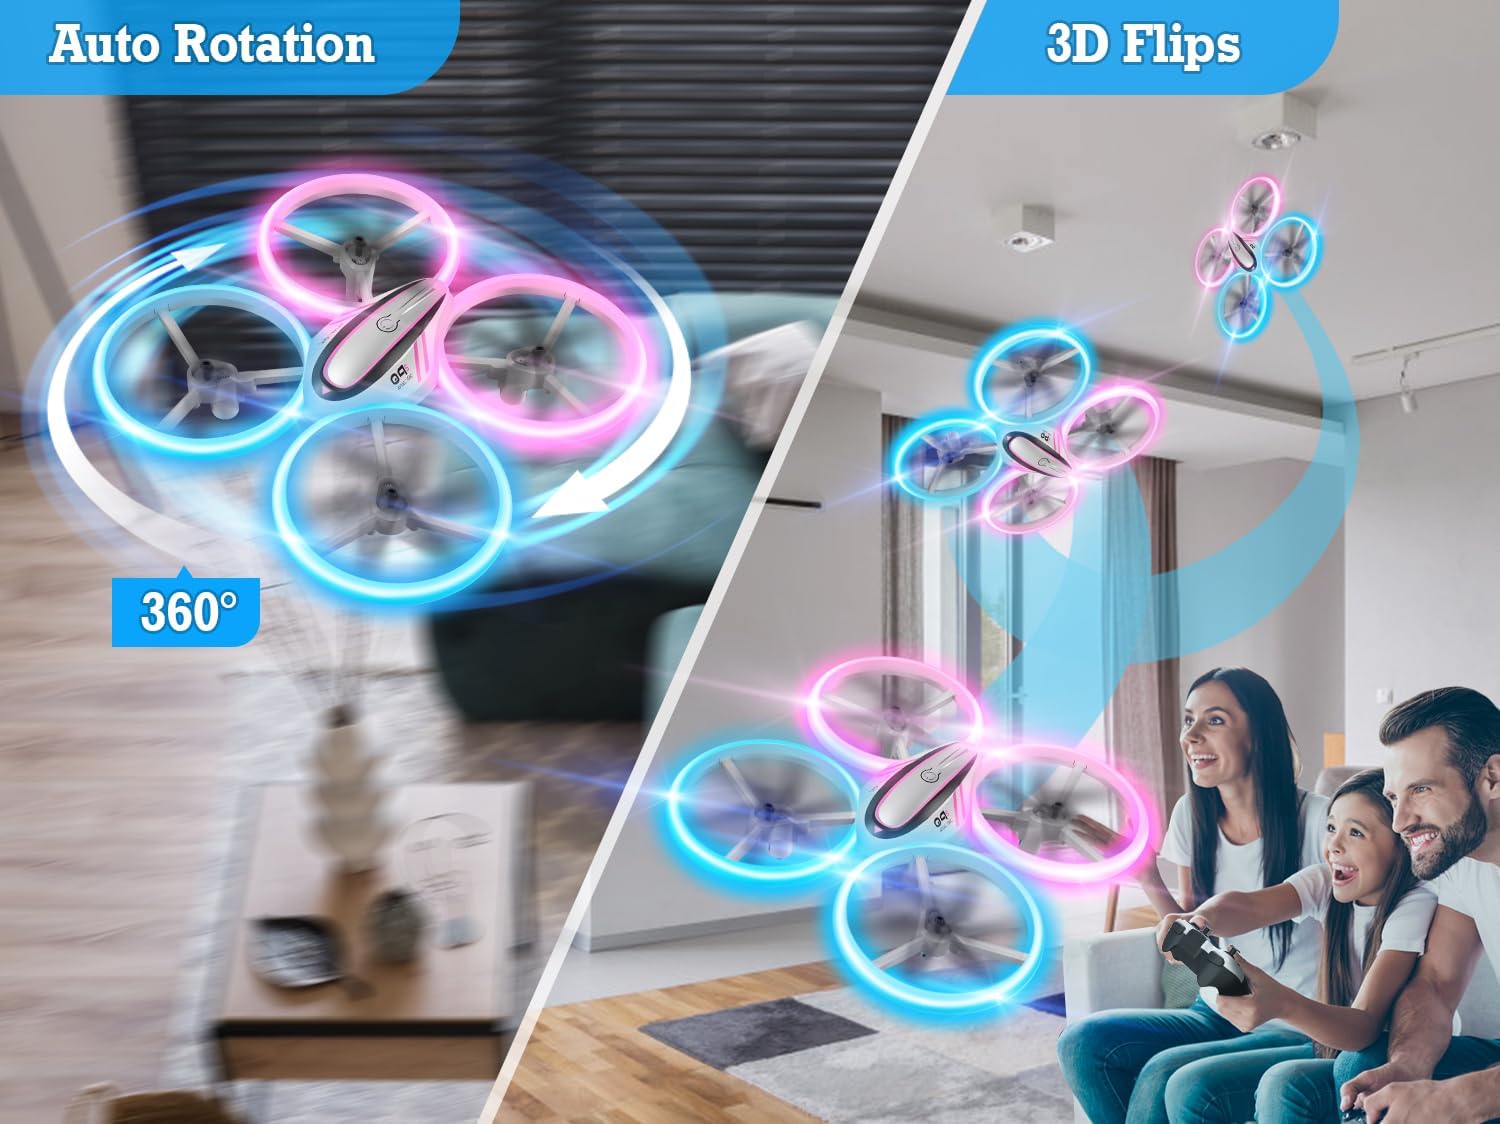
Image: The remote control for the HASAKEE Q9s Drone, showing the battery compartment on the back where AAA batteries are inserted.
3. Pairing the Drone and Remote:
- Place the drone on a flat, level surface.
- Turn on the drone by pressing its power button. The LED lights on the drone will flash.
- Turn on the remote control.
- Wait approximately 3 seconds for the drone and remote to automatically link. The drone's LED lights will become solid once paired.
- If the drone drifts, use the calibration button on the remote (center button on the right-hand side) to adjust its flight stability.
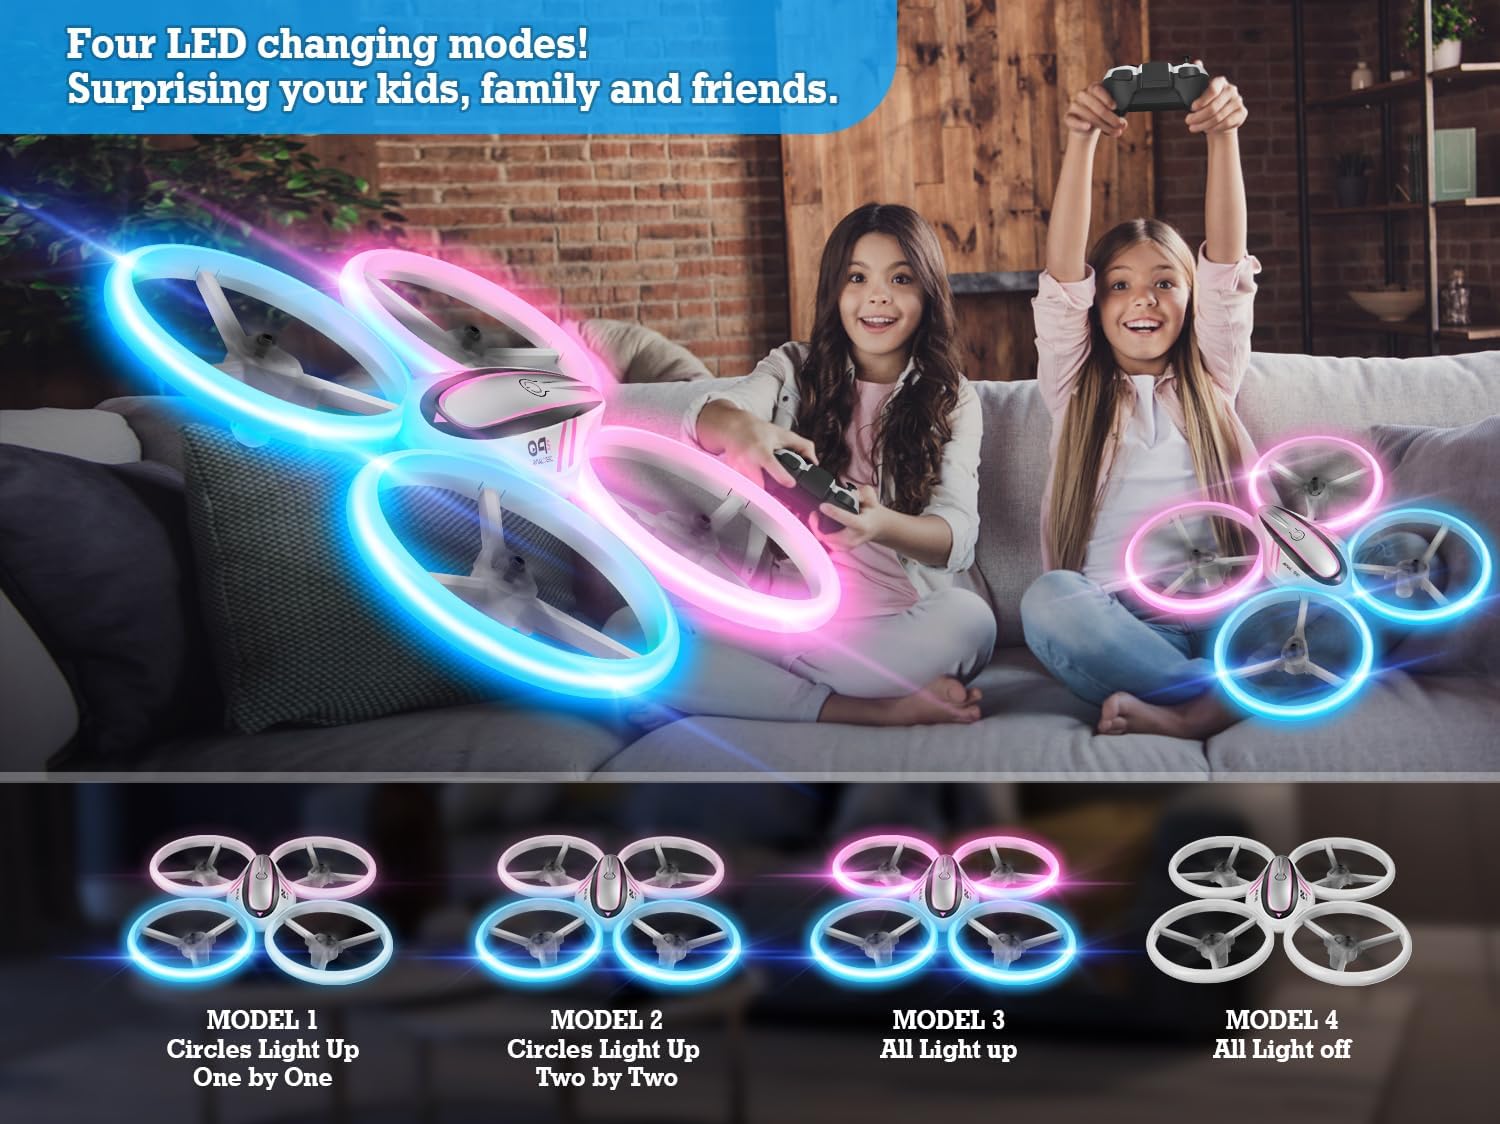
Image: The HASAKEE Q9s Drone and its remote control on a flat surface, illustrating the initial setup and pairing process.
4. Watch Setup Video:
Video: An unboxing and first look at the HASAKEE Q9s Mini Drone, demonstrating its components and initial setup steps.
Operating Instructions
Take-Off and Landing:
The Q9s Drone features a one-button take-off and landing function. Press the designated button on the remote control to initiate automatic take-off or landing. For manual control, use the left joystick to control altitude.

Image: The HASAKEE Q9s Drone taking off and landing with a single button press, indicated by arrows.
Altitude Hold:
The Altitude Hold feature allows the drone to maintain a stable height automatically, making it easier for beginners to control. You do not need to constantly adjust the throttle to keep the drone at a specific altitude.

Image: The HASAKEE Q9s Drone hovering in place, demonstrating the Altitude Hold function for stable flight.
Headless Mode:
In Headless Mode, the drone's orientation is relative to the pilot, not the drone's front. This simplifies control as you don't need to worry about which way the drone is facing. Activate this mode for easier navigation, especially for new pilots.
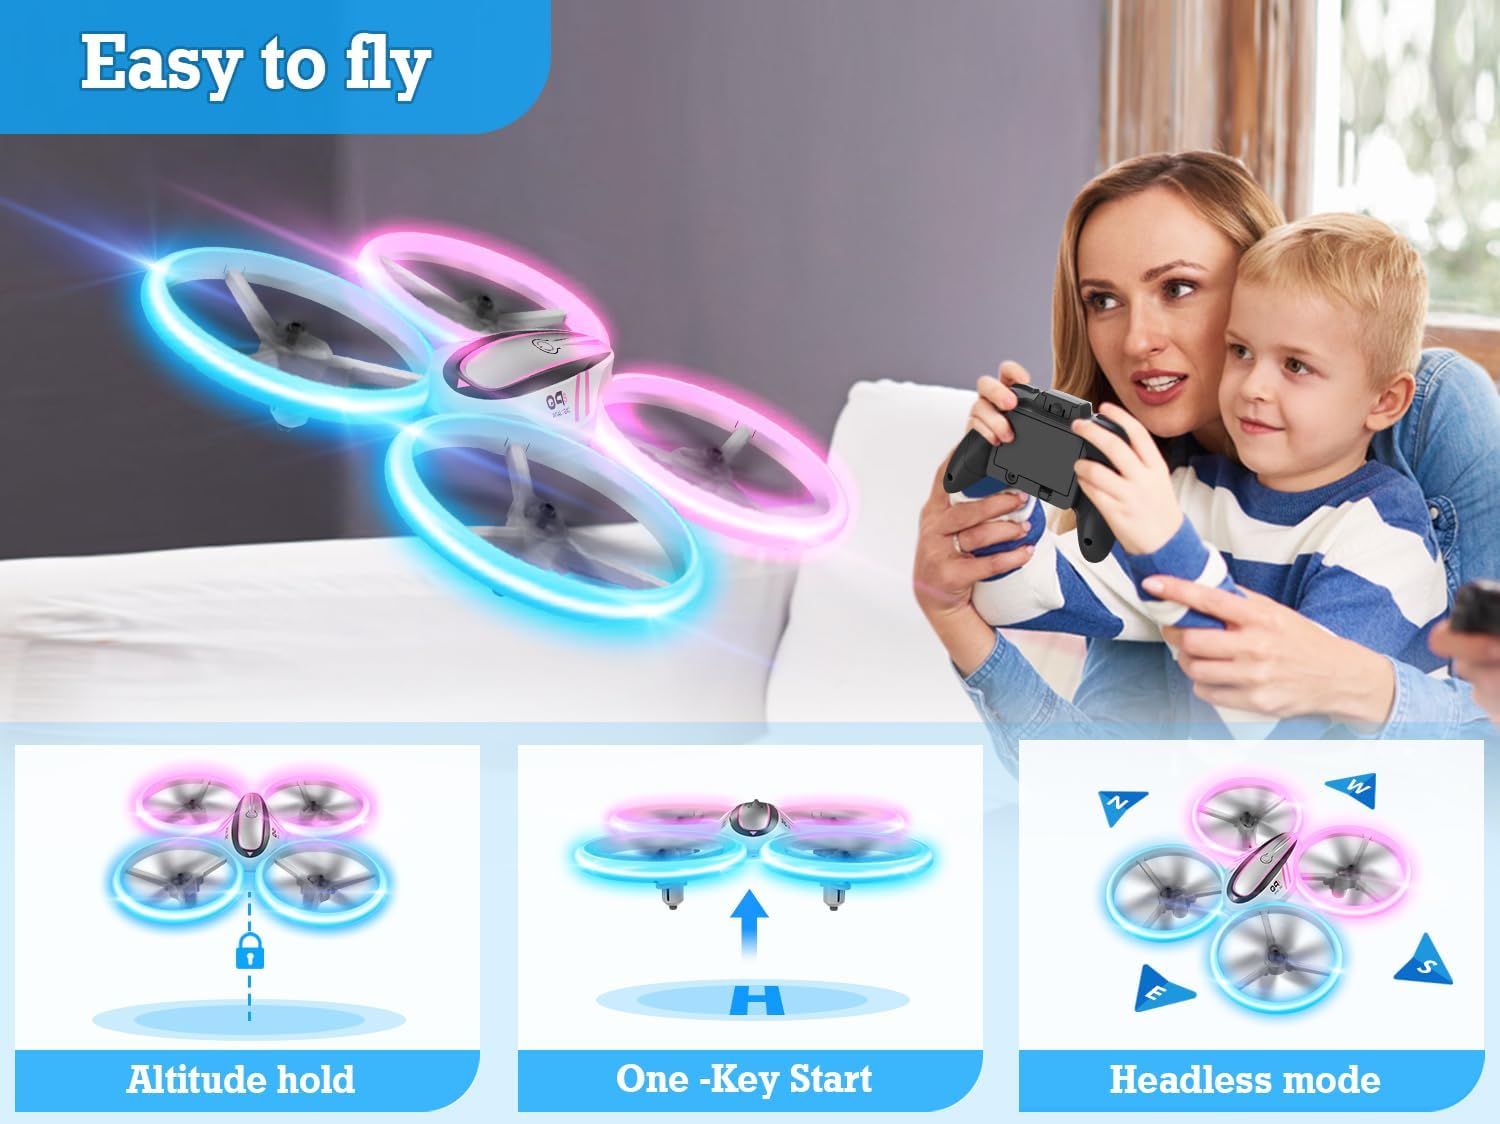
Image: The HASAKEE Q9s Drone flying in Headless Mode, showing simplified directional control for the pilot.
Speed Modes:
Choose from three speed modes (Low, Medium, High) to match your skill level. Beginners should start with Low speed and gradually increase as they gain confidence.

Image: Illustration of the HASAKEE Q9s Drone's three speed modes: Low, Medium, and High, suitable for different skill levels.
360-Degree Flips and Auto-Rotation:
Perform exciting aerial stunts with the 360-degree flip and auto-rotation functions. Refer to the remote control diagram in the user manual for specific button presses to activate these tricks.
Image: The HASAKEE Q9s Drone executing a 360-degree flip and an auto-rotation maneuver, showcasing its stunt capabilities.
Circle Fly:
Engage the Circle Fly function to have the drone automatically fly in a circular path, adding another dynamic element to your flight experience.

Image: A child operating the HASAKEE Q9s Drone as it performs a "Circle Fly" maneuver in an outdoor setting.
Watch Flight Demonstration:
Video: A demonstration of the HASAKEE Q9s Drone's flight capabilities, including its ease of use and vibrant lights.
Lighting Modes
The Q9s Drone features bright LED lights with three different display modes, enhancing visibility and adding excitement to your flights, especially in low-light conditions. The green lights typically indicate the back of the drone, and blue lights indicate the front, aiding in orientation.

Image: The HASAKEE Q9s Drone displaying its four different LED lighting modes, including individual light-up patterns and all lights on/off.
Safety Guidelines
- Always operate the drone in open, clear areas, away from people, animals, and obstacles.
- The drone is equipped with propeller guards to prevent injury from spinning propellers. However, exercise caution during operation.
- Avoid flying in strong winds or adverse weather conditions, as this can affect control and potentially damage the drone.
- Do not operate the drone near water or in wet conditions.
- Ensure the drone is within the maximum control range of 60 meters to maintain connection with the remote control.
- Supervise children during drone operation.
Maintenance
- Cleaning: Wipe the drone gently with a dry, soft cloth to remove dust and debris. Avoid using water or harsh chemicals.
- Propeller Check: Regularly inspect the propellers for any damage or cracks. Replace damaged propellers immediately using the provided spare propellers and screwdriver.
- Battery Care: Store batteries in a cool, dry place. Do not overcharge or over-discharge batteries.
- Storage: When not in use, store the drone and remote control in a safe place to prevent damage.
Troubleshooting
| Problem | Solution |
|---|---|
| Drone does not pair with remote. | Ensure both the drone and remote are powered on and placed on a flat surface. Turn off and restart both devices, then attempt pairing again. Make sure the drone's LED lights become solid after turning on the remote. |
| Short flight time. | Ensure batteries are fully charged before each flight. Flight time is approximately 7 minutes per battery. Use the second battery for extended play. |
| Drone drifts during flight. | Calibrate the drone using the calibration button on the remote control. Ensure the drone is placed on a flat, level surface before take-off. |
| Propeller stops or is damaged. | Check for any obstructions around the propellers. If a propeller is damaged, replace it with a spare propeller using the provided screwdriver. |
Specifications
- Brand: HASAKEE
- Model Name: Q9S
- Color: Pink (variant shown)
- Material: Plastic (ABS)
- Battery Capacity: 500 Milliamp Hours (per battery)
- Flight Time: Approximately 7 Minutes per battery
- Charging Time: Approximately 55 Minutes
- Max Control Range: ≤ 60 Meters
- Remote Control Battery: 3 x AAA Batteries (Not Included)
- Special Features: Bright LEDs, Multiple Glow Modes, 360 Degree Flips, Auto Rotation, High/Medium/Low Speeds, Four Protective Guards, Altitude Hold, Headless Mode.
- Product Dimensions: 1"L x 1"W x 1"H (Note: This dimension appears to be a generic placeholder; actual drone size is larger.)
- Item Weight: 0.035 ounces (Note: This weight appears to be a generic placeholder or for a small component; actual drone weight is higher.)
Warranty and Support
For warranty information, technical support, or any inquiries regarding your HASAKEE Q9s Drone, please contact HASAKEE customer service directly. Refer to the contact details provided on the product packaging or the official HASAKEE website.
Ask a question about this manual
Ask about setup, troubleshooting, compatibility, parts, safety, or missing instructions. Manuals+ will review the question and use this page’s manual context to help answer it.