1. Product Overview
The Maclean MC-474 is a secure tablet holder designed for wall mounting or attachment to a VESA 75x75 compatible monitor arm. It features a locking mechanism to protect your tablet from theft and vandalism, making it suitable for public areas, conference rooms, and interactive information environments. This mount is compatible with tablets ranging from 9.7 to 11 inches.
Key Features:
- Anti-theft key lock design.
- Non-slip pads inside the case to prevent scratches.
- Compatible with 9.7"-11" tablets (e.g., iPad, iPad Air, iPad Pro, Samsung Galaxy Tab A/A7/S6 Lite).
- Adaptable for wall mounting or VESA 75x75 compatible mounts.
- Covered home button for public use.

Image 1.1: The Maclean MC-474 Tablet Advertising Wall Mount in a typical installation scenario, showcasing its application in a display setting.
2. What's in the Box
Please verify that all components are present before beginning installation.
- Tablet Holder (Werbetablettenhalter)
- Mounting Accessories (Montagezubehör)
- Assembly Instructions (Montageanleitung)
3. Safety Information
Read all instructions carefully before installation and use. Failure to follow these instructions may result in product damage, property damage, or personal injury.
- Ensure the mounting surface can support the weight of the mount and the tablet.
- Use appropriate tools and hardware for installation.
- Keep small parts away from children.
- Do not overtighten screws during assembly.
- Regularly check the mount for stability and security.
4. Setup and Installation
The MC-474 mount offers two primary installation methods: direct wall mounting or attachment to a VESA 75x75 compatible arm.
4.1. Wall Mounting
- Select Location: Choose a suitable wall location, ensuring it is structurally sound and free from electrical wires or plumbing.
- Mark Drilling Points: Hold the mount against the wall at the desired height and use a pencil to mark the drilling points through the designated holes on the back of the mount.
- Drill Holes: Drill pilot holes using an appropriate drill bit for your wall type (e.g., concrete, drywall). Insert wall anchors if necessary.
- Secure Mount: Align the mount with the drilled holes and secure it to the wall using the provided screws. Ensure it is firmly attached.

Image 4.1: Rear view of the tablet mount, highlighting the wall mounting points and VESA attachment area.
4.2. VESA 75x75 Mounting
- Prepare VESA Arm: Ensure your monitor arm or stand has a VESA 75x75 mounting plate.
- Attach Mount: Align the VESA holes on the back of the tablet mount with the VESA plate on your monitor arm.
- Secure: Use the appropriate screws (typically M4 screws, often supplied with the VESA arm or the mount) to firmly attach the tablet mount to the VESA arm.
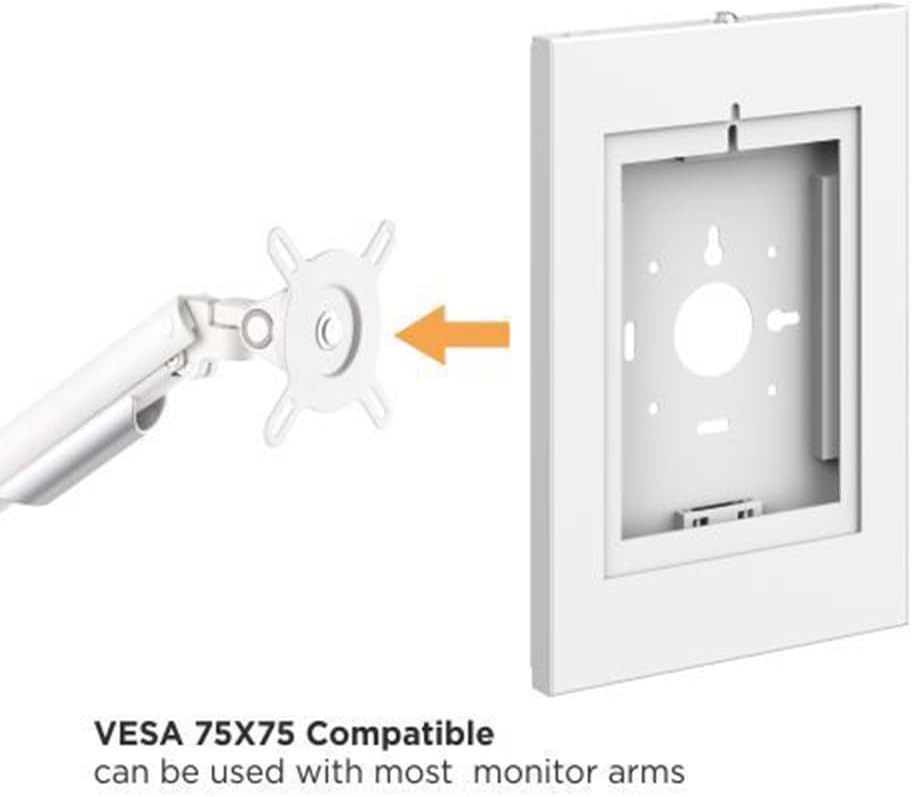
Image 4.2: Illustration of the tablet mount's compatibility with a VESA 75x75 monitor arm, demonstrating how it attaches.
4.3. Inserting the Tablet
- Unlock: Use the provided key to unlock the tablet holder. The front panel will open.
- Position Tablet: Carefully place your 9.7"-11" tablet into the holder. Ensure it sits securely against the non-slip pads.
- Adjust: The internal brackets can be adjusted to fit various tablet sizes within the specified range. Ensure the tablet is centered and snug.
- Close and Lock: Close the front panel of the holder and use the key to lock it securely.

Image 4.3: Front view of the tablet holder, showing the internal structure and non-slip pads where the tablet is placed.

Image 4.4: Detail of the covered home button area, designed to prevent unauthorized access or accidental presses in public settings.

Image 4.5: Close-up of the anti-theft locking mechanism, demonstrating how the key secures the tablet within the mount.
5. Operating Instructions
Once installed and the tablet is secured, the mount requires minimal operation.
- Tablet Access: To access or remove the tablet, use the provided key to unlock the front panel.
- Display Orientation: The mount is designed for a fixed orientation. Ensure your tablet's display settings are adjusted accordingly (e.g., portrait or landscape mode).
- Cable Management: Utilize any available cable routing options on your VESA arm or behind the mount to keep cables tidy and secure.
6. Maintenance
Regular maintenance ensures the longevity and proper function of your tablet mount.
- Cleaning: Wipe the mount with a soft, damp cloth. Avoid abrasive cleaners or solvents that may damage the finish.
- Security Check: Periodically check all screws and mounting points to ensure they remain tight and secure.
- Lock Mechanism: Ensure the locking mechanism operates smoothly. If it becomes stiff, a small amount of graphite lubricant can be applied to the keyhole.
7. Troubleshooting
If you encounter issues with your Maclean MC-474 tablet mount, refer to the following common problems and solutions.
| Problem | Possible Cause | Solution |
|---|---|---|
| Tablet does not fit | Tablet size is outside the 9.7"-11" range. Internal brackets are not adjusted correctly. | Verify tablet dimensions. Adjust internal brackets to accommodate the tablet. |
| Mount feels unstable | Mounting screws are loose. Wall surface is not strong enough. | Tighten all mounting screws. Re-evaluate the mounting surface and use appropriate anchors if needed. |
| Lock mechanism is stiff | Dust or debris in the lock. Lack of lubrication. | Clean the keyhole. Apply a small amount of graphite lubricant. |
8. Specifications
| Feature | Detail |
|---|---|
| Model Number | MC-474 |
| Compatible Tablet Sizes | 9.7" - 11" screen diagonal |
| Compatible Devices | iPad, iPad Air, iPad Pro, Samsung Galaxy Tab A, Tab A7, Tab S6 Lite |
| Mounting Type | Wall Mount / VESA 75x75 |
| Material | Plastic |
| Color | White |
| Item Dimensions | 13.35 x 0.89 x 0.89 inches (approximate external dimensions) |
| Item Weight | 1.79 Kilograms |

Image 8.1: Technical drawing illustrating the dimensions of the tablet mount.
9. Warranty and Support
For warranty information or technical support, please refer to the documentation provided with your purchase or contact Maclean customer service directly. Keep your purchase receipt for warranty claims.


