1. Introduction
Thank you for choosing the EVVO D1 Slim Dishwasher. This manual provides essential information for the safe and efficient operation, installation, and maintenance of your appliance. Please read it thoroughly before first use and keep it for future reference.
2. Safety Information
Always follow basic safety precautions when using electrical appliances to reduce the risk of fire, electric shock, or injury.
- Ensure the dishwasher is properly grounded.
- Do not operate the dishwasher if it is damaged. Contact customer support.
- Keep children away from the dishwasher, especially when it is operating or when the door is open.
- Use only detergents and rinse aids specifically designed for automatic dishwashers.
- Never touch the heating element during or immediately after operation.
- Load sharp items (knives, forks) with the handles up to prevent injury.
- Do not overload the dishwasher.
- Disconnect the appliance from the power supply before cleaning or maintenance.
3. Product Overview
The EVVO D1 Slim Dishwasher is designed for efficiency and convenience in smaller spaces, offering a capacity for 9 place settings and a range of washing programs.

Figure 3.1: The EVVO D1 Slim dishwasher seamlessly integrated into a modern kitchen.

Figure 3.2: Close-up of the hidden control panel with LED display for intuitive program selection.
Key Features:
- 9 Place Settings: Compact design ideal for smaller households without compromising capacity.
- Slim 45 cm Width: Perfect for kitchens with limited space.
- 5 Wash Programs: Includes options for various cleaning needs, such as a 30-minute quick wash and a half-load function.
- Hidden Control Panel & LED Display: Provides a sleek aesthetic and easy program management.
- Adjustable Upper Basket: Accommodates different sizes of dishes and utensils.
- Temperature Control: Special function for optimized washing.
4. Setup and Installation
Proper installation is crucial for the performance and longevity of your dishwasher. It can be installed under a counter or as a freestanding unit.
4.1 Unpacking
Carefully remove all packaging materials. Inspect the dishwasher for any damage during transit. Report any damage to your retailer immediately.
4.2 Placement
Position the dishwasher on a level, stable surface. Ensure there is adequate space for the door to open fully and for water and electrical connections.
4.3 Water Connection
Connect the water inlet hose to a cold water supply. Ensure the drain hose (included) is properly connected to a drain pipe or sink trap, preventing kinks or blockages.
4.4 Electrical Connection
Connect the dishwasher to a grounded electrical outlet. The voltage requirement is 220V. Do not use extension cords or adapters.
5. Operating Instructions
Follow these steps for optimal washing results.
5.1 Loading the Dishwasher
Proper loading ensures effective cleaning and drying. Utilize the adjustable upper basket for taller items and the cutlery basket for silverware.

Figure 5.1: Open dishwasher showing the interior racks and adjustable upper basket.

Figure 5.2: Example of properly loaded dishes in the lower rack.
- Scrape off large food particles before loading.
- Place glasses, cups, and smaller items in the upper basket.
- Place plates, bowls, and larger items in the lower basket.
- Ensure items do not block the spray arms.
- Load cutlery into the cutlery basket with handles facing up for safety and better cleaning.
5.2 Adding Detergent, Rinse Aid, and Salt
- Detergent: Add the appropriate amount of dishwasher detergent to the dispenser.
- Rinse Aid: Fill the rinse aid dispenser to improve drying performance and prevent water spots. The LED display will indicate when refill is needed.
- Dishwasher Salt: If you live in an area with hard water, add dishwasher salt to the dedicated compartment to prevent limescale buildup. The LED display will indicate when refill is needed.
5.3 Program Selection
The dishwasher features 5 wash programs, controlled via the hidden panel and LED display.
- Close the dishwasher door.
- Press the power button to turn on the appliance.
- Use the program selection buttons (pulsadores) to choose your desired wash cycle. Available programs include:
- Quick Wash (30 minutes): For lightly soiled dishes that need a fast clean. Note: This program may use cooler water.
- Half Load: For smaller loads, optimizing water and energy consumption.
- Eco: Energy-efficient program for normal soiled dishes.
- Intensive: For heavily soiled pots and pans.
- Normal: Standard program for daily use.
- The LED display will show the selected program and remaining time.
- Press the Start button to begin the cycle.
6. Maintenance
Regular maintenance ensures optimal performance and extends the life of your dishwasher.
6.1 Cleaning the Filters
The filter system should be cleaned regularly to prevent food particles from recirculating and affecting wash performance.
- Turn off and unplug the dishwasher.
- Remove the lower basket.
- Twist and lift out the filter assembly.
- Rinse the filters under running water to remove any debris. Use a soft brush if necessary.
- Reassemble the filters and place them back into the dishwasher, ensuring they are securely locked.
6.2 Cleaning the Spray Arms
Check the spray arm nozzles for blockages. If clogged, remove the spray arms and clear the holes with a thin object.
6.3 Cleaning the Interior and Exterior
- Wipe the interior with a damp cloth after each cycle to prevent odors.
- Clean the exterior with a soft, damp cloth and mild detergent. Do not use abrasive cleaners.
7. Troubleshooting
Before contacting customer service, refer to the following common issues and solutions.
| Problem | Possible Cause | Solution |
|---|---|---|
| Dishwasher does not start | Power supply issue, door not closed properly, program not selected. | Check power connection, ensure door is latched, select a program and press Start. |
| Dishes are not clean | Improper loading, clogged spray arms, insufficient detergent, dirty filters, wrong program. | Reload dishes, clean spray arms and filters, add more detergent, select a more intensive program. |
| Water remains in the tub | Clogged drain hose or filter, drain pump malfunction. | Clean filters, check drain hose for kinks or blockages. |
| Water spots or streaks on dishes | Lack of rinse aid, hard water. | Refill rinse aid dispenser, consider using dishwasher salt. |
| Quick wash program uses cold water | This program is designed for quick washes of lightly soiled items and may not heat water to the same degree as other cycles. | For hotter washes, select a standard or intensive program. Ensure hot water supply is connected and functioning correctly for other cycles. |
8. Specifications
Detailed technical specifications for the EVVO D1 Slim Dishwasher.
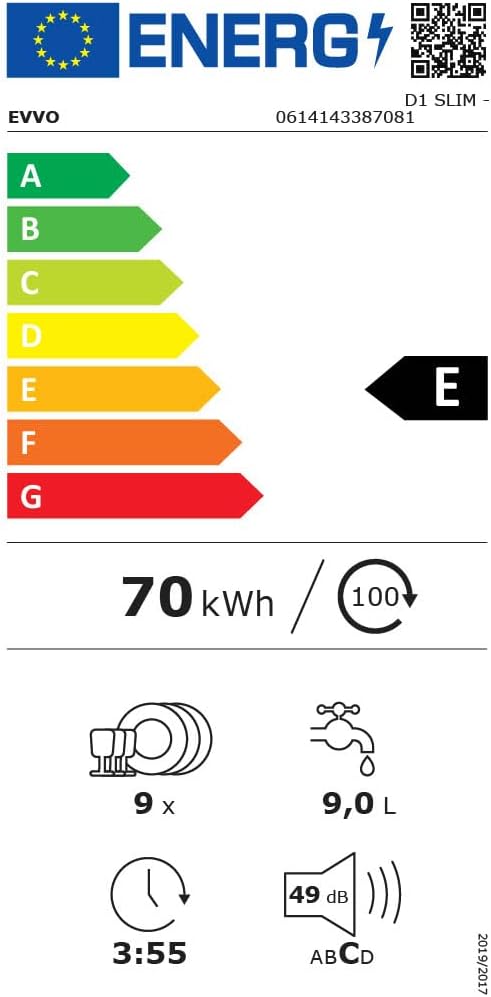
Figure 8.1: Dimensional diagram of the EVVO D1 Slim dishwasher.

Figure 8.2: Energy label indicating efficiency class E and consumption details. For more details, visit EPREL Database.
| Parameter | Value |
|---|---|
| Model Number | D1 Slim (V0274) |
| Dimensions (H x W x D) | 85 x 45 x 60 cm |
| Weight | 36.5 kg |
| Capacity | 9 Place Settings |
| Noise Level | 49 dB |
| Number of Programs | 5 |
| Voltage | 220 V |
| Energy Efficiency Class | E |
| Water Consumption (per cycle) | 9.0 L |
| Cycle Duration (Eco program) | 3:55 (h:min) |
| Installation Type | Under-counter or Freestanding |
| Material | Stainless steel, plastic, and other metals |
| Components Included | Cutlery basket, Drain Hose, User Manual |
9. Warranty and Support
9.1 Warranty Information
This EVVO D1 Slim Dishwasher comes with a 3-year warranty from the date of purchase. The warranty covers manufacturing defects and malfunctions under normal use. Please retain your proof of purchase for warranty claims.
9.2 Customer Support
For technical assistance, spare parts, or warranty claims, please contact EVVO customer support through their official website or the retailer where you purchased the appliance. Provide your model number (D1 Slim) and serial number (if applicable) for faster service.