1. Introduction
This manual provides detailed instructions for the installation, operation, and maintenance of the Epoch DELL PERC H755 TRI-Mode PCIe 4.0 16-Port 8GB NV Internal RAID Adapter. Please read this manual thoroughly before installation and use to ensure proper functionality and safety.
The Epoch DELL PERC H755 is a high-performance storage controller designed for server and desktop environments, offering advanced RAID capabilities and support for various storage interfaces.
2. Safety Information
Observe the following safety precautions to prevent damage to the adapter or injury to yourself:
- Always disconnect power from the system before installing or removing the adapter.
- Wear an anti-static wrist strap when handling the adapter to prevent electrostatic discharge (ESD) damage.
- Ensure proper ventilation around the system to prevent overheating.
- Do not expose the adapter to moisture or extreme temperatures.
- Refer to your system's documentation for specific safety guidelines related to component installation.
3. Package Contents
Verify that all items are present in the package:
- Epoch DELL PERC H755 RAID Adapter
- Low-profile bracket (if applicable, for smaller chassis)
- Documentation (this manual)

Figure 1: Front view of the Epoch DELL PERC H755 RAID Adapter, showing the heatsink and included full-height bracket. This image displays the primary components of the adapter, including the PCIe connector and various chips.
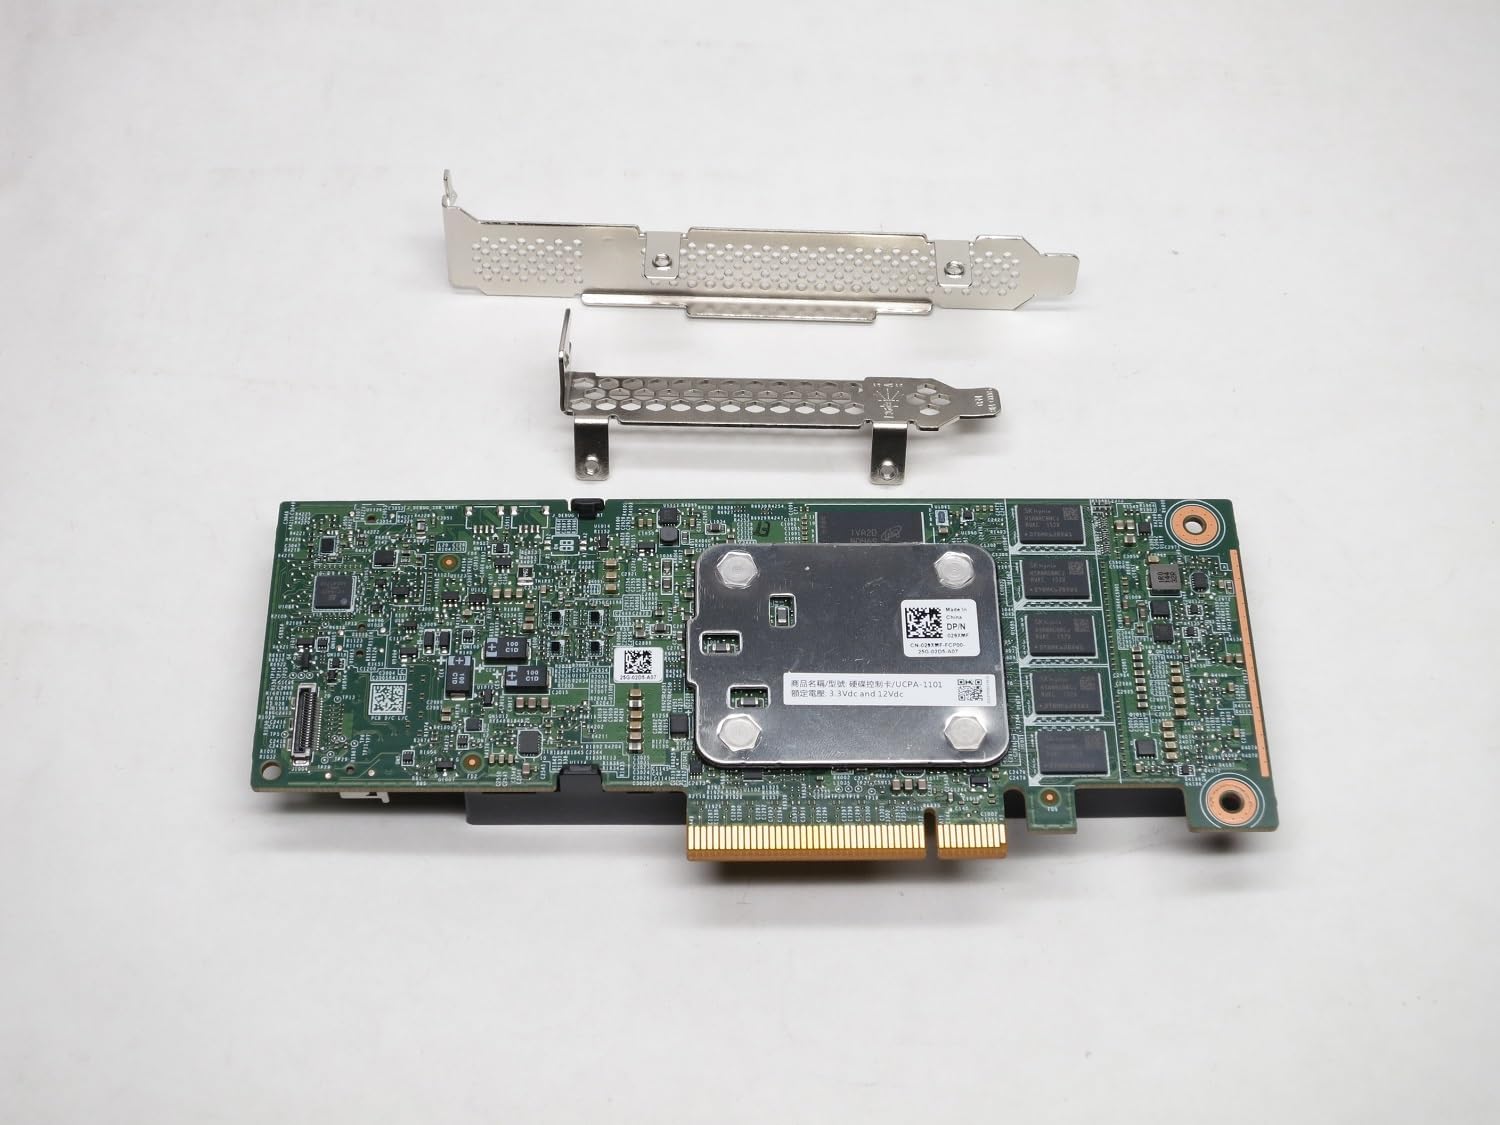
Figure 2: Rear view of the Epoch DELL PERC H755 RAID Adapter, illustrating the reverse side of the PCB with additional components and mounting points. The low-profile bracket is also visible above the card.
4. Setup and Installation
4.1 System Requirements
- Available PCIe 4.0 x8 or x16 slot.
- Compatible server or desktop system (e.g., Dell PowerEdge R250, R350, R750, R6525, R7525, R750xs, T150, T350, XR11, XR12).
- Operating system with appropriate driver support.
4.2 Hardware Installation
- Power Off System: Shut down your computer or server and disconnect the power cord.
- Open Chassis: Open the system chassis according to the manufacturer's instructions.
- Locate PCIe Slot: Identify an available PCIe 4.0 x8 or x16 slot.
- Remove Slot Cover: Remove the corresponding expansion slot cover from the chassis.
- Install Adapter: Carefully align the adapter with the PCIe slot and press firmly until it is securely seated. Ensure the bracket is properly aligned with the chassis opening.
- Secure Adapter: Secure the adapter with the chassis retention mechanism or screw.
- Connect Cables: Connect your SAS/SATA/NVMe drives to the adapter's ports using appropriate cables. Refer to your system's cabling diagram for optimal configuration.
- Close Chassis: Close the system chassis and reconnect the power cord.
4.3 Driver Installation
Upon system boot, the operating system may automatically detect and install generic drivers. For optimal performance and full functionality, it is recommended to download and install the latest drivers from the Dell support website for your specific server model and operating system.
5. Operating the RAID Adapter
5.1 BIOS/UEFI Configuration
Access your system's BIOS/UEFI settings during boot-up (typically by pressing F2, F10, or DEL). Navigate to the storage or RAID configuration section. Here you can:
- Verify the detection of the PERC H755 adapter.
- Configure boot options if you intend to boot from a RAID volume.
5.2 RAID Volume Creation
The PERC H755 supports various RAID levels. RAID volumes are typically created using the RAID controller's BIOS configuration utility (accessible during system boot, often via Ctrl+R or similar key combination) or through a software utility provided by Dell (e.g., Dell OpenManage Server Administrator).
Supported RAID Levels:
- RAID 0: Striping (performance, no redundancy)
- RAID 1: Mirroring (redundancy, 50% capacity)
- RAID 5: Striping with parity (good balance of performance and redundancy)
- RAID 6: Striping with dual parity (higher redundancy than RAID 5)
- RAID 10: Striping and mirroring (high performance and redundancy)
- RAID 50: Striping of RAID 5 arrays
- RAID 60: Striping of RAID 6 arrays
Consult the Dell PERC H755 documentation for detailed steps on creating and managing RAID volumes.
6. Maintenance
Regular maintenance ensures optimal performance and longevity of your RAID adapter:
- Firmware Updates: Periodically check the Dell support website for updated firmware for the PERC H755 adapter. Firmware updates can improve performance, stability, and add new features.
- Driver Updates: Keep your operating system drivers for the RAID adapter up to date.
- System Monitoring: Utilize system monitoring tools (e.g., Dell OpenManage) to monitor the health of your RAID volumes and connected drives.
- Physical Inspection: During system maintenance, visually inspect the adapter for any signs of damage or loose connections. Ensure proper airflow around the card.
7. Troubleshooting
This section provides solutions to common issues. For more complex problems, refer to Dell's official support resources.
7.1 Adapter Not Detected
- Check Seating: Ensure the adapter is fully seated in the PCIe slot.
- Power: Verify that the system has power and is properly connected.
- BIOS/UEFI: Check BIOS/UEFI settings to ensure the PCIe slot is enabled.
- Different Slot: Try installing the adapter in a different PCIe slot.
7.2 Drive Not Detected in RAID Configuration
- Cable Connections: Ensure all data cables from the drives to the adapter are securely connected.
- Drive Power: Verify that the drives are receiving power.
- Drive Health: Test the individual drives to ensure they are functional.
- Firmware/Drivers: Ensure the latest firmware for the adapter and drivers for the operating system are installed.
7.3 RAID Volume Degradation
- Identify Failed Drive: Use the RAID utility or system monitoring software to identify the failed drive.
- Replace Drive: Replace the failed drive with a new, compatible drive.
- Rebuild Volume: Initiate the RAID volume rebuild process through the RAID utility.
8. Specifications
| Feature | Description |
|---|---|
| Model | EPOCH 4CKPR DELL PERC H755 |
| Brand | Epoch |
| Interface | PCIe 4.0 |
| Supported Drives | SATA 6Gb/s, SAS 12Gb/s, PCIe 4.0 (NVMe) |
| Ports | 16-Port (2x8 internal) |
| Buffer Size | 8 GB |
| RAID Levels | RAID 0, RAID 1, RAID 5, RAID 6, RAID 10, RAID 50, RAID 60 |
| Compatible Devices | Desktop, Server |
| Compatible Systems | Dell PowerEdge R250, R350, R750, R6525, R7525, R750xs, T150, T350, XR11, XR12 |
| UPC | 810103376243 |
9. Warranty and Support
For warranty information and technical support, please refer to the official Epoch or Dell documentation that accompanied your product, or visit the respective manufacturer's support websites. Keep your purchase receipt for warranty claims.
For Dell-specific support and resources related to the PERC H755, please visit Dell Support.