
1. Setup and Assembly
This section provides detailed instructions for assembling your Goimu XB03 Folding Exercise Bike. Please follow these steps carefully to ensure proper setup and safe operation.
1.1 Unpacking and Parts Identification
Carefully remove all components from the packaging. Verify that all parts listed in the manual are present. Tools required for assembly are included in the package.
1.2 Assembly Steps
The Goimu XB03 Folding Exercise Bike is designed for quick assembly, with 70% of the product pre-installed. The following steps will guide you through the remaining assembly process.
Video 1: Installation Guide for Niceday Recumbent Exercise Bike RC88. This video demonstrates the step-by-step assembly process for a similar recumbent exercise bike, providing a visual aid for your Goimu XB03 setup.
- Step 1: Remove Protective Bracket and Bolts. Locate the protective bracket and bolts on the main frame. Use the provided tools to remove them. These parts are no longer needed for the final assembly.
- Step 2: Install Front and Rear Foot Tubes. Carefully lift the main unit and slide the front foot tube (#7) into its designated slot at the front. Secure it using the M10 acorn nuts and arc washers. Repeat this process for the rear foot tube (#5) at the back of the unit. Ensure all connections are tight.
- Step 3: Install the Seat Set. Remove any pre-assembled screws from the seat support frame. Attach the seat backrest frame to the main seat support. Then, attach the seat cushion to the seat support frame using the M6*13 screws. Finally, attach the assembled seat unit to the main frame using the M8*66 carriage bolts and M8 nylock nuts. Adjust the seat to your preferred position and secure it.
- Step 4: Install the Seat Back. Attach the mesh seat back to the seat backrest frame using the M6*45 bolts. Ensure it is securely fastened for comfort and support.
- Step 5: Install the Lever. Insert the seat adjustment lever into its slot on the side of the seat rail. Secure it with the M6*13 screws. Connect the induction wire from the lever to the main unit.
- Step 6: Install the Upright Tube. Connect the induction wires from the upright tube to the corresponding connectors on the main unit. Carefully insert the upright tube into the main frame. Secure it using the M8*17 screws. Attach the decorative covers (left and right) to conceal the connection points, securing them with M4*20 screws.
- Step 7: Install the Digital Monitor. Remove the pre-assembled screws from the back of the digital monitor. Connect the induction wires from the upright tube to the digital monitor. Attach the monitor to the upright tube using the M8*25 bolts. Install two AAA batteries into the digital monitor's battery compartment.
- Step 8: Install the Handlebar. Attach the handlebar to the top of the upright tube, securing it with the M8*25 bolts. Place the handlebar cover over the connection point.
- Step 9: Install the Pedals. Identify the left (L) and right (R) pedals. Attach the pedal straps to each pedal. Screw the left pedal counter-clockwise into the left crank arm and the right pedal clockwise into the right crank arm. Ensure they are tightened securely.

Figure 1: The Goimu XB03 Folding Exercise Bike components, illustrating the ease of assembly and the integrated transport wheels for convenient relocation.
2. Operating Instructions
This section details how to operate your Goimu XB03 Folding Exercise Bike, including adjusting settings and understanding the digital monitor.
2.1 Seat Adjustment
To adjust the seat position:
- Raise the lever located under the seat upward to unlock the seat.
- Slide the seat forward or backward to your desired position, ensuring your legs have a slight bend at the knee when fully extended on the pedals.
- Push the lever downward to fasten the seat securely. The seat will not move again after fixing.

Figure 2: The ergonomically designed seat and integrated heart rate tracking handles for comfortable and monitored workouts.
2.2 Resistance Adjustment
The Goimu XB03 features 8 levels of magnetic resistance. To adjust the resistance:
- Turn the tension control knob located on the main unit clockwise to increase resistance (higher intensity).
- Turn the tension control knob counter-clockwise to decrease resistance (lower intensity).
- Levels 1-3 are suitable for warm-up, 4-6 for running, and 7-8 for fat burning.

Figure 3: The magnetic resistance knob, offering 8 levels of intensity for diverse workout needs.
2.3 Digital Monitor Functions
The LCD monitor displays various workout data. It is battery-powered (AAA batteries required).
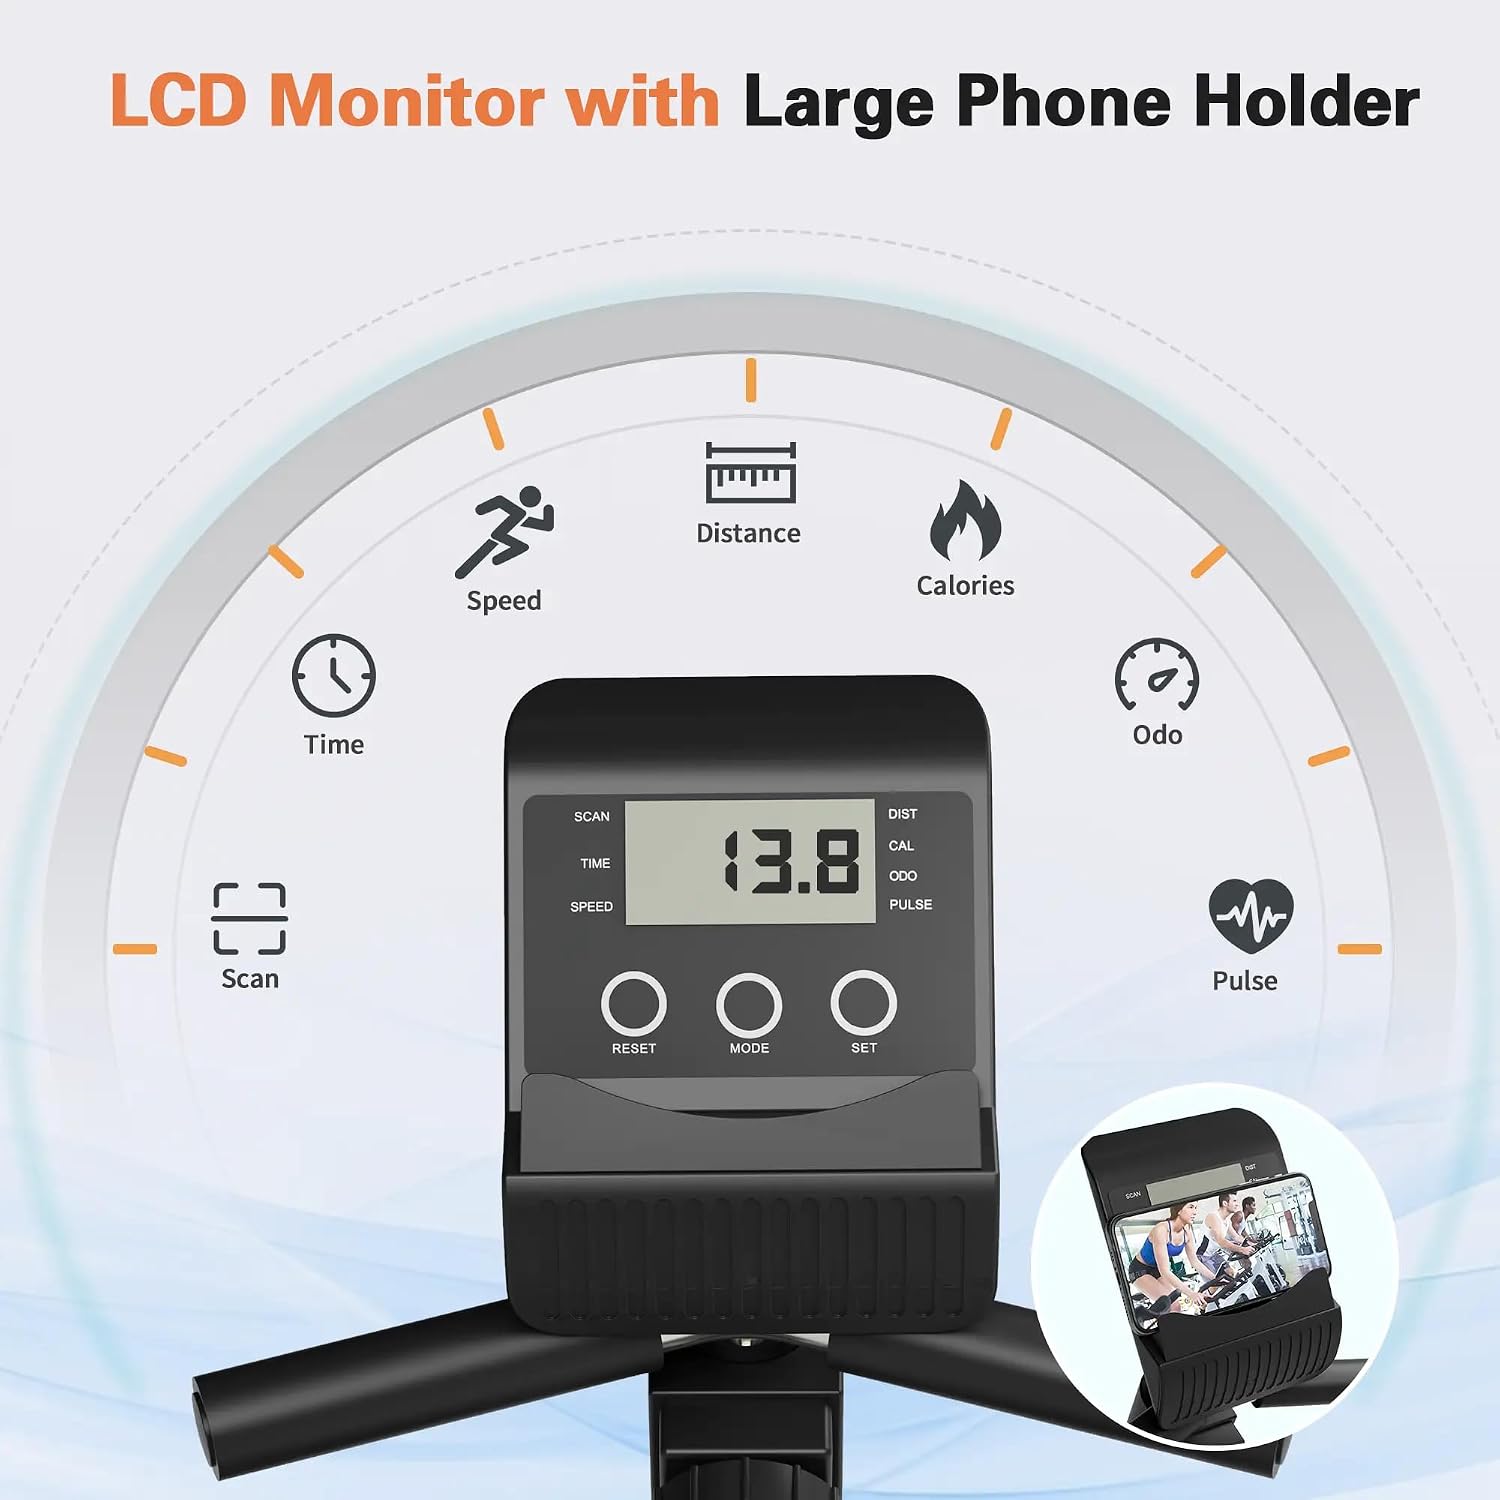
Figure 4: The LCD monitor with a phone holder, providing real-time workout data.
- MODE Button: Press to cycle through display modes: SCAN, TIME, SPEED, DISTANCE, CALORIES, ODOMETER, PULSE.
- RESET Button: Press to clear current workout data (Time, Speed, Distance, Calories).
- SET Button: Used to set target values for Time, Distance, or Calories (refer to the monitor's specific instructions for detailed setting procedures).
- SCAN Mode: Automatically cycles through all functions every few seconds.
- PULSE: To measure your heart rate, grip the heart rate sensors on the handles firmly. Your pulse will be displayed on the monitor after a few seconds.
Video 2: MERACH S08 Recumbent Bike Overview. This video demonstrates the operational features of a similar recumbent bike, including seat adjustment, tension control, and monitor functions, which are applicable to the Goimu XB03.
3. Maintenance
Regular maintenance ensures the longevity and optimal performance of your Goimu XB03 Folding Exercise Bike.
3.1 Cleaning
- Wipe down the bike after each use with a damp cloth to remove sweat and dust.
- Avoid using abrasive cleaners or solvents that could damage the finish or electronic components.
3.2 Inspection and Tightening
- Periodically check all bolts, nuts, and connections to ensure they are securely tightened. Loose components can affect performance and safety.
- Inspect pedals and straps for wear and tear. Replace if necessary.
3.3 Storage
- Store the exercise bike in a cool, dry place away from direct sunlight and moisture.
- The bike features a folding design for compact storage. Refer to the assembly instructions for folding and unfolding.
4. Troubleshooting
If you encounter any issues with your Goimu XB03 Folding Exercise Bike, refer to the following common problems and solutions.
| Problem | Possible Cause | Solution |
|---|---|---|
| Monitor not displaying data. | Loose wire connection, dead batteries. | Check all wire connections to the monitor. Replace batteries in the monitor. |
| Unusual noise during operation. | Loose components, friction. | Inspect and tighten all bolts and nuts. Ensure no parts are rubbing against each other. |
| Resistance not changing. | Tension cable issue, magnetic brake misalignment. | Check the tension cable connection to the resistance knob and the magnetic brake system. If the issue persists, contact customer support. |
| Seat is wobbly. | Loose seat adjustment lever or mounting bolts. | Ensure the seat adjustment lever is fully engaged. Tighten the seat mounting bolts. |
5. Specifications
Key technical specifications for the Goimu XB03 Folding Exercise Bike:
- Product Dimensions: 87.88 x 49.02 x 114.05 cm (34.6 x 19.3 x 44.9 inches)
- Item Weight: 30.91 kg (68.15 Pounds)
- Item Model Number: XB03
- Color: Black
- Display Type: LCD
- Drive System: Belt
- Material: Alloy Steel
- Maximum Height Recommendation: 76.77 Inches
- Monitor Metrics: Calories Burned, Distance, Heart Rate, Speed, Time
- Power Source: Manpower Driver (Battery for monitor)
- Special Features: Adjustable Footstrap, Adjustable Resistance Level, Adjustable Seat, Calories Monitor, Grip Pulse Sensor
- Maximum Weight Capacity: 300 Pounds
- Resistance Mechanism: Magnetic
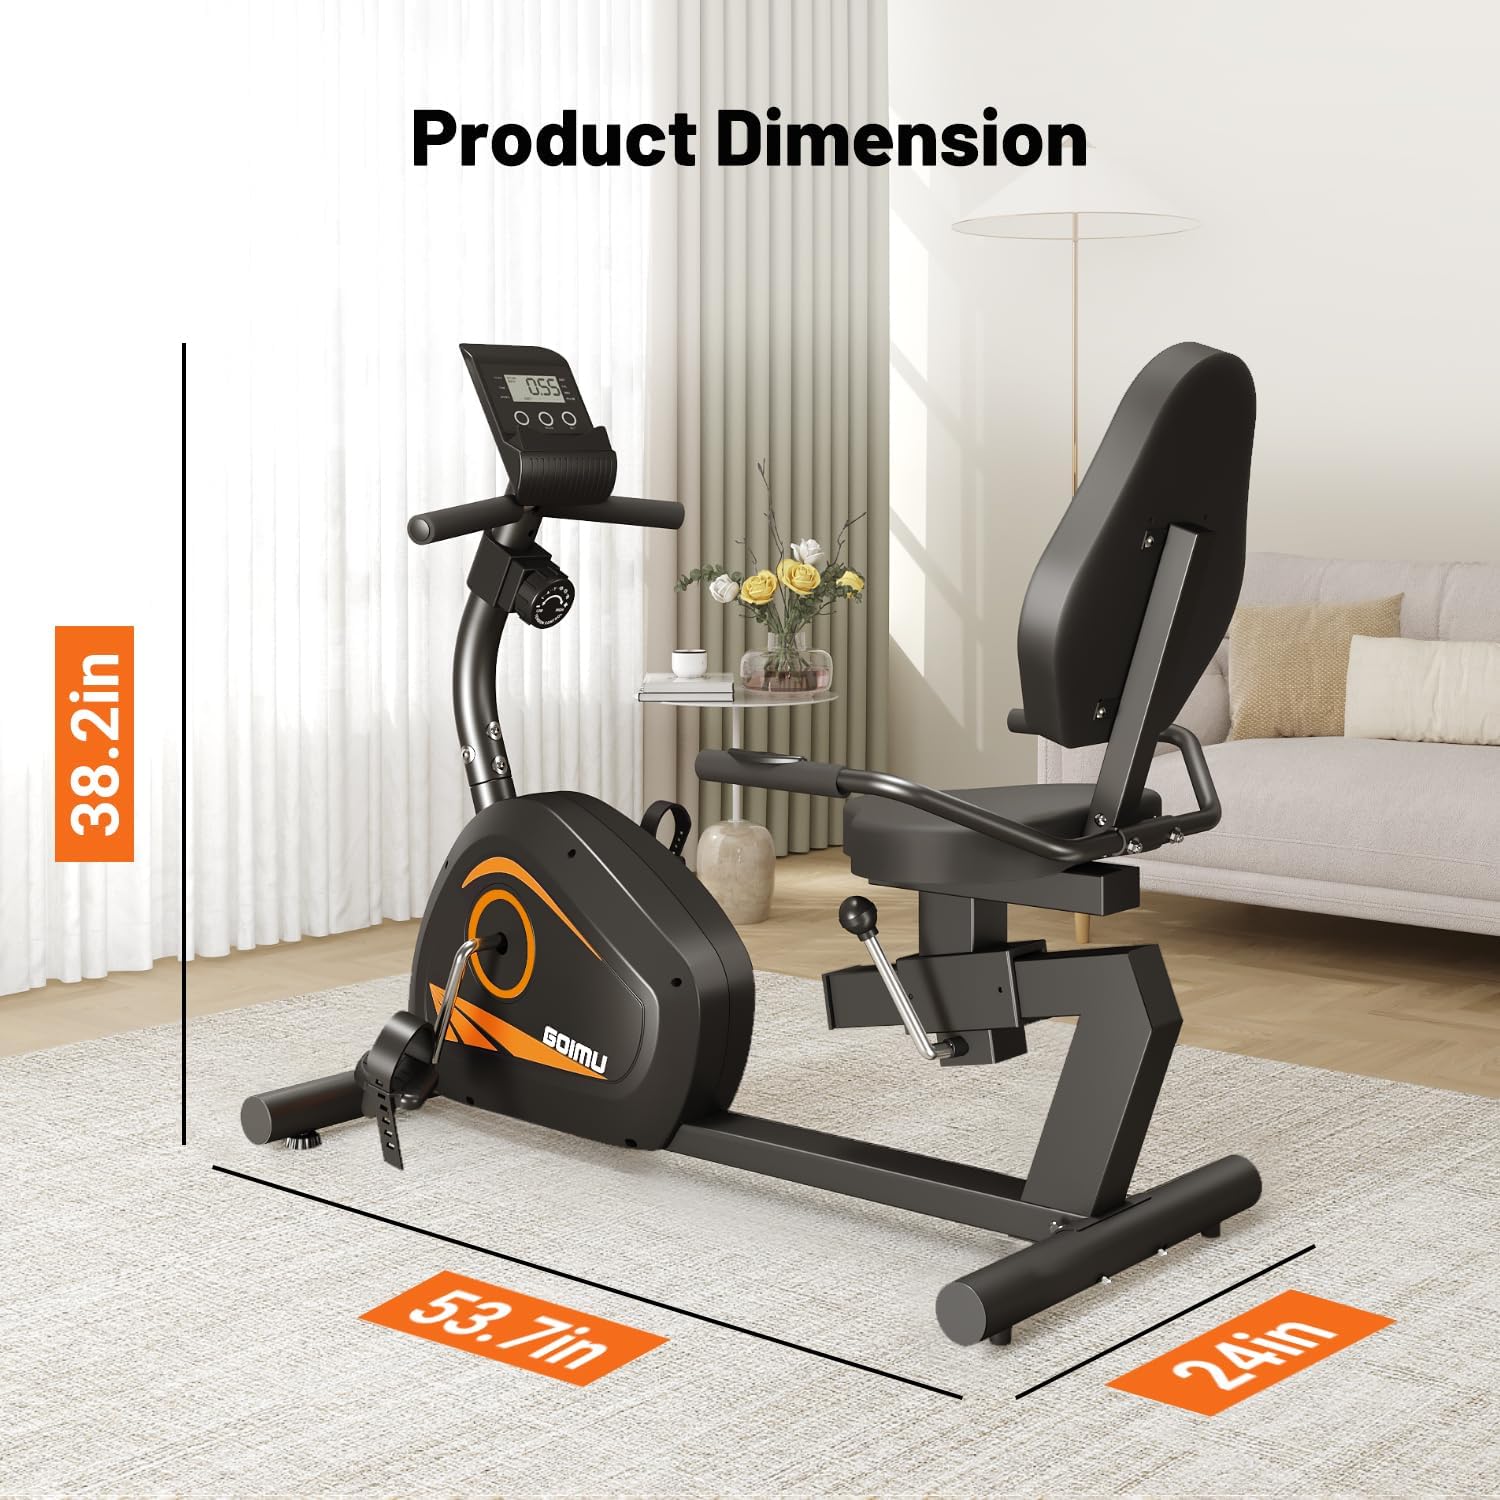
Figure 5: Visual representation of the Goimu XB03 exercise bike's dimensions.
6. Warranty and Support
Your Goimu XB03 Folding Exercise Bike comes with a commitment to quality and customer satisfaction.
6.1 Warranty Information
The product includes a 12-month warranty from the date of purchase. This warranty covers manufacturing defects and ensures quality. Please retain your proof of purchase for warranty claims.
6.2 Customer Support
For any questions, concerns, or assistance with assembly, operation, or troubleshooting, please contact our customer support team. Your inquiry will be resolved within 18 hours. Additionally, online instructional videos are available to provide further guidance.