1. Introduction
This manual provides detailed instructions for the installation, operation, and maintenance of your BXLIYER Android 12 2 Din Autoradio. Please read this manual thoroughly before using the product to ensure proper function and safety.
2. Product Features
- Operating System: Android 12
- Processor: Rockchip AC8257 A53 Octa-Core 64-bit, 2.0 GHz
- Memory: 4GB RAM + 64GB ROM
- Display: 9-inch IPS Digital Touchscreen, 1024x600 resolution (supports 1280x600 HD)
- Audio Output: 4 * 50W max, TDA7851 Amplifier IC
- Radio: AM/FM with RDS, TDA7786 Radio IC
- Connectivity: Built-in WiFi, supports 4G (external USB 4G modem required)
- Navigation: Built-in GPS, supports online and offline maps (3D maps, voice guidance)
- Smartphone Integration: Wireless CarPlay, Android Auto, MirrorLink (iOS/Android)
- Bluetooth: Bluetooth 5.0 for hands-free calling and music streaming
- DSP: Integrated Digital Sound Processor for enhanced audio
- Video Support: 4K (3840x2160 pixels) and 1080P HD video playback
- Storage Expansion: USB and MicroSD (up to 500GB)
- Camera Input: Supports AHD cameras, includes a 4LED rear camera
- Steering Wheel Control: Supports connection to original car steering wheel controls
- Fast Boot: System access in less than 2 seconds
- OBD2: Compatible with most OBD2 scanners (Torque app)
- Split Screen: Allows running two applications simultaneously
- Multicolor Illumination: Customizable RGB button lighting
3. Applicable Car Models
This autoradio is designed for a perfect fit with the following Ford models:
- Ford Focus (2005-2007)
- Ford Fiesta (2005-2008)
- Ford Kuga (2008-2011)
- Ford Mondeo (2003-2007)
- Ford S-Max (2007-2009)
- Ford C-Max (2007-2009)
- Ford Galaxy (2005-2007)
- Ford Fusion (2006-2011)
- Ford Connect (2005-2007)
If you are unsure about compatibility with your specific vehicle, please contact customer support with photos of your car's dashboard.
4. What's in the Box
Verify that all components are present upon unpacking:

Image showing the complete contents of the product box, including the main autoradio unit, power cables, RCA output cables, GPS antenna, USB cables, radio antenna, external microphone, and a 4LED rear camera.
- BXLIYER Autoradio Main Unit
- Power Cable
- RCA Output Socket A
- RCA Output Socket B
- GPS Antenna
- USB Cable (Double USB Cable included)
- Radio Antenna
- External Microphone
- 4LED Rear Camera
- Frame Kit
- Installation Brackets and Screws
- User Manual
5. Installation Tips
Proper installation is crucial for optimal performance. Refer to the wiring diagram and ensure all connections are secure.
Detailed wiring diagram illustrating connections for the main power socket, RCA outputs, USB cables, WiFi antenna, GPS antenna, camera input, and external microphone.
5.1 Wiring Connections
- Power Socket: Connect the main power harness to your vehicle's wiring. Ensure correct connections for B+(12V), ACC, ILL, REVERSE, RL+, RR+, FL+, FR+, GND, KEY1, KEY2.
- Antennas: Connect the WiFi antenna, GPS antenna, and Radio antenna to their respective ports.
- USB Cables: Connect the provided USB cables for data transfer and external device connectivity.
- RCA Outputs: Use RCA Output Socket A for AUX-IN L/R and RCA Output Socket B for SUB-WOOFER and AUX VIDEO IN 1.
- Camera Input: Connect the rear camera to the CAMERA input. The unit will automatically switch to the rear camera view when reverse gear is engaged.
- Microphone: Connect the external microphone for improved call quality.
5.2 Pre-Installation Check
Before final installation, perform a test connection to ensure the unit powers on and basic functions operate correctly.
6. Setup
6.1 Initial Power On
After installation, turn on your vehicle's ignition. The autoradio should power on automatically. The fast boot feature allows access to the system in less than 2 seconds.
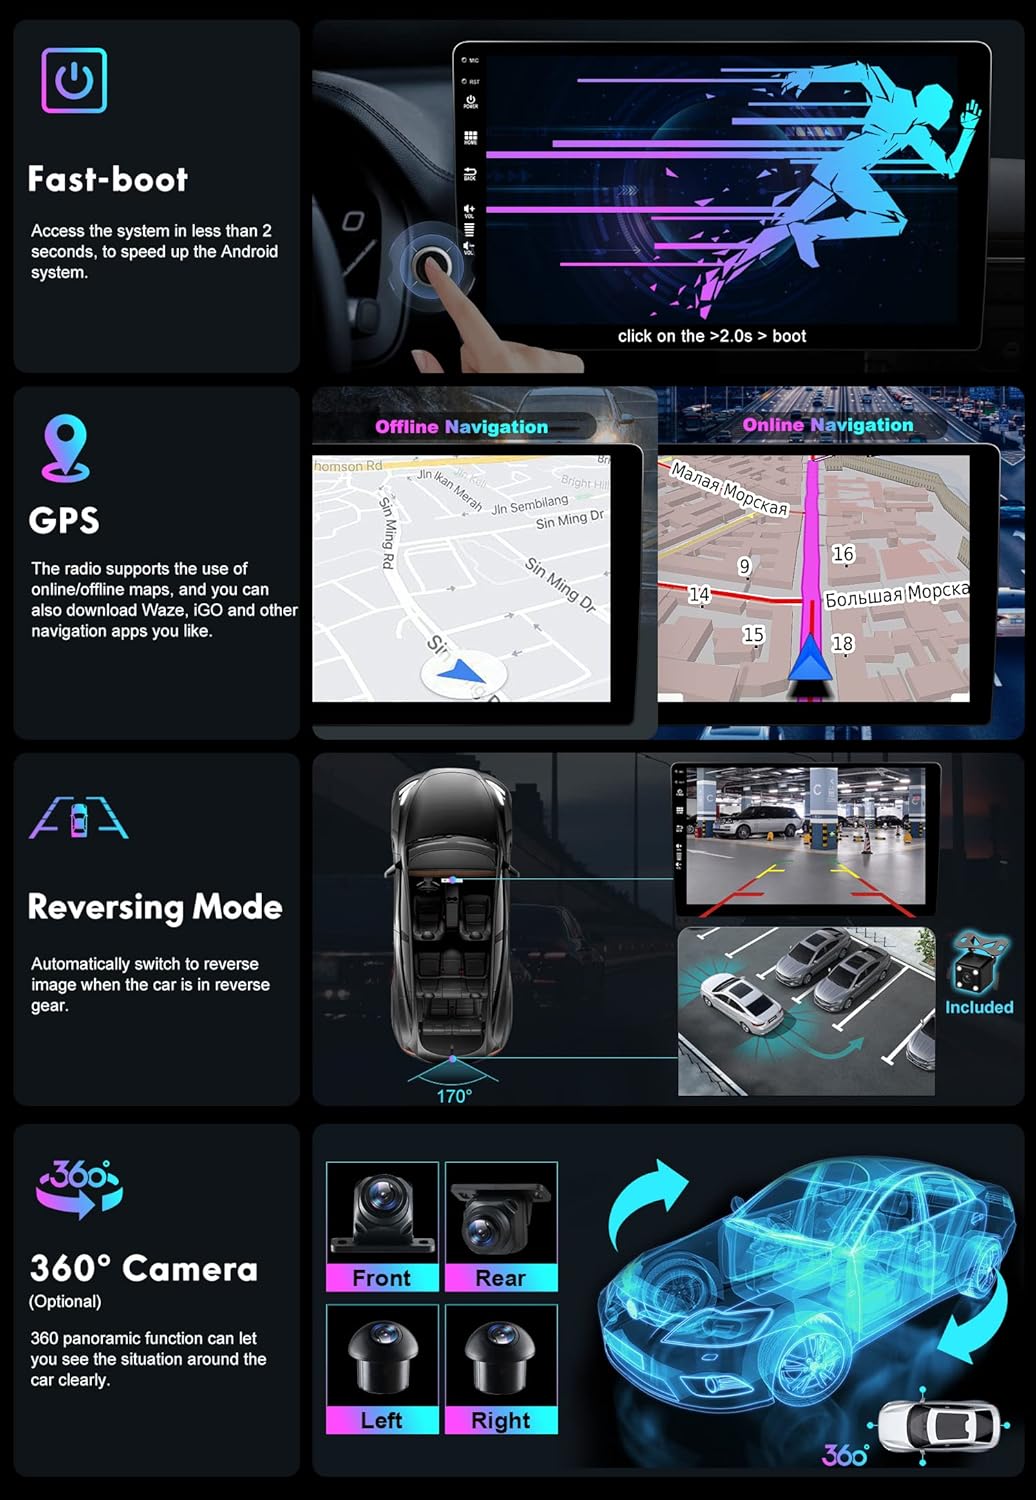
Illustration of the fast boot process, highlighting the rapid startup time of the Android system.
6.2 Language and Time Settings
Navigate to Settings > System > Languages & input to select your preferred language. Set the correct time zone and date under Settings > System > Date & time.
6.3 Wi-Fi Connection
Go to Settings > Network & internet > Wi-Fi. Turn on Wi-Fi, select your network, and enter the password to connect to the internet.

Visual representation of the 4G and Wi-Fi dual-band support, indicating seamless internet connectivity.
6.4 Steering Wheel Control Configuration
Access Settings > Car settings > Steering wheel learning. Follow the on-screen instructions to map your vehicle's steering wheel buttons to the autoradio functions.
Diagram showing how the autoradio supports connection to the original car steering wheel controls for convenient operation.
7. Operating Instructions
7.1 Navigation (GPS)
The unit supports both online and offline navigation applications. Pre-installed maps are available, and you can download additional apps like Waze or iGO from the Google Play Store. To use offline maps, download the map data when connected to Wi-Fi.
Comparison of offline and online navigation interfaces, demonstrating the unit's GPS capabilities.
7.2 CarPlay / Android Auto
Connect your smartphone wirelessly or via USB cable to access CarPlay (for iOS) or Android Auto (for Android). This allows you to use phone functions like navigation, music, and calls directly on the autoradio screen.

Visual demonstration of CarPlay and Android Auto interfaces, illustrating wireless and wired connection options.
7.3 Bluetooth 5.0
Pair your phone via Bluetooth for hands-free calling and audio streaming. Go to Settings > Connected devices > Pair new device. Select your phone from the list and confirm the pairing code.
Graphic illustrating Bluetooth 5.0 technology, showing connections for phone calls, phone book access, and music playback.
7.4 MirrorLink
Mirror your smartphone screen (iOS or Android) onto the autoradio display via USB cable or Wi-Fi connection. This allows you to view and control your phone's content on the larger screen.
Example of MirrorLink in action, showing a smartphone screen duplicated on the autoradio display.
7.5 Split Screen
Utilize the split-screen feature to run two applications simultaneously, such as navigation and music playback. Drag an app to one side of the screen to activate split-screen mode.
Illustration of the split-screen function, demonstrating how two applications can be viewed and operated concurrently.
7.6 Reversing Mode and 360° Camera
When reverse gear is engaged, the unit automatically displays the rear camera feed. The optional 360° panoramic camera system (requires separate purchase of 4 AHD cameras) provides a comprehensive view around your vehicle for easier parking and maneuvering.
Visuals depicting the automatic reversing camera display and the multi-angle views provided by the optional 360° camera system (front, rear, left, right).
7.7 DAB+ (Optional)
For Digital Audio Broadcasting (DAB+) functionality, an external DAB+ tuner (model B083Q7YG4F) is required and sold separately. Once connected, you can enjoy high-quality digital radio broadcasts.
Screenshot of the DAB+ radio interface, displaying available digital radio stations and signal quality.
7.8 Multicolor Illumination
Customize the color of the physical buttons on the unit. Navigate to Settings > Car settings > Button light to choose from a range of RGB colors.
Display of the RGB color selection interface for customizing the button backlighting.
8. Maintenance
- Cleaning: Use a soft, dry cloth to clean the screen and unit. Avoid abrasive cleaners or solvents.
- Software Updates: Periodically check for system updates via Wi-Fi in the settings menu to ensure optimal performance and access to new features.
- Data Backup: Regularly back up important data stored on the unit to an external USB drive.
9. Troubleshooting
| Problem | Possible Cause | Solution |
|---|---|---|
| Unit does not power on | Incorrect wiring; Blown fuse; Vehicle battery issue | Check power connections (B+, ACC, GND). Inspect vehicle fuses. Verify car battery voltage. |
| No sound | Volume too low; Mute activated; Speaker wiring issue | Increase volume. Check if mute is active. Verify speaker connections. |
| GPS signal lost or inaccurate | GPS antenna not properly connected or obstructed | Ensure GPS antenna is securely connected and placed in an unobstructed location (e.g., dashboard). |
| Bluetooth connection issues | Phone not discoverable; Incorrect pairing; Interference | Ensure phone's Bluetooth is on and discoverable. Delete previous pairings and re-pair. Move away from other wireless devices. |
| Rear camera not displaying | Camera wiring incorrect; Reverse signal not detected | Check camera video input and power connections. Ensure the REVERSE wire is correctly connected to the vehicle's reverse light signal. |
| Touchscreen unresponsive | System freeze; Software glitch | Perform a soft reset (refer to manual for specific reset button location, usually a small pinhole). If issue persists, contact support. |
10. Specifications
| Feature | Specification |
|---|---|
| Model Number | BXLIYER-E900-J |
| Operating System | Android 12 |
| CPU | Rockchip AC8257 A53 Octa-Core 64-bit, 2.0 GHz |
| RAM | 4 GB DDR3 |
| ROM | 64 GB |
| Screen Size | 9 Inches |
| Screen Resolution | 1024x600 (supports 1280x600 HD) |
| Audio Output Power | 4 * 50W max |
| Radio IC | TDA7786 |
| Amplifier IC | TDA7851 |
| Bluetooth Version | 5.0 |
| Wi-Fi | Built-in, supports 2.4GHz and 5GHz bands |
| 4G Support | Requires external USB 4G modem |
| Video Playback | 4K (3840x2160), 1080P HD |
| Storage Capacity (MicroSD/USB) | Up to 500 GB |
| Item Weight | 2.3 Kilograms |
| Human Interface Input | Microphone |
| Batteries Included | No |
11. Warranty and Support
11.1 Warranty Information
This product comes with a 2-year warranty from the date of purchase. The warranty covers manufacturing defects and malfunctions under normal use. It does not cover damage caused by improper installation, misuse, accidents, or unauthorized modifications.
11.2 Customer Support
For technical assistance, troubleshooting, or warranty claims, please contact BXLIYER customer support at joyx_techsupport@163.com. Please provide your model number (BXLIYER-E900-J) and a detailed description of the issue when contacting support.