1. Overview
This manual provides comprehensive instructions for the installation, operation, and maintenance of the HHXXOVA GCS906-2D Digital Readout (DRO) system. This high-precision instrument is designed to enhance the accuracy and efficiency of various metalworking machines, including lathes, milling machines, and grinders, by providing precise position detection.
The GCS906-2D features an intuitive LCD display and a robust design, ensuring reliable performance in demanding industrial environments. It is specifically configured for 2-axis applications.
2. Product Features
- High Precision Resolution: Supports customizable precision resolutions including 0.5µm, 1µm, 2µm, 5µm, and 10µm. Other resolutions like 0.1µm may be available upon request.
- Clear LCD Display: Equipped with an easy-to-read LCD screen for clear recognition of readings and functions.
- Enhanced Signal Protection: DRO signal lines are protected by multi-layer isolating wire and a metal softshell, ensuring excellent anti-interference capabilities for both power supply and signal.
- Stable Performance: The display screen operates with an independent power supply, contributing to high stability during operation.
- Durable Construction: Features an aluminum alloy spray plastic appearance, providing dustproof, wear-resistant, and good shielding properties. The keyboard is designed for durability.
- Versatile Application: Ideal for a wide range of metalworking machinery, including lathes, cylindrical grinders, milling machines, surface grinders, and boring mills.
- Improved Efficiency: Designed to enable operators to work faster and with greater accuracy.
- Advanced Functions: Offers fast programming, full-featured capabilities, including X and Y axis display, and automatic tool compensation.
- High Speed Tracking: Capable of a travelling speed of up to 100m/min with a pulse signal period of 20µm.
3. Package Contents
Upon opening the package, verify that all components listed below are present and undamaged. If any items are missing or damaged, please contact customer support immediately.
- GCS906-2D Digital Readout (DRO) Unit
- Linear Scales (2 units, corresponding to your selected travel length)
- Mounting Brackets and Hardware for DRO and Linear Scales
- Power Cable
- User Manual (this document)

Figure 3.1: GCS906-2D Digital Readout System Kit Contents. This image displays the main DRO unit, two linear scales of varying lengths, various mounting brackets, screws, and a power cable, illustrating the complete package for the 2-axis system.
4. Setup & Installation
Proper installation is crucial for the accurate and reliable operation of your GCS906-2D DRO system. Follow these steps carefully.
4.1 Mounting the DRO Unit
- Select a suitable location on your machine that provides clear visibility of the display and easy access to the keypad. Ensure the location is free from excessive vibration, heat, or moisture.
- Use the provided mounting brackets and hardware to securely attach the DRO unit. Ensure it is firmly fixed to prevent movement during machine operation.

Figure 4.1: Front Panel of GCS906-2D DRO Unit. This image shows the front of the digital readout unit, highlighting its LCD display for numerical readings and the comprehensive keypad for various functions and data input.
4.2 Installing Linear Scales
- Mount the linear scales parallel to the machine's axes of motion (X and Y). Ensure the scales are rigidly fixed and aligned precisely to the travel path.
- Position the reading head of each linear scale to move smoothly along the scale without binding or excessive play. Maintain the specified gap between the reading head and the scale.
- Protect the scales from chips, coolant, and debris using appropriate covers or guards.
4.3 Connecting Components
- Connect the signal cables from the linear scales to the corresponding X and Y axis input ports on the rear of the GCS906-2D DRO unit. Ensure the connectors are fully seated and secured.
- Connect the provided power cable to the AC input port on the rear of the DRO unit.
- Plug the power cable into a suitable AC 80V ~ 260V, 50HZ ~ 60HZ power outlet.

Figure 4.2: Rear Panel of GCS906-2D DRO Unit. This image displays the back of the digital readout unit, clearly showing the input ports labeled X, Y, and Z for connecting linear scales, the main power switch, and the AC power input socket.
5. Operation
This section outlines the basic operational procedures for the GCS906-2D Digital Readout system.
5.1 Powering On/Off
To power on the unit, flip the power switch located on the rear panel to the 'ON' position. The LCD display will illuminate. To power off, flip the switch to the 'OFF' position.
5.2 Display Modes (ABS/INC)
The GCS906-2D supports both Absolute (ABS) and Incremental (INC) display modes. The current mode is indicated on the LCD screen.
- ABS (Absolute) Mode: Displays the position relative to a fixed datum point.
- INC (Incremental) Mode: Displays the position relative to a temporary zero point set by the user.
Use the dedicated button on the keypad (often labeled "ABS/INC" or similar) to toggle between these modes.
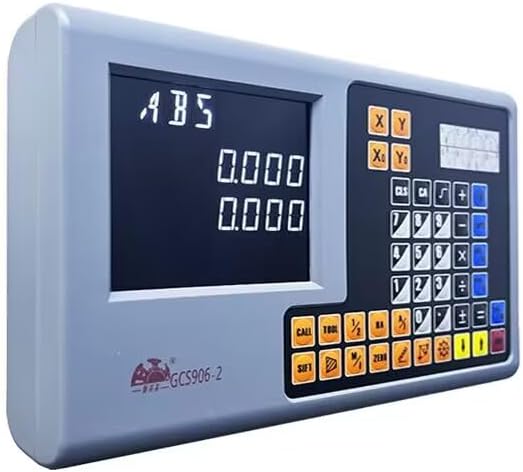
Figure 5.1: GCS906-2D Display in ABS Mode. This angled view of the digital readout unit clearly shows the LCD display indicating "ABS" (Absolute) mode, along with the numerical position readings and the full control keypad.
5.3 Zeroing Axes
To set the current position of an axis to zero:
- Move the machine axis to the desired zero position.
- Press the "ZERO" button on the keypad. The display for the active axis will reset to 0.000.
5.4 Axis Selection (X, Y)
The GCS906-2D displays readings for both X and Y axes simultaneously. Specific functions or settings may require selecting an individual axis using the "X/Y" or "AXIS" buttons on the keypad.
5.5 Basic Keypad Functions
The keypad provides access to various functions. Common buttons include:
- Numeric Keys (0-9): For entering values.
- +/-: For changing the sign of a value.
- CLS (Clear): Clears the current input or error.
- ENT (Enter): Confirms an input or selection.
- CALL: Accesses specific functions or memory.
- TOOL: Tool compensation functions.
- 1/2: Divides a value by two (e.g., for center finding).
- SIFT: Shift key for alternative functions.
Refer to the detailed function descriptions in the full product manual for advanced operations and specific function key usage.
6. Maintenance
Regular maintenance ensures the longevity and accuracy of your GCS906-2D DRO system.
- Cleaning: Keep the DRO unit and linear scales clean. Use a soft, dry cloth to wipe down the display and keypad. For scales, gently remove any dust, chips, or coolant residue. Avoid abrasive cleaners or solvents.
- Cable Inspection: Periodically inspect all signal and power cables for any signs of wear, damage, or loose connections. Ensure signal lines are protected and not subjected to sharp bends or pinching.
- Environmental Protection: While the unit is designed to be dustproof and wear-resistant, avoid exposing it to excessive moisture, extreme temperatures, or direct impact.
- Linear Scale Protection: Ensure that any protective covers or bellows for the linear scales are intact and functioning correctly to prevent contamination.
7. Troubleshooting
This section provides basic troubleshooting steps for common issues. For more complex problems, contact technical support.
| Problem | Possible Cause | Solution |
|---|---|---|
| DRO unit does not power on. | No power supply; loose power cable; faulty power outlet. | Check power cable connection; ensure power outlet is active; verify power switch is ON. |
| Axis display shows "---" or erratic readings. | Loose or disconnected linear scale cable; damaged linear scale; excessive contamination on scale. | Check linear scale cable connection to DRO unit; clean linear scale surface; inspect scale for damage. |
| Readings are inaccurate. | Improper linear scale installation/alignment; incorrect resolution setting. | Verify linear scale alignment and mounting rigidity; check DRO resolution settings (refer to advanced manual). |
8. Technical Specifications
| Product Name | GCS906-2D Digital Readout System |
| Display Material | LCD DRO |
| Dimensions (L x W x H) | 278mm x 175mm x 43mm (approx. 10.94" x 6.89" x 1.69") |
| Voltage Range | AC 80V ~ 260V / 50HZ ~ 60HZ |
| Power Consumption | 25VA |
| Coordinates | 2 Axis |
| Linear Scale Resolution | 0.5µm, 1µm, 2µm, 5µm, 10µm (customizable) |
| Accuracy | ±0.5µm, 1µm, 5µm, or 10µm / 0.0002" (at 20°C) |
| Pulse Signal Period | 20µm |
| Max. Travelling Speed | 100m/min |
| Compatible Linear Scale Travel Length | 100mm - 1000mm (actual scales sold separately or as part of a kit) |
| Place of Origin | China (Mainland) |
9. Warranty & Support
9.1 Product Warranty
The HHXXOVA GCS906-2D Digital Readout system comes with a 1-Year Warranty from the date of purchase. This warranty covers defects in materials and workmanship under normal use. It does not cover damage caused by misuse, accident, unauthorized modification, or improper installation.
Please retain your proof of purchase for warranty claims.
9.2 Customer Support
For technical assistance, troubleshooting beyond this manual, or warranty inquiries, please contact HHXXOVA customer support through the retailer where the product was purchased or visit the official HHXXOVA website for contact information.
When contacting support, please have your product model number (GCS906-2D) and purchase date ready.