1. Important Safeguards
Please read all instructions carefully before using this appliance. Keep this manual for future reference.
- Ensure the voltage matches your power supply.
- Do not immerse the appliance, power cord, or plug in water or other liquids.
- Unplug from the outlet when not in use and before cleaning. Allow to cool before putting on or taking off parts, and before cleaning the appliance.
- Do not operate any appliance with a damaged cord or plug, or after the appliance malfunctions or has been damaged in any manner.
- The use of accessory attachments not recommended by the appliance manufacturer may result in fire, electric shock, or injury to persons.
- Do not use outdoors.
- Do not let the cord hang over the edge of a table or counter, or touch hot surfaces.
- Do not place on or near a hot gas or electric burner, or in a heated oven.
- Always attach plug to appliance first, then plug cord into the wall outlet. To disconnect, turn any control to 'off', then remove plug from wall outlet.
- This appliance is for household use only.
- Exercise extreme caution when using hot steam.
2. Product Overview
Familiarize yourself with the components and controls of your Beiooya Espresso Machine.
2.1 Component Description
The following image illustrates the main parts of the espresso machine:

Image: Labeled diagram of the espresso machine components. Key parts include the Preheat Tray, Buttons, Water Tank Cover, Pressure Gauge, Steam Knob, Removable Water Tank, Detachable Steam Pipe, Detachable Drip Tray, Brewing Handle, and Coffee Spoon.
2.2 Digital Control Panel
The top panel features illuminated buttons for various functions and a durable stainless steel cup plate for pre-heating coffee cups.

Image: A detailed view of the machine's digital control panel, showing the power button, single cup function key (with hot water indicator), and double cup function key (with steam indicator). The stainless steel cup warming plate is also visible.
2.3 Swivel Control Knob
The swivel control knob allows selection between coffee brewing, steam, and hot water functions.

Image: The swivel control knob on the side of the machine, clearly marked for Coffee Function Gear, Steam Function Gear, and Hot Water Function Gear. This image also shows the machine actively brewing espresso into two cups.
3. Setup
3.1 Initial Cleaning
- Remove all packaging materials and labels.
- Wash the removable water tank, brewing handle, filter basket, and coffee spoon in warm soapy water. Rinse thoroughly and dry.
- Wipe the exterior of the machine with a damp cloth. Do not immerse the main unit in water.
3.2 Filling the Water Tank
- Remove the water tank from the back of the machine.
- Fill the tank with fresh, cold water up to the 'MAX' line. Do not overfill. The tank has a capacity of 37 oz (1100 mL).
- Place the water tank back onto the machine, ensuring it is seated correctly.
3.3 First Use / Priming the Machine
Before first use or if the machine has not been used for a long time, it needs to be primed to ensure water flows through the system.
- Ensure the water tank is filled.
- Place a cup under the brewing head and another under the steam wand.
- Plug the machine into a grounded power outlet. Press the power button. The single and double shot buttons will flash, indicating preheating.
- Once the buttons stop flashing and remain steadily lit, the machine is ready.
- Turn the swivel control knob to the 'Hot Water' position (usually indicated by a water droplet symbol). Allow water to flow into the cup for about 30 seconds.
- Turn the swivel control knob back to the 'Coffee' position.
- Press the single shot button to dispense water through the brewing head for about 30 seconds.
- The machine is now primed and ready for use.
4. Operating Instructions
4.1 Pre-heating Cups
For best results, pre-heat your espresso cups on the stainless steel cup plate located on top of the machine. This helps maintain the temperature of your espresso.
4.2 Making Espresso
- Ensure the machine is primed and preheated (buttons are steadily lit).
- Select the appropriate filter basket (single or double shot) and place it into the brewing handle.
- Using the coffee spoon, add finely ground espresso coffee to the filter basket. For a single shot, use one level spoon; for a double shot, use two level spoons.
- Use the tamper end of the coffee spoon to firmly press down the coffee grounds. Ensure the surface is level.
- Attach the brewing handle to the brewing head by aligning it with the 'lock' symbol and rotating it counter-clockwise until it is securely in place and facing forward.
- Place one or two pre-heated espresso cups under the brewing spouts.
- Press either the single shot or double shot button. The machine will begin brewing espresso.
- Once the desired amount of espresso is dispensed, the machine will stop automatically.
- Carefully remove the brewing handle (it may be hot) and discard the used coffee grounds. Rinse the filter basket and brewing handle.
4.3 Using the Steam Wand for Milk Frothing
The 360° swivel steam wand allows for easy frothing of milk for lattes and cappuccinos.

Image: The Beiooya espresso machine with its 360-degree swivel steam wand actively frothing milk in a pitcher, demonstrating its capability to create microfoam for various coffee beverages like lattes and cappuccinos.
- Ensure the machine is preheated.
- Fill a stainless steel frothing pitcher with cold milk (dairy or non-dairy) up to one-third full.
- Position the frothing pitcher under the steam wand. Submerge the tip of the steam wand just below the surface of the milk.
- Turn the swivel control knob to the 'Steam' position.
- Steam will begin to release. Move the pitcher slowly up and down, keeping the steam wand tip just below the surface to create foam.
- Once the milk has reached the desired temperature and consistency (approximately 140-150°F or 60-65°C), turn the swivel control knob back to the 'Coffee' position to stop the steam.
- Immediately wipe the steam wand with a damp cloth to prevent milk residue from drying.
4.4 Hot Water Function
To dispense hot water for tea or Americanos:
- Ensure the machine is preheated.
- Place a cup under the steam wand.
- Turn the swivel control knob to the 'Hot Water' position.
- Hot water will dispense from the steam wand.
- Turn the knob back to the 'Coffee' position to stop the flow.
4.5 High Pressure Extraction
The machine features a 20-bar Italian pump for optimal extraction, ensuring a rich and aromatic coffee experience.
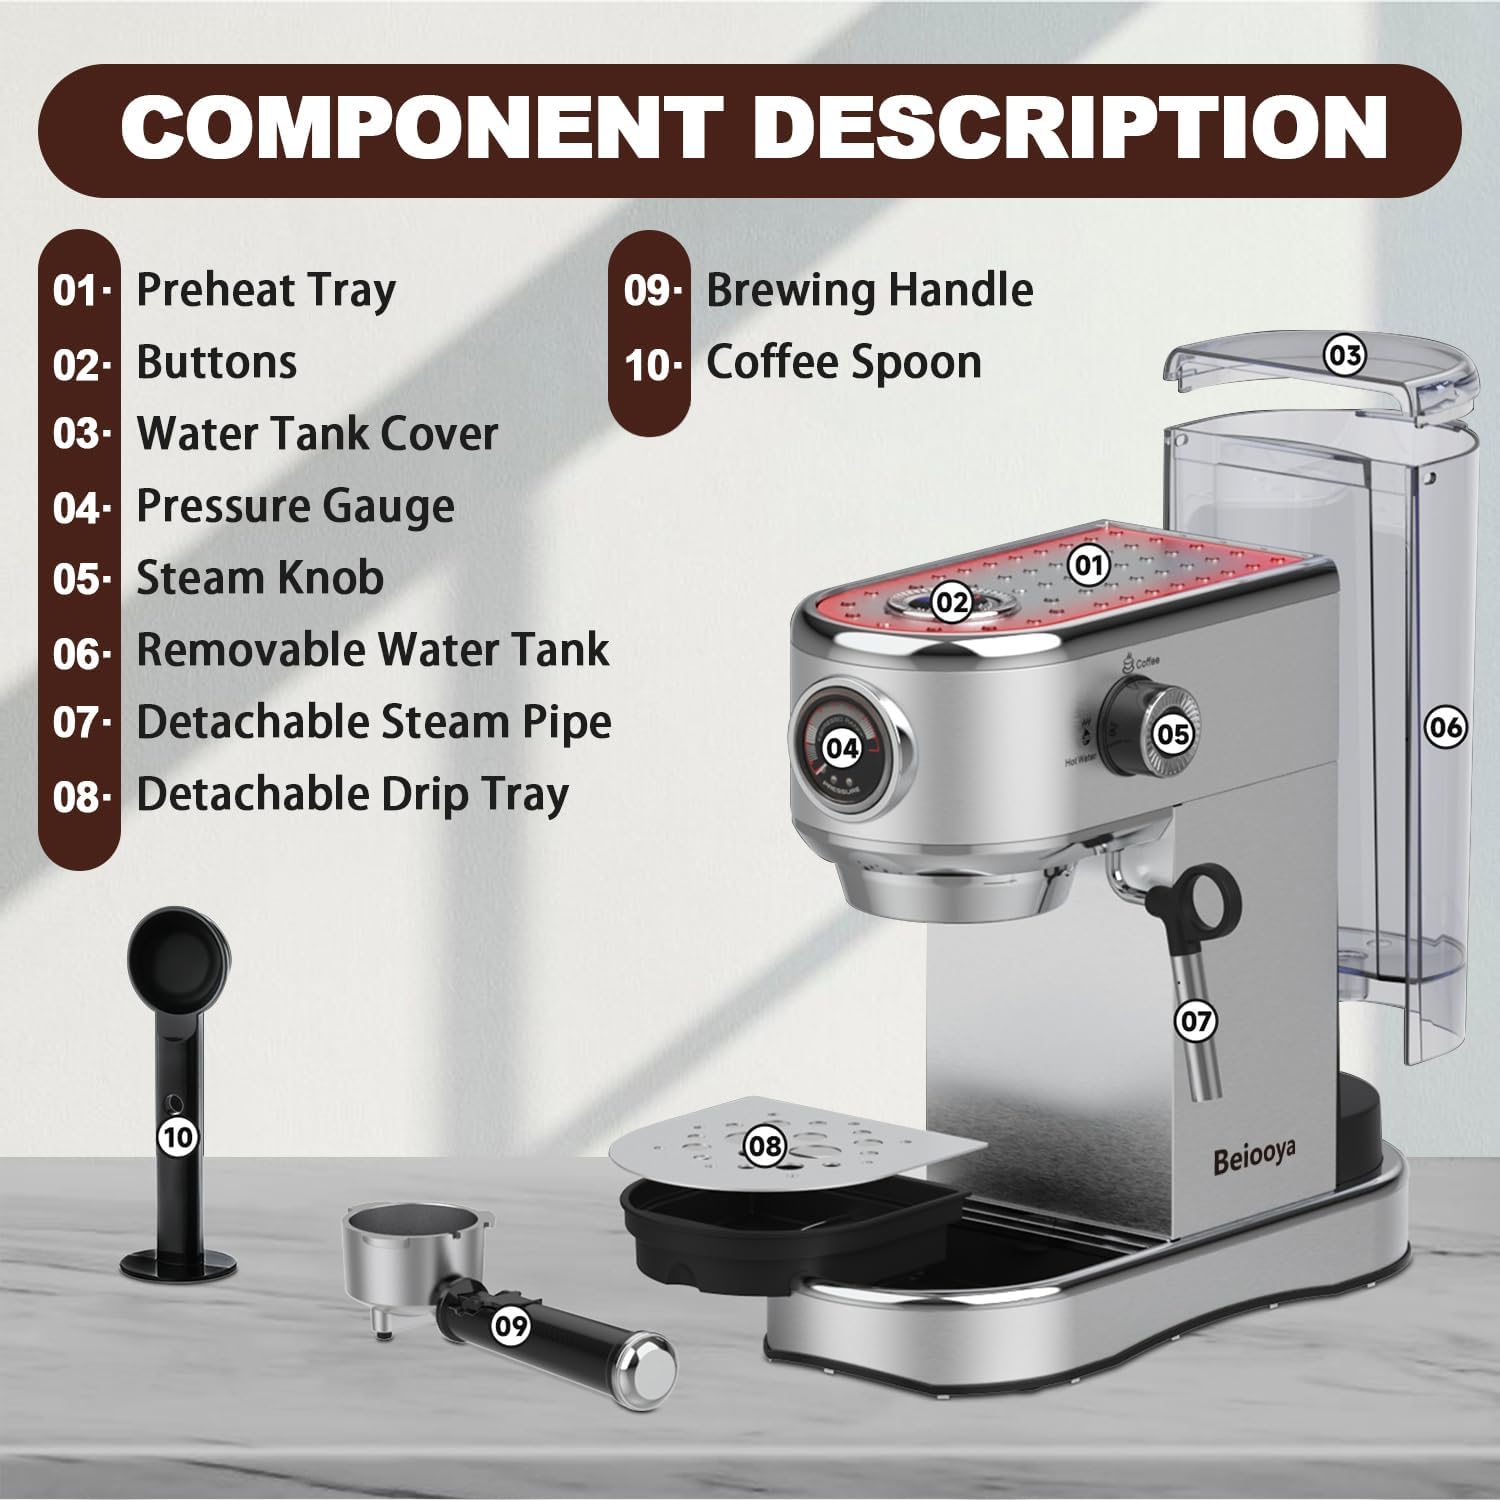
Image: The espresso machine brewing coffee, highlighting its high-pressure extraction capabilities. The image also provides key dimensions of the machine: approximately 12 inches high, 11.2 inches wide, and 5 inches deep.
5. Maintenance
5.1 Cleaning the Drip Tray
The removable drip tray simplifies the cleaning process.
- When the drip tray indicator floats up, it's time to empty it.
- Carefully pull out the drip tray.
- Empty the water and rinse the tray with warm soapy water. Dry thoroughly before replacing.
5.2 Cleaning the Steam Wand
It is crucial to clean the steam wand immediately after each use to prevent milk residue buildup.
- After frothing, wipe the steam wand with a damp cloth.
- Briefly turn the steam knob to release a short burst of steam to clear any internal milk residue.
- If the steam wand becomes clogged, use the cleaning pin (if provided) to clear the nozzle hole. The steam pipe is detachable for thorough cleaning.
5.3 Descaling
Regular descaling is essential to maintain machine performance and extend its lifespan, especially in areas with hard water. Descale every 2-3 months or as needed.
- Prepare a descaling solution according to the descaler manufacturer's instructions (e.g., white vinegar and water, or a commercial descaling agent).
- Fill the water tank with the descaling solution.
- Place a large container under the brewing head and another under the steam wand.
- Turn on the machine and allow it to preheat.
- Run half of the solution through the brewing head by pressing the double shot button multiple times.
- Run the remaining half of the solution through the steam wand by turning the swivel control knob to 'Hot Water' and then 'Steam'.
- After dispensing all the solution, rinse the water tank and fill it with fresh water.
- Repeat steps 5-7 with fresh water to thoroughly rinse the machine.
6. Troubleshooting
Refer to this section for common issues and their solutions.
| Problem | Possible Cause | Solution |
|---|---|---|
| No coffee dispenses / Slow flow | Coffee grounds too fine or tamped too hard; machine not primed; clogged filter. | Use coarser grind; tamp less firmly; prime the machine (see Section 3.3); clean filter basket. |
| No steam / Weak steam | Steam wand clogged; machine not fully preheated for steam. | Clean steam wand nozzle; allow machine to fully heat up (steam indicator should be steady); briefly purge steam wand before frothing. |
| Water leaks from machine | Water tank not seated correctly; drip tray full; seal issues. | Ensure water tank is firmly in place; empty drip tray; contact customer support if problem persists. |
| Coffee is not hot enough | Cups not preheated; machine not fully preheated. | Preheat cups on the warming plate; ensure machine is fully preheated before brewing. |
6.1 Troubleshooting Video
This video demonstrates some operational aspects of the machine, which may assist in troubleshooting or understanding its functions.
Video: A user-submitted video demonstrating the operation of the espresso machine, including preparing coffee and using the steam wand. This can be helpful for visual guidance on setup and usage.
7. Specifications
- Brand: Beiooya
- Model: B0CJT3SCJ2
- Pressure System: 20 Bar
- Power/Wattage: 1450 Watts
- Voltage: 120 Volts
- Water Tank Capacity: 37 oz (1100 mL)
- Material: Stainless Steel
- Product Dimensions: 30.48 x 28.45 x 12.7 cm (12 x 11.2 x 5 inches)
- Item Weight: 3.53 kg
- Special Features: Auto Clean Function, Milk Frother Steam Wand, Cup Warming Plate
- Recommended Uses: Home Use, Creating Espresso-Based Beverages (Cappuccino, Latte)
8. Warranty and Support
Beiooya provides a 1-year after-sale service for this espresso machine. We are committed to the quality of our product and your satisfaction.
If you have any questions, concerns, or require assistance with your Beiooya Espresso Machine, please contact our customer support team. Refer to your purchase documentation for specific contact details.
Please retain your proof of purchase for warranty claims.