1. Introduction
Thank you for choosing the ASHATA Wearable Barcode Scanner. This compact and versatile device is designed to enhance productivity in various environments by providing efficient and hands-free barcode scanning. Its ergonomic, wearable design allows for comfortable use throughout the day, making it ideal for inventory management, retail, logistics, and more.
This manual provides detailed instructions on how to set up, operate, and maintain your barcode scanner. Please read it thoroughly before use to ensure optimal performance and longevity of the device.

Image: The ASHATA Wearable Barcode Scanner comfortably worn on the back of a user's hand, demonstrating its compact and hands-free design.
2. Safety Information
- Do not expose the device to extreme temperatures, humidity, or corrosive substances.
- Avoid dropping or subjecting the device to severe impact.
- Do not attempt to disassemble or repair the device yourself. Refer to qualified personnel for service.
- Keep the scanner away from strong magnetic fields.
- Do not look directly into the scanning light to avoid eye strain.
3. Package Contents
Please check the box for the following items:
- ASHATA Wearable Barcode Scanner Unit
- Wearable Glove/Strap
- USB Charging Cable
- USB Receiver (for 2.4G wireless connection, if applicable)
- User Manual (this document)

Image: A flat lay of all components included in the ASHATA Wearable Barcode Scanner package, including the scanner unit, wearable strap, cables, and accessories.
4. Product Overview
4.1 Component Identification

Image: A detailed diagram highlighting the key components of the scanner, including the scanning button, indicator lights, and charging port.
- Scanning Button: Press to initiate a scan in manual trigger mode.
- Low Power Indicator Light: Indicates low battery status.
- Turn On/Off Indicator Light: Shows power status and connection status.
- Charging Port: USB Type-C port for charging the device.
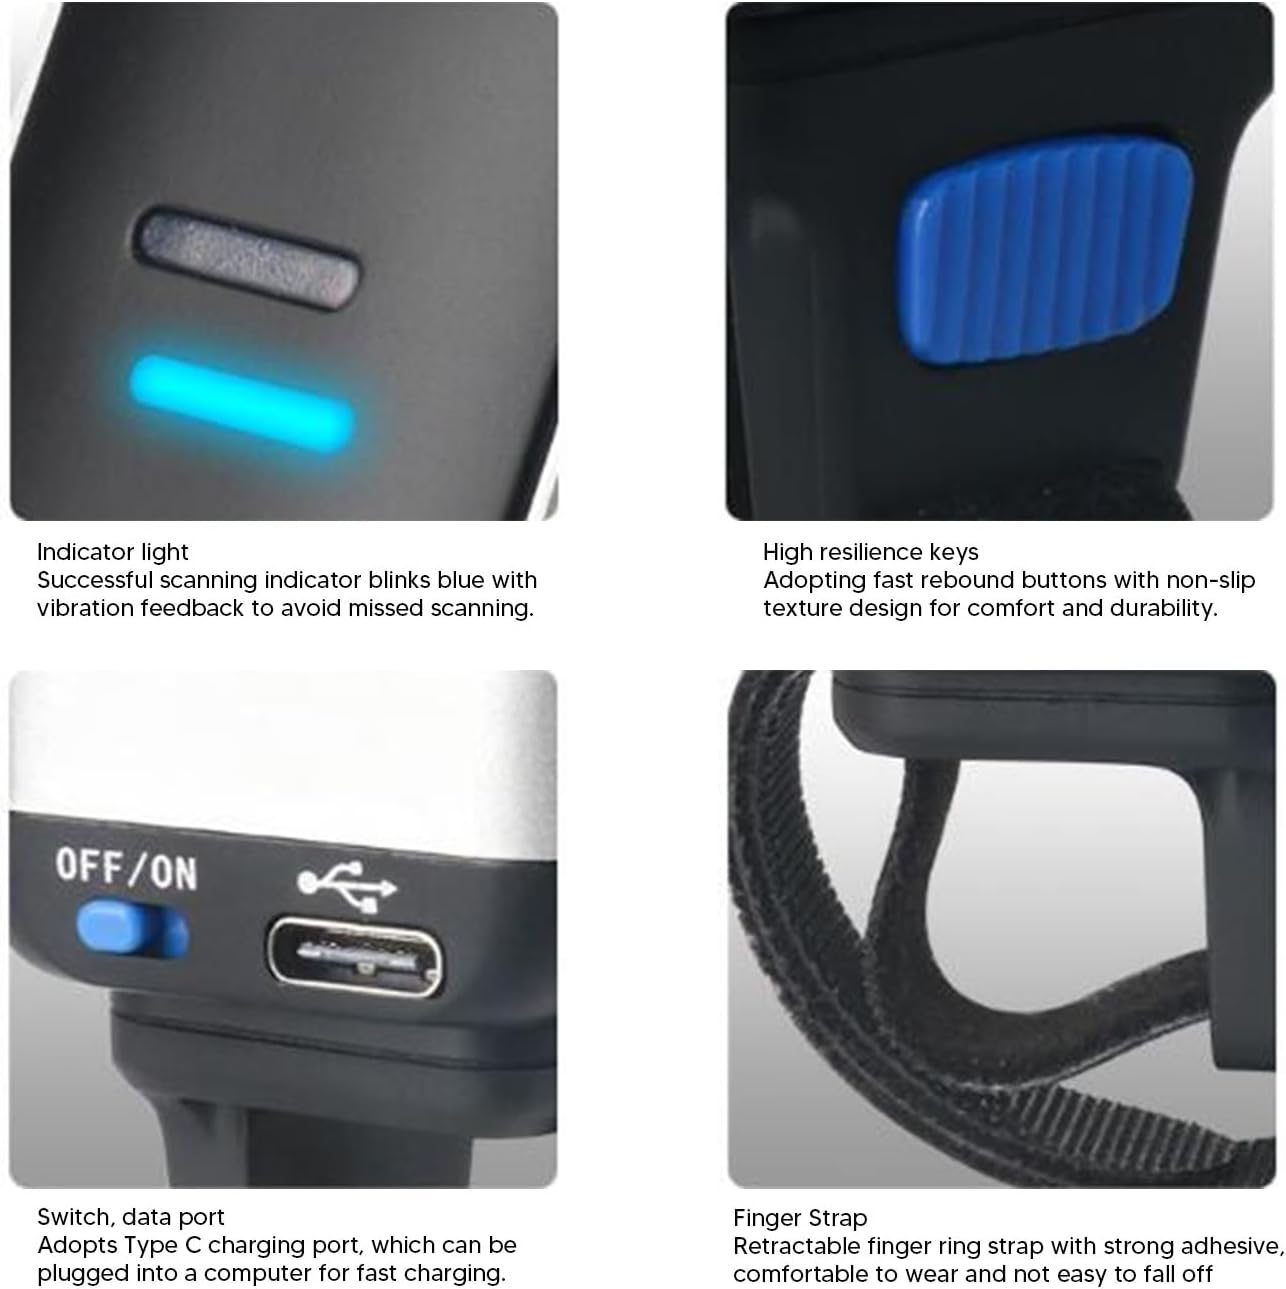
Image: Close-up views of the scanner's indicator light, high resilience keys, USB Type-C charging port with ON/OFF switch, and the comfortable finger strap.
5. Setup
5.1 Wearing the Scanner
The scanner is designed to be worn comfortably on either the left or right hand, allowing for maximum flexibility and hands-free operation.
- Place the main strap around the back of your hand, securing it with the Velcro closure.
- Attach the scanner unit to the designated mount on the strap.
- Thread the finger ring through the appropriate loop and secure it around your index finger.
- Adjust all straps to ensure a snug yet comfortable fit.

Image: A six-step visual guide demonstrating the process of attaching the scanner unit to the hand strap and securing it for use.
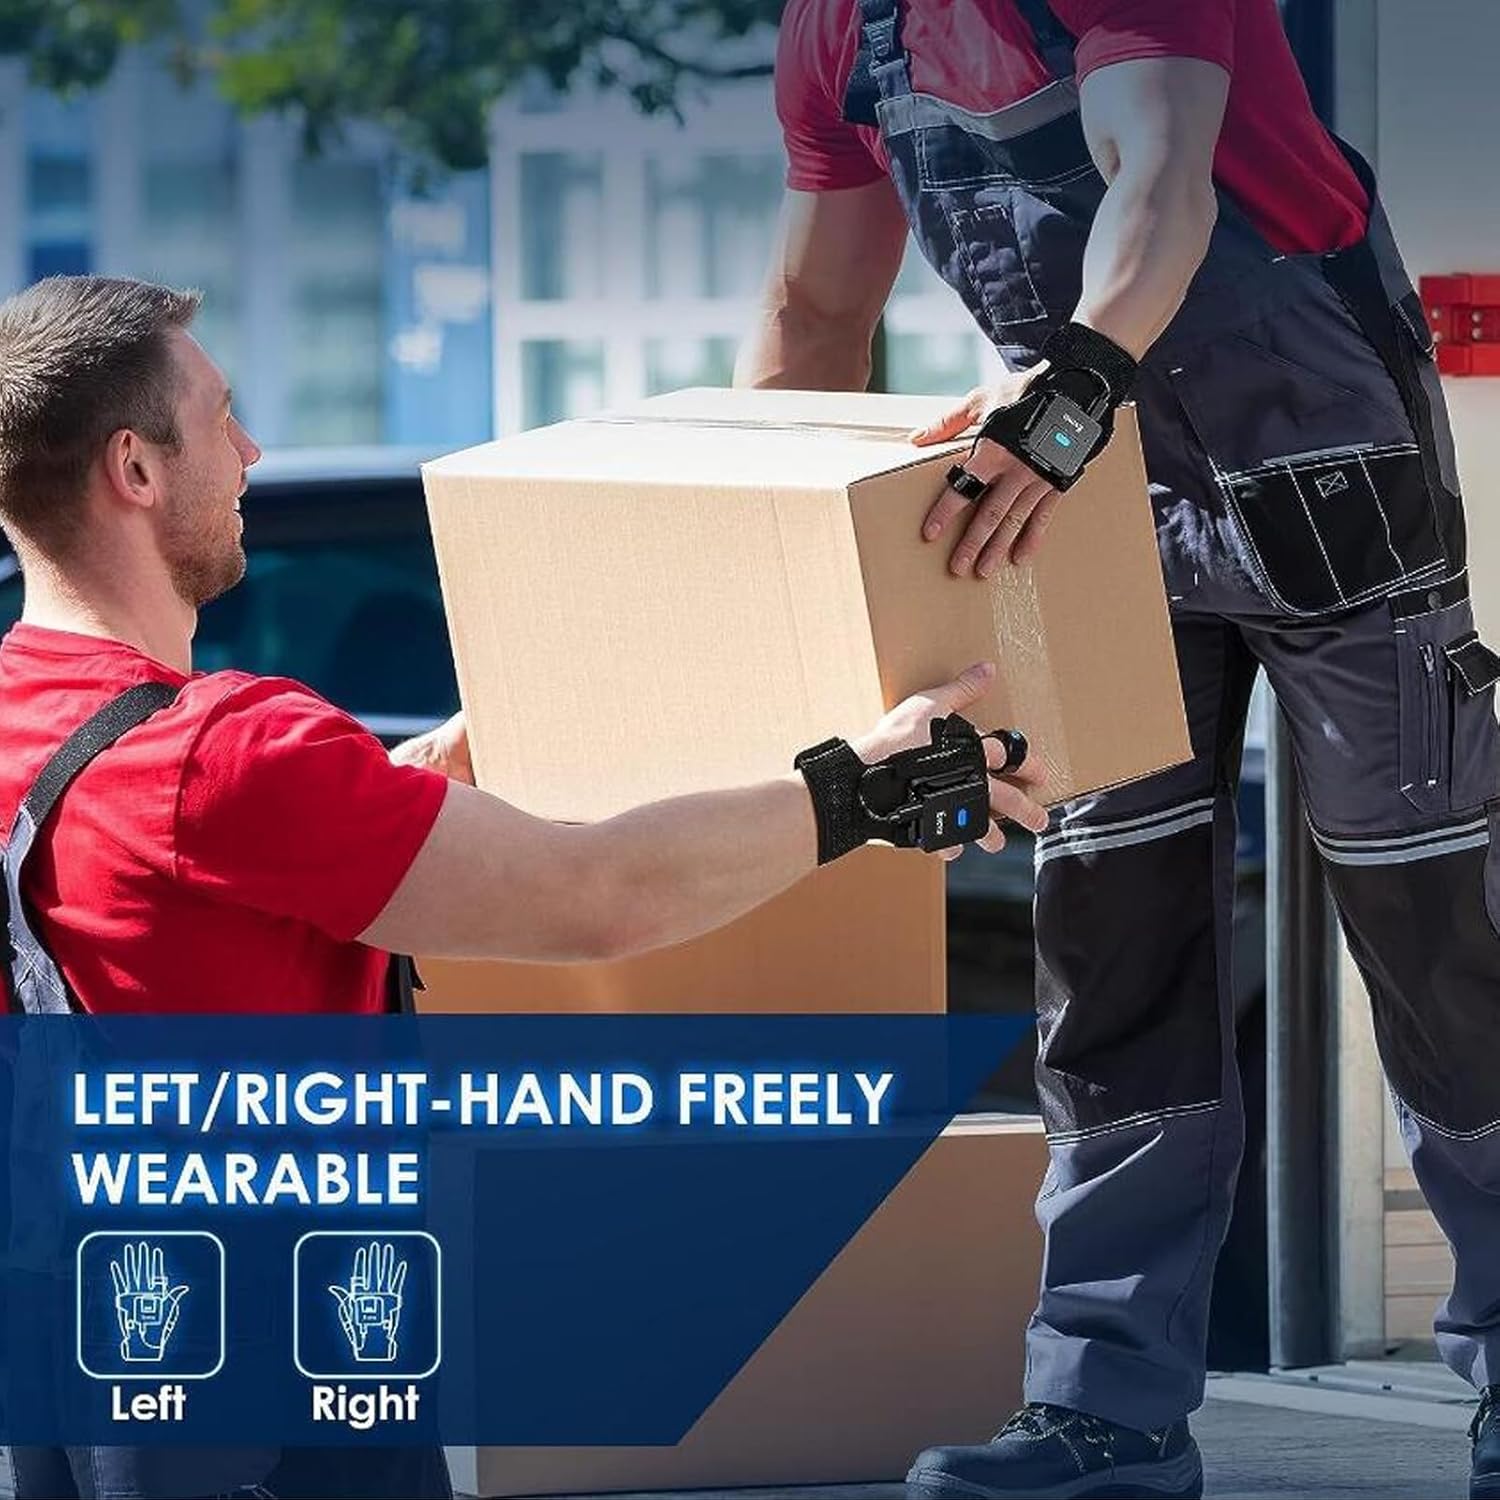
Image: An illustration demonstrating the scanner's adaptability for both left and right-hand wear, highlighting its ergonomic design for various users.
5.2 Charging the Device
Before first use, fully charge the scanner. A full charge provides approximately 10 hours of continuous operation.
- Connect the USB charging cable to the scanner's Type-C charging port.
- Plug the other end of the cable into a USB power adapter (not included) or a computer's USB port.
- The indicator light will show charging status (refer to product specifications for light behavior).
- Once fully charged, disconnect the cable.
5.3 Connecting to a Device
The scanner supports both Bluetooth and USB wired connections.
5.3.1 Bluetooth Connection
- Ensure the scanner is powered on.
- Activate Bluetooth on your host device (smartphone, tablet, laptop, etc.).
- Search for available Bluetooth devices. The scanner should appear as "ASHATA Scanner" or similar.
- Select the scanner from the list to pair. A successful connection will be indicated by the scanner's light.
5.3.2 USB Wired Connection
- Connect the scanner to your computer using the provided USB cable.
- The scanner will be recognized as a HID keyboard device, requiring no special drivers.
- Data scanned will be input directly into any active text field.
6. Operating
6.1 Scanning Modes
The scanner offers three distinct scanning modes to suit various operational needs:
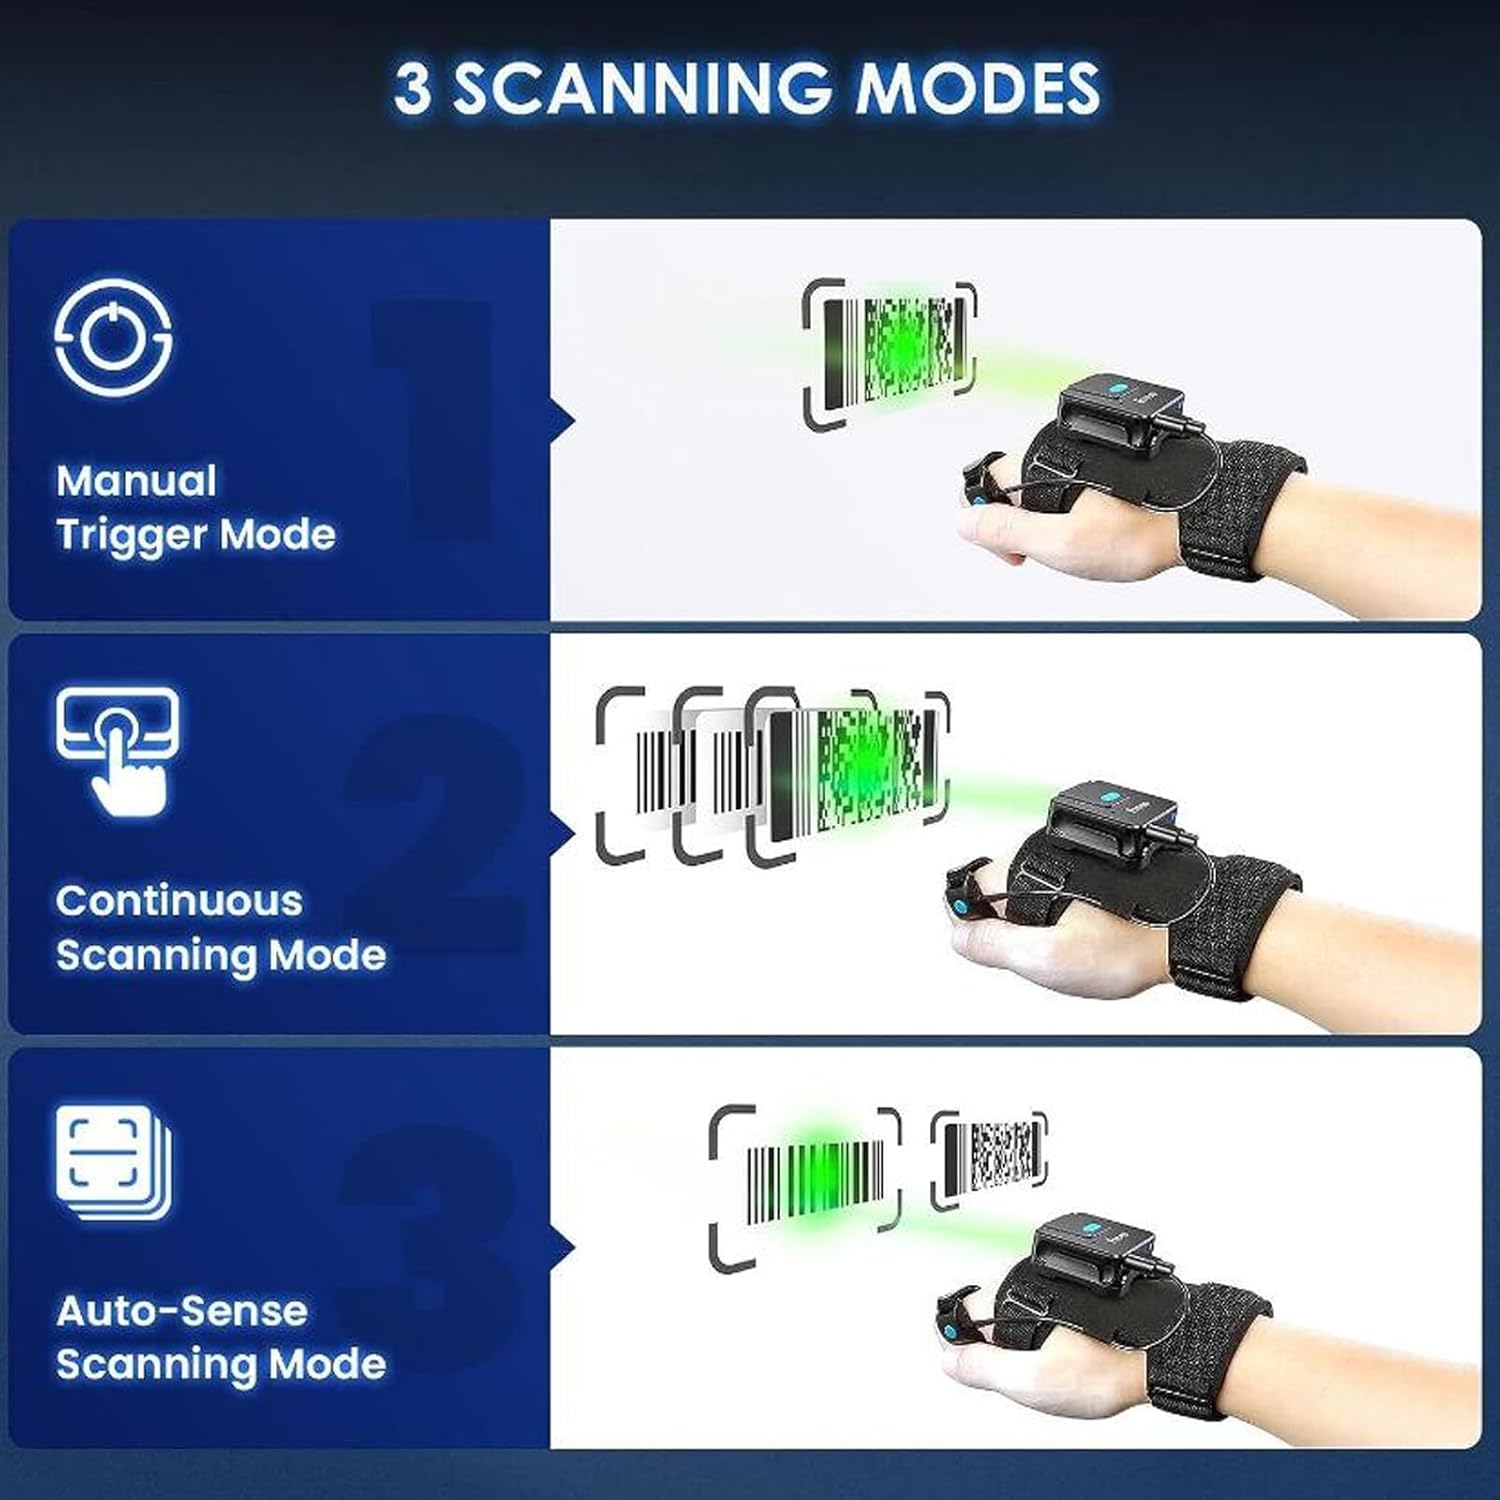
Image: A visual representation of the three operational modes, showing how the scanner interacts with barcodes in each setting.
- Manual Trigger Mode: Press the scanning button to scan each barcode individually. Ideal for precise, controlled scanning.
- Continuous Scanning Mode: The scanner continuously emits a scanning beam, automatically reading any barcode that passes within its field of view. Suitable for high-volume, rapid scanning.
- Auto-Sense Scanning Mode: The scanner activates its beam only when a barcode is detected in its proximity, then automatically scans it. This mode conserves battery life while still offering hands-free operation.
Refer to the quick start guide or specific programming barcodes (if provided) to switch between these modes.
6.2 Scanning Barcodes
To scan a barcode:
- Ensure the scanner is connected to your host device.
- Point the scanning window at the barcode you wish to read.
- Depending on the selected mode:
- In Manual Trigger Mode, press the scanning button.
- In Continuous or Auto-Sense Mode, simply position the barcode within the scanning range.
- A successful scan will typically be indicated by a beep and/or a flash of the indicator light. The scanned data will appear in the active application on your host device.
6.3 Compatibility
The ASHATA Wearable Barcode Scanner is designed for broad compatibility with various operating systems and devices:
- Operating Systems: Windows XP/7/8/10, OS X, Linux, Android, iOS.
- Devices: Laptops, Desktop PCs, POS systems, Smartphones, Tablets.

Image: A comprehensive chart illustrating the wide range of devices and operating systems compatible with the scanner, including Windows, Mac OS, Linux, Android, and iOS.
7. Maintenance
- Cleaning: Use a soft, dry cloth to clean the scanner's exterior. For the scanning window, use a lens cleaning cloth and solution if necessary, ensuring no liquid enters the device.
- Storage: Store the scanner in a cool, dry place away from direct sunlight and extreme temperatures when not in use.
- Battery Care: For optimal battery life, avoid fully discharging the battery frequently. If storing for extended periods, charge the battery to about 50% every few months.
8. Troubleshooting
| Problem | Possible Cause | Solution |
|---|---|---|
| Scanner does not power on. | Low battery; Power switch off. | Charge the scanner; Ensure the power switch is in the 'ON' position. |
| Cannot connect via Bluetooth. | Scanner not in pairing mode; Host device Bluetooth off; Out of range. | Ensure scanner is discoverable; Turn on Bluetooth on host device; Move scanner closer to host device. |
| Scanner not reading barcodes. | Barcode damaged/unreadable; Incorrect scanning mode; Scanner lens dirty. | Try scanning a different barcode; Check/change scanning mode; Clean the scanning lens. |
| Scanned data not appearing on screen. | Not connected to host device; No active text field. | Verify connection (Bluetooth/USB); Click into a text field (e.g., Notepad, Word document). |
9. Specifications
| Feature | Specification |
|---|---|
| Brand | ASHATA |
| Model Number | ASHATAspboxucfrm |
| Decoding Capability | 1D, 2D, QR barcodes (EAN, UPC, Code 39, Code 128, Industrial 25, DataMatrix, PDF417, Aztec, Maxicode, Hanxin, etc.) |
| Sensor Type | CCD Sensor |
| Connectivity | Bluetooth, USB Wired |
| Battery Capacity | 800mAh Rechargeable Battery |
| Operating Time | Approx. 10 hours (continuous use after full charge) |
| Product Weight | 190 g |
| Package Dimensions | 15.8 x 12.7 x 4.4 cm |
10. Warranty and Support
ASHATA products are manufactured to high-quality standards. For warranty information and technical support, please refer to the documentation provided with your purchase or visit the official ASHATA website. Please retain your proof of purchase for warranty claims.