Product Overview
This document provides essential information for the installation, operation, and maintenance of your PartCatalog Front Disc Brake Pad Wear Sensor, model PC-292048. This sensor is designed as a direct OE replacement part, ensuring compatibility and performance equivalent to the original equipment in your vehicle.
The brake pad wear sensor is a critical component of your vehicle's braking system, designed to alert the driver when brake pads have worn down to a critical level, indicating the need for replacement. This helps prevent damage to brake rotors and ensures safe vehicle operation.

Image 1: The PartCatalog Front Disc Brake Pad Wear Sensor (Model PC-292048). This image shows the complete sensor assembly, including the wiring and connectors, coiled for packaging.
Safety Information
Always prioritize safety when working on your vehicle's braking system. Improper installation or maintenance can lead to serious injury or vehicle damage. If you are not confident in your ability to perform this installation, it is highly recommended to seek assistance from a qualified automotive technician.
- Ensure the vehicle is parked on a level surface and the parking brake is engaged.
- Use appropriate jack stands to support the vehicle after lifting; never rely solely on a jack.
- Wear appropriate personal protective equipment (PPE), including safety glasses and gloves.
- Disconnect the vehicle's battery before beginning work to prevent accidental electrical shorts.
- Allow brake components to cool down before handling, as they can be extremely hot after vehicle operation.
Compatibility and Fitment
This brake pad wear sensor is specifically designed for certain BMW 750Li models. It is crucial to verify that your vehicle's make, model, year, and engine specifications match those listed in the fitment chart below. Using an incompatible part can lead to malfunction and potential damage.
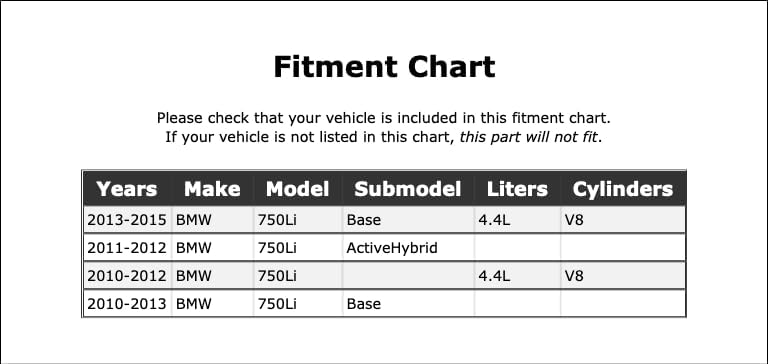
Image 2: Fitment Chart. This chart details the specific BMW 750Li models, years, submodels, liters, and cylinders that are compatible with this brake pad wear sensor. Please cross-reference your vehicle's information with this chart.
If your vehicle is not explicitly listed in the provided fitment chart, this part is not compatible and should not be installed.
Installation (Setup)
The installation of a brake pad wear sensor typically involves replacing the old, worn sensor during a brake pad replacement. The sensor is usually integrated into or attached to the brake pad itself.
Tools and Materials (Typical):
- Vehicle jack and jack stands
- Wheel lug wrench
- Socket set and ratchet
- Torque wrench
- Brake cleaner (optional)
- New brake pads (if replacing)
General Installation Steps:
- Prepare the Vehicle: Safely lift and support the vehicle, then remove the wheel corresponding to the sensor being replaced.
- Locate the Old Sensor: Identify the existing brake pad wear sensor. It will typically be a wire connected to the brake pad and routed to a connector on the vehicle's chassis.
- Disconnect the Old Sensor: Carefully disconnect the electrical connector of the old sensor. Note its routing.
- Remove the Old Sensor: Detach the sensor from the brake pad (if integrated) or its mounting points.
- Install the New Sensor: Attach the new PartCatalog sensor to the new brake pad (if applicable) or its designated mounting location. Ensure it is securely fastened and routed correctly to prevent chafing or damage.
- Connect the New Sensor: Plug the new sensor's connector into the vehicle's wiring harness. Ensure a firm, secure connection.
- Reassemble: Reinstall any removed brake components, the wheel, and lower the vehicle.
- Test: After installation, start the vehicle and check for any brake warning lights. If the light persists, refer to the troubleshooting section.

Image 3: Alternate view of the sensor. This image provides a different perspective of the sensor, showing the full length of the cable and the various clips and grommets for proper routing.
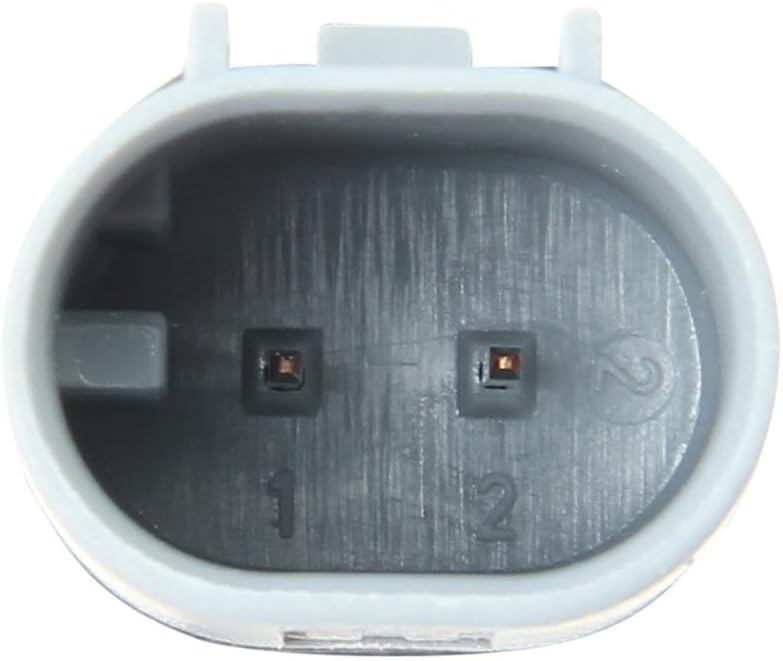
Image 4: Close-up of the sensor's electrical connector. This image highlights the specific design of the connector, which ensures a secure and proper electrical connection to the vehicle's wiring harness.
Operating Principles
The brake pad wear sensor operates on a simple electrical principle. It contains a small wire loop embedded within the sensor tip. As the brake pad wears down, the rotor eventually makes contact with and wears through this wire loop. When the wire loop is broken, it completes an open circuit, which the vehicle's onboard computer detects. This detection triggers a warning light on the dashboard, typically indicating "Brake Wear" or a similar message, alerting the driver that the brake pads require immediate attention.
Maintenance
Brake pad wear sensors are designed to be replaced when they activate (i.e., when the brake pads are worn). They are not typically subject to routine maintenance. However, during routine brake inspections, it is advisable to visually inspect the sensor's wiring for any signs of damage, fraying, or improper routing that could lead to premature failure or false warnings.
Always replace the brake pad wear sensor whenever new brake pads are installed, especially if the old sensor has activated or is damaged. Reusing an activated or damaged sensor will prevent the system from providing accurate wear warnings.
Troubleshooting
If you encounter issues after installing the new brake pad wear sensor, consider the following:
- Brake Warning Light Remains On:
- Verify that the sensor's electrical connector is fully seated and secure.
- Inspect the entire length of the sensor wire for any kinks, cuts, or damage.
- Ensure the correct sensor was installed for your specific vehicle model and wheel position (front/rear).
- Some vehicles may require the brake wear light to be reset manually using a diagnostic scan tool after sensor replacement. Consult your vehicle's service manual for specific reset procedures.
- Check if the brake pads themselves are indeed new and not already worn past the sensor's activation point.
- No Warning Light When Pads Are Worn:
- This indicates a potential failure of the sensor or the vehicle's warning system. Ensure the sensor is correctly installed and connected.
- Inspect the sensor for any physical damage that might prevent it from making contact with the rotor.
If troubleshooting steps do not resolve the issue, it is recommended to consult a professional automotive technician for diagnosis.
Specifications
| Attribute | Detail |
|---|---|
| Brand | PartCatalog |
| Manufacturer Part Number | PC-292048 |
| Position | Front |
| ASIN | B0CJRXPV6H |
| Compatibility | Compatible with specific BMW 750Li models (refer to fitment chart) |
Warranty Information
This PartCatalog brake pad wear sensor is typically covered by a return policy. For specific warranty details, including duration and coverage, please refer to the purchase terms and conditions from your retailer. Generally, a 30-day refund or replacement policy is offered for this product.
Customer Support
For further assistance, technical questions, or warranty claims regarding your PartCatalog brake pad wear sensor, please contact PartCatalog customer support through the retailer where the product was purchased. You may also visit the official PartCatalog website for contact information and additional resources.
Please have your product model number (PC-292048) and purchase details ready when contacting support.