PartCatalog PC-905146
Ignition Switch Instruction Manual
Model: PC-905146
1. Product Overview
This document provides essential information for the installation, operation, and maintenance of your new PartCatalog Ignition Switch, model PC-905146. This OE replacement part is designed to fit and function like the original equipment, ensuring an exact fit and smooth operation for compatible vehicles.
The package includes one (1) Ignition Switch.

Figure 1: Top-down view of the PartCatalog Ignition Switch. This image shows the main body of the switch, including the electrical connector housing and mounting points.
2. Compatibility and Fitment
This ignition switch is specifically designed for direct replacement in certain vehicle models. It is crucial to verify compatibility with your vehicle before installation.

Figure 2: Official Fitment Chart. This chart indicates the specific vehicle years, make, and model for which this ignition switch is compatible.
Based on the official fitment chart, this ignition switch is compatible with:
- Years: 2001-2006
- Make: Jeep
- Model: TJ
If your vehicle is not listed in this chart, this part will not fit.
3. Installation (Setup)
The PartCatalog Ignition Switch is engineered for a direct fit, simplifying the replacement process. While designed for straightforward installation, it is recommended that installation be performed by a qualified automotive technician to ensure proper function and safety.
General Installation Guidelines:
- Safety First: Always disconnect the vehicle's battery before beginning any electrical work to prevent accidental short circuits or injury.
- Access the Old Switch: Locate and carefully remove the existing ignition switch from your vehicle. This may involve removing dashboard panels or steering column covers. Refer to your vehicle's service manual for specific instructions.
- Disconnect Wiring: Carefully disconnect all electrical connectors from the old ignition switch. Note the orientation and connection points if necessary.
- Remove Old Switch: Unfasten any mounting screws or clips securing the old switch.
- Install New Switch: Position the new PartCatalog Ignition Switch in place. Ensure it aligns correctly with mounting points.
- Connect Wiring: Reconnect all electrical connectors to the new switch, ensuring a secure and proper connection.
- Secure New Switch: Fasten the new switch using the original screws or clips.
- Reassemble: Reinstall any removed dashboard panels or steering column covers.
- Reconnect Battery: Reconnect the vehicle's battery.
- Test Functionality: Test the ignition switch thoroughly to ensure all functions (e.g., accessory, ignition, start) operate correctly before driving the vehicle.
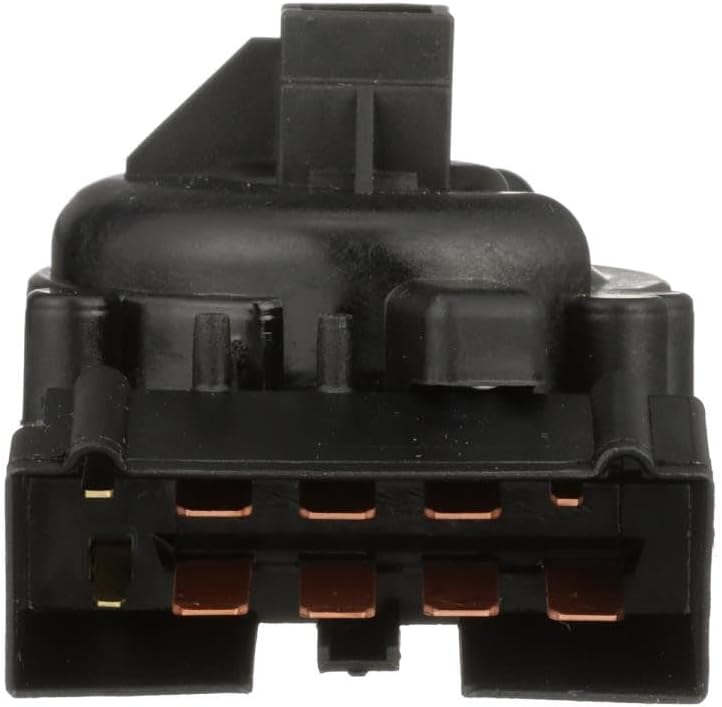
Figure 3: Close-up view of the electrical connector pins on the ignition switch. Ensure these pins align correctly with the vehicle's harness during installation.
4. Operation
The ignition switch controls the electrical power to various vehicle systems, including the engine's ignition, accessories, and starting circuit. Once installed, the operation of this OE replacement switch will be identical to your vehicle's original equipment.
- OFF: All electrical systems are off.
- ACC (Accessory): Powers accessories like the radio, power windows, etc., without turning on the engine.
- ON/RUN: Powers the ignition system and other vehicle electronics for normal operation.
- START: Engages the starter motor to crank the engine. The key returns to the ON/RUN position after releasing.
5. Maintenance
The PartCatalog Ignition Switch is a sealed unit and does not require routine maintenance. To ensure its longevity and proper function:
- Avoid exposing the switch to excessive moisture or corrosive chemicals.
- Ensure all electrical connections remain clean and secure.
- Do not apply excessive force when turning the ignition key.
6. Troubleshooting
If you experience issues after installing the ignition switch, consider the following common troubleshooting steps:
- No Power/Intermittent Power:
- Check battery connections to ensure they are clean and tight.
- Verify all electrical connectors to the ignition switch are fully seated and secure.
- Inspect fuses related to the ignition system and accessories.
- Engine Does Not Crank:
- Ensure the vehicle is in Park (P) or Neutral (N) for automatic transmissions, or clutch is depressed for manual transmissions.
- Check the starter motor and its connections.
- Verify the battery has sufficient charge.
- Key Sticks or Is Hard to Turn:
- Ensure the steering wheel is not locked. Gently jiggle the steering wheel while turning the key.
- Do not force the key. If the issue persists, the problem may be with the ignition cylinder (tumbler) rather than the electrical switch itself.
If troubleshooting steps do not resolve the issue, it is recommended to consult a professional automotive technician for diagnosis and repair.
7. Specifications
| Manufacturer | PartCatalog |
| Brand | PartCatalog |
| Model Number | PC-905146 |
| ASIN | B0CJRXCF6S |
| Date First Available | September 25, 2023 |
8. Warranty Information
For detailed information regarding the warranty coverage for your PartCatalog Ignition Switch, please refer to the manufacturer's official warranty policy provided with your purchase or visit the PartCatalog website. Warranty terms typically cover defects in materials and workmanship under normal use.
9. Customer Support
If you have any questions, require technical assistance, or need to report an issue with your PartCatalog Ignition Switch, please contact PartCatalog customer support. Contact information can typically be found on the product packaging or the official PartCatalog website.
For further assistance, you may also refer to the product page on Amazon.com: https://www.amazon.com/dp/B0CJRXCF6S
Ask a question about this manual
Ask about setup, troubleshooting, compatibility, parts, safety, or missing instructions. Manuals+ will review the question and use this page’s manual context to help answer it.