1. Product Overview
The LASERTAIL 9-inch 8-core car stereo radio is an advanced head unit designed to upgrade the in-car entertainment and navigation experience for compatible Dodge Ram models. It features an Android 12 system, 5Ghz WiFi connectivity, a 9-inch IPS HD touch screen, CarPlay, Android Auto, GPS navigation, DSP audio processing, and FM/RDS radio. This unit is specifically compatible with Dodge Ram 1500, 2500, and 3500 models manufactured between 2013 and 2018, provided they have manual A/C controls.

Image: The LASERTAIL 9-inch 8-core car stereo radio seamlessly integrated into a Dodge Ram dashboard, showcasing its large touch screen display.
2. What's in the Box
Verify that all components are present before beginning installation:
- Car radio and Frame (1 unit)
- AHD rear view camera (1 unit)
- Installation kit (1 set)
- Function instruction (1 manual)
- Installation instruction (1 manual)
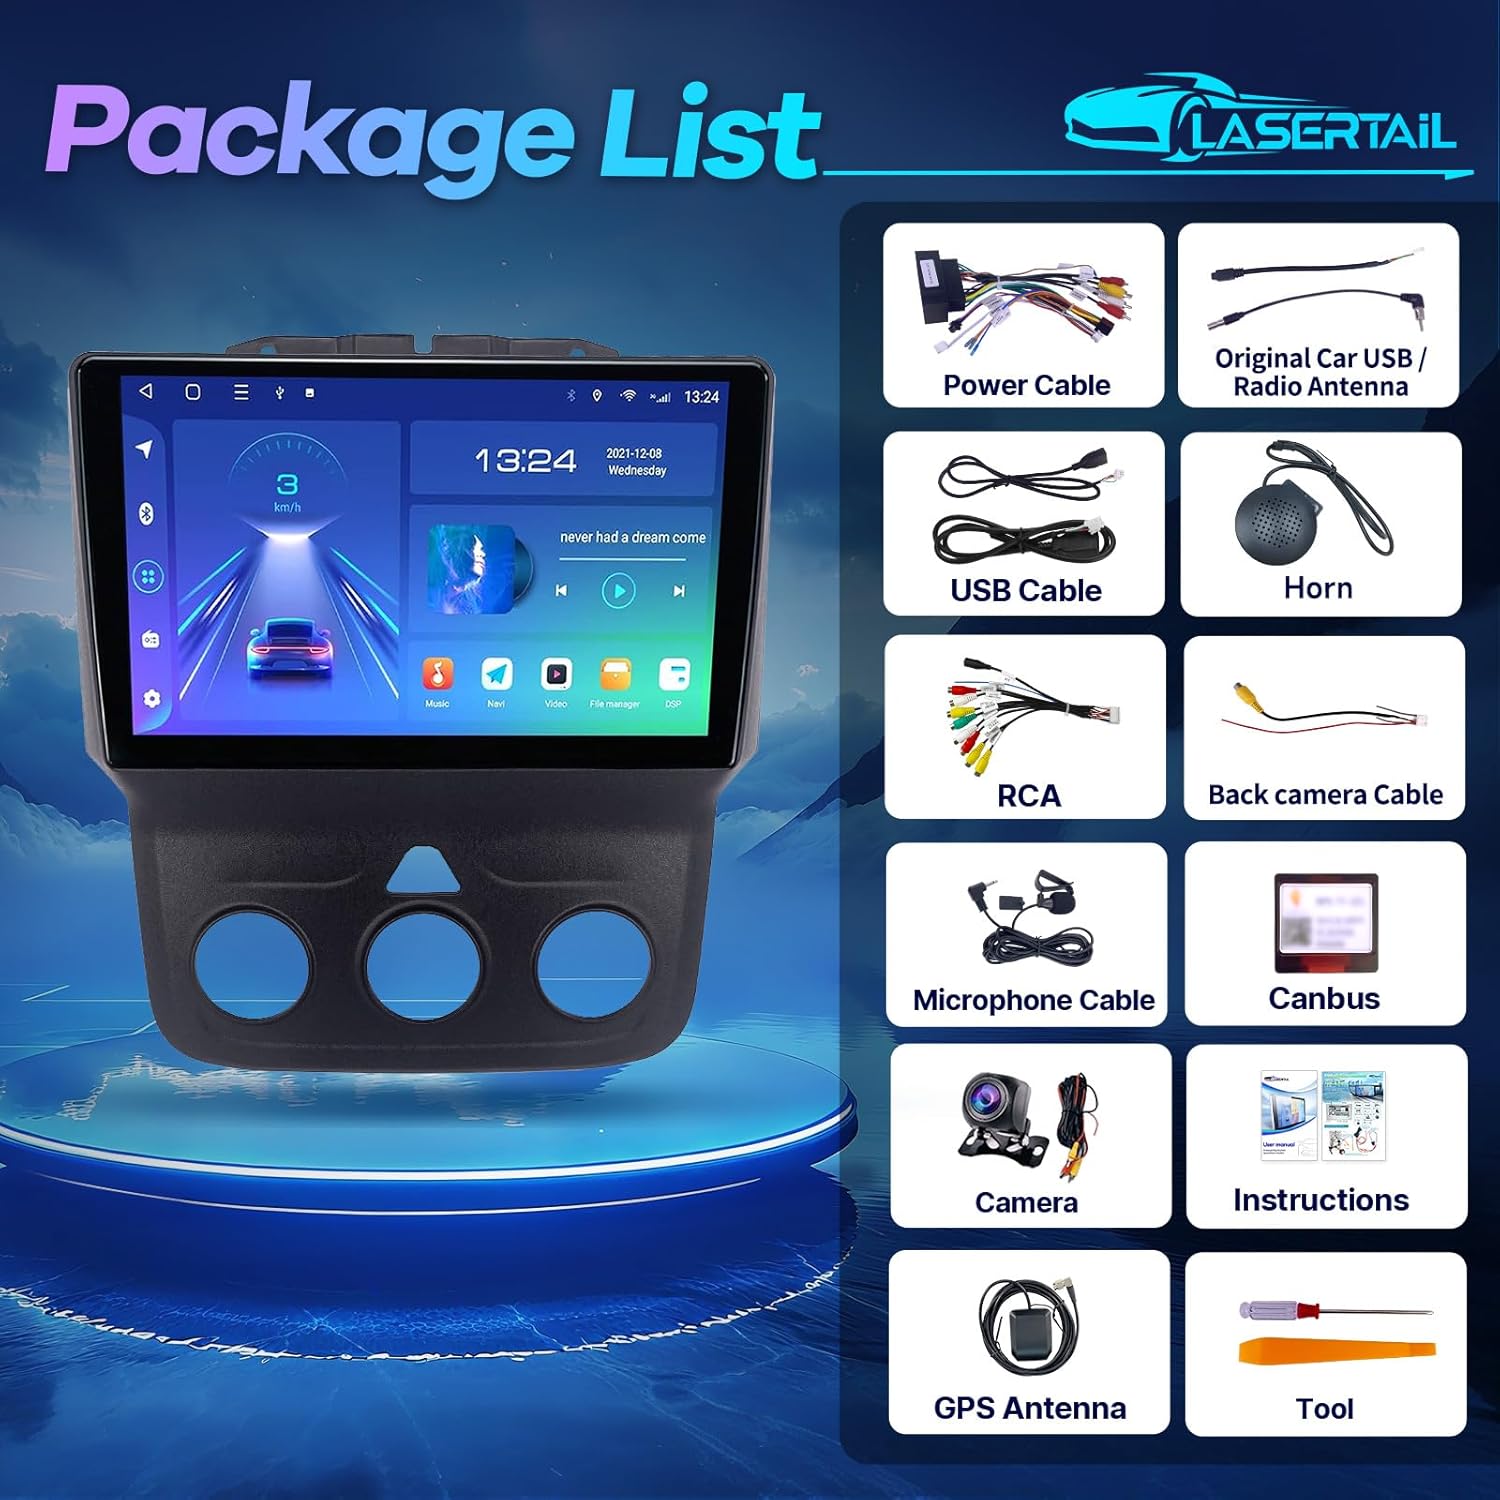
Image: A complete view of all items included in the product package, laid out on a white surface.
3. Installation Guide
This section provides general guidance for installing the LASERTAIL car stereo. Professional installation is recommended. Ensure the vehicle's battery is disconnected before starting any electrical work.
3.1. Removing the Factory Radio
- Carefully remove the top dashboard panel above the factory radio. This usually involves prying it gently.
- Unscrew any visible screws securing the factory radio and surrounding trim.
- Gently pull the entire radio assembly out from the dashboard. Disconnect all wiring harnesses from the back of the factory unit.

Image: A hand demonstrating the removal of the factory radio unit from a Dodge Ram dashboard, revealing the internal wiring.
3.2. Wiring Connections
Connect the provided wiring harnesses to the new LASERTAIL head unit and the vehicle's existing wiring. The system is designed for plug-and-play installation for most connections.
- Main Power Harness: Connect the main power cable plug from the new unit to the vehicle's corresponding harness.
- Canbus Decoder: Connect the 8-PIN connector for the Canbus decoder to ensure proper communication with the vehicle's systems, eliminating error codes.
- USB Cables: Connect the 4-PIN and 6-PIN USB cables to the designated ports on the head unit. These can be routed to a convenient location for external device connection.
- GPS Antenna: Connect the GPS cable to the GPS port on the head unit. Mount the GPS antenna in a location with a clear view of the sky, typically on the dashboard or under the windshield.
- Radio Antenna: Connect the radio antenna to the appropriate port.
- Microphone: Connect the external microphone cable for improved call quality.
- Amplifier Cable: If your original car has an amplifier, connect the amplifier cable (blue wires) to the corresponding wires. If not, it doesn't need to be connected.
- RCA Cable Plug: Connect the RCA cable plug for auxiliary audio/video inputs and outputs, including subwoofer and amplifier connections if applicable.
- Reversing Video Input Cable: Connect this cable to enable the backup camera feature.
Video: Detailed instructions on how to connect the wiring harness to the car radio unit.

Image: A visual guide illustrating the various wiring connections for the car stereo, including power, USB, and RCA cables.
3.3. Backup Camera Installation
The unit supports the original factory camera. An AHD rear view camera is included for enhanced night vision and a 170° wide-angle view.
- Connect the camera cable to the reversing video input cable.
- Connect the red wire of the camera power cable to the backup light's positive (+) terminal.
- Connect the black wire of the camera power cable to the vehicle's ground (GND).
- Ensure the reverse control line (usually a brown or red wire labeled 'Reverse') from the main harness is connected to the vehicle's reverse light signal.
Video: A step-by-step guide on connecting the backup camera to the car stereo system.

Image: Illustrates the AHD backup camera and its connection, alongside the steering wheel control functionality.
3.4. Final Assembly
- Carefully tuck all wires and harnesses into the dashboard cavity, ensuring they are not pinched.
- Mount the new head unit into the dashboard opening, securing it with the appropriate screws from the installation kit.
- Reattach the dashboard trim panels.
- Reconnect the vehicle's battery.

Image: The car stereo unit perfectly fitted into the dashboard of a Dodge Ram, demonstrating its compatibility.
4. Operating Instructions
This section covers the basic operation of your LASERTAIL car stereo.
4.1. Power On/Off and Basic Navigation
- Press the power button (usually located on the top left of the unit) to turn the device on or off.
- The home screen displays various applications and widgets. Swipe left or right to access additional app pages.
- Use the touch screen to select applications or adjust settings.
Video: Demonstrates various functions and user interface navigation of the car stereo in a Dodge Ram.
4.2. CarPlay and Android Auto
The unit supports both wireless and wired CarPlay and Android Auto for seamless smartphone integration.
- Enable Connectivity: Turn on Wi-Fi and Bluetooth on your smartphone.
- Pair Device: On the car stereo, select "SYU-Android" from the Bluetooth device list and pair with your phone. Confirm the pairing code.
- Launch Car Link: Open the "Car Link 2.0" application on the head unit. The system will attempt to connect to your smartphone.
- Once connected, your phone's interface will appear on the car stereo display, allowing access to navigation, music, calls, and messages.
Video: A demonstration of how to connect and use CarPlay with the smart car multimedia player.

Image: The car stereo screen showing the interfaces for both CarPlay and Android Auto, highlighting their wireless and wired connectivity options.
4.3. GPS Navigation
The unit has a built-in GPS module and supports both online and offline maps. Connect to 5GHz WiFi or a mobile hotspot for online map access.
- Select the Navigation app (e.g., Waze, Google Maps, Here We Go) from the home screen.
- Enter your destination and follow the on-screen directions.

Image: The GPS navigation interface displaying various map applications available on the car stereo.
4.4. Audio Features (DSP, FM/RDS Radio)
- FM/RDS Radio: Access the Radio app to tune into FM stations and receive RDS information.
- DSP & EQ: The built-in DSP (Digital Sound Processor) and 48-band EQ allow for extensive audio customization. Select the DSP Equalizer app to adjust sound effects, sound field, and bass boost.

Image: The DSP and 48-band equalizer interface, allowing users to customize their audio experience.
4.5. Steering Wheel Control (SWC)
The unit retains original steering wheel control functionality. Access the SWC app to configure buttons for functions like switching music, adjusting volume, and answering calls.

Image: A driver interacting with the car stereo using the vehicle's original steering wheel controls.
4.6. Other Features
- 5Ghz WiFi: Connect to a 5Ghz WiFi network for fast and stable internet access, enabling app downloads from the Google Play Store.
- Mirror Link: Project your smartphone screen onto the car stereo display for enhanced viewing.
- Split Screen: Utilize the split-screen display to run two applications simultaneously.

Image: The car stereo screen showing 5G WiFi connectivity and a selection of downloadable applications.
5. Maintenance and Care
- Screen Cleaning: Use a soft, lint-free cloth to clean the touch screen. Avoid abrasive cleaners or solvents.
- Software Updates: Periodically check for software updates to ensure optimal performance and access to new features. Updates can typically be downloaded via WiFi.
- Cooling Fan: The unit features an intelligent cooling fan system that activates when the CPU temperature or volume exceeds preset values, prolonging the head unit's lifespan. Ensure the fan vents are not obstructed.

Image: A detailed view of the cooling fan located on the rear of the car stereo, designed to prevent overheating.
6. Troubleshooting
If you encounter issues with your LASERTAIL car stereo, refer to the following common troubleshooting steps:
- No Power: Check all power connections and ensure the vehicle's battery is fully charged. Verify fuses are intact.
- No Sound: Confirm speaker connections are secure. Check audio settings (DSP, EQ) to ensure volume is not muted or set too low. Verify amplifier connections if applicable.
- Bluetooth/CarPlay/Android Auto Connection Issues: Ensure Wi-Fi and Bluetooth are enabled on your phone and the head unit. Try unpairing and re-pairing the device. Restart both the phone and the head unit.
- GPS Signal Loss: Ensure the GPS antenna is properly connected and mounted in a location with a clear view of the sky.
- Backup Camera Not Displaying: Verify the camera's power and signal connections. Ensure the reverse control line is correctly wired to the vehicle's reverse light signal.
- System Lag/Slow Response: Close unnecessary background applications. Clear system cache if available in settings.
- Fan Noise: The cooling fan operates to prevent overheating. If noise is excessive or unusual, ensure vents are clear. If the issue persists, contact customer support.
For persistent issues or complex problems, please contact LASERTAIL technical support as indicated in the user manual or via email.
7. Specifications
| Feature | Specification |
|---|---|
| Product Dimensions | 12.4 x 0.01 x 5.3 inches |
| Item Weight | 4 pounds |
| Item Model Number | Dodge Ram 1500 2500 3500 (Compatibility) |
| Brand | LASERTAIL |
| Vehicle Service Type | Dodge Ram 1500, 2500, 3500 (2013-2018, manual A/C) |
| Screen Size | 9 Inches |
| Resolution | 720 x 1280 (IPS HD Touch Screen) |
| Operating System | Android 12 |
| CPU | 8 Core |
| RAM | 2GB |
| ROM | 32GB |
| Connectivity Technology | Bluetooth, Wi-Fi (5Ghz) |
| Special Features | Android Auto, CarPlay, GPS Navigation, Touchscreen, Bluetooth, SWC, DSP (48EQ), Split Screen Display, Voice Assistant, Mirror Link, Backup Camera, Upgrade Cooling Fan |
| Map Type | North America |
| Audio Output Mode | Stereo |
| Mounting Type | Dashboard Mount |
8. Warranty and Support
LASERTAIL products are designed for quality and reliability. For any questions regarding installation, operation, or product issues, please refer to the contact information provided in your included user manual or reach out to LASERTAIL customer support directly. Information regarding specific warranty periods and service procedures can be found in the product documentation.