
1. Introduction
This manual provides detailed instructions for the assembly, operation, and maintenance of your IMagacFun Outdoor Patio Greenhouse. Please read this manual thoroughly before assembly and use to ensure proper function and safety.
The IMagacFun Outdoor Patio Greenhouse is designed to provide an optimal environment for growing flowers and plants, offering protection from various weather conditions. It features a robust aluminum frame, durable polycarbonate panels, and convenient access points.
2. Product Features
- Durable Construction: Features strong 4mm clear polycarbonate panels that are UV-resistant and thermally insulated, ensuring high temperature and increased humidity inside.
- Stable Aluminum Structure: Maintenance-free, powder-coated, and rust-resistant aluminum alloy frame provides durable support and stability.
- Adjustable Roof Vent: Equipped with a hand-pushed pull rod to adjust the opening angle of the skylight for optimal ventilation.
- Sliding Door: Allows for easy access to the greenhouse interior.
- Efficient Water Drainage: Built-in rain gutters and outlet help collect and drain rainwater, with a triangular roof design for effective runoff.
- Enhanced Stability: Added triangular connection board and crossbars on side walls protect connections and stabilize panels.
- Versatile Fixing Options: Can be fixed into soil or concrete, with connecting parts and expansion screws included.
- Reinforced Structure: Designed to carry heavy snow loads.
3. Safety Information
Please observe the following safety precautions during assembly and use:
- Always wear appropriate safety gear, including gloves, during assembly.
- Ensure all parts are correctly aligned and securely fastened before use.
- Do not attempt to assemble the greenhouse alone; a minimum of two people is recommended.
- Choose a level and stable location for installation to prevent tipping.
- Keep children and pets away from the assembly area.
- In strong winds or heavy snow, ensure the greenhouse is properly anchored and consider additional reinforcement if necessary.
- Do not hang heavy objects from the greenhouse frame.
4. Package Contents
Verify that all components are present before beginning assembly. Refer to the parts list provided in your packaging. The greenhouse will be delivered in two boxes, which may arrive on different days. Please do not worry if they do not arrive simultaneously.

Image: Two cardboard boxes on a lawn next to the greenhouse, illustrating that the product may be delivered in multiple packages.
Typical components include:
- Aluminum Frame Sections
- Polycarbonate Panels
- Sliding Door Assembly
- Roof Vent Mechanism
- Fasteners (screws, nuts, bolts)
- Gutter System Components
- Anchoring Hardware (for soil or concrete)
- Assembly Gloves (x2 pairs)
5. Setup and Assembly
Assembly typically requires at least 6 hours and two people. Follow the step-by-step instructions provided in the separate assembly guide included with your product. Key steps include:
- Site Preparation: Choose a level, well-drained area for your greenhouse. Clear any debris and ensure adequate space around the structure for access and maintenance.
- Base Assembly: Assemble the base frame first, ensuring it is square and level.
- Wall Frame Construction: Erect the vertical and horizontal frame sections for the walls.
- Panel Installation: Carefully slide the polycarbonate panels into the deepened grooves of the frame. Ensure panels are oriented correctly for UV protection.
- Roof Assembly: Install the roof frame and panels. Attach the adjustable roof vent mechanism.
- Door Installation: Mount the sliding door assembly.
- Gutter System: Install the rain gutters and outlet.
- Anchoring: Securely anchor the greenhouse to the ground using the provided hardware. For concrete, use expansion screws.
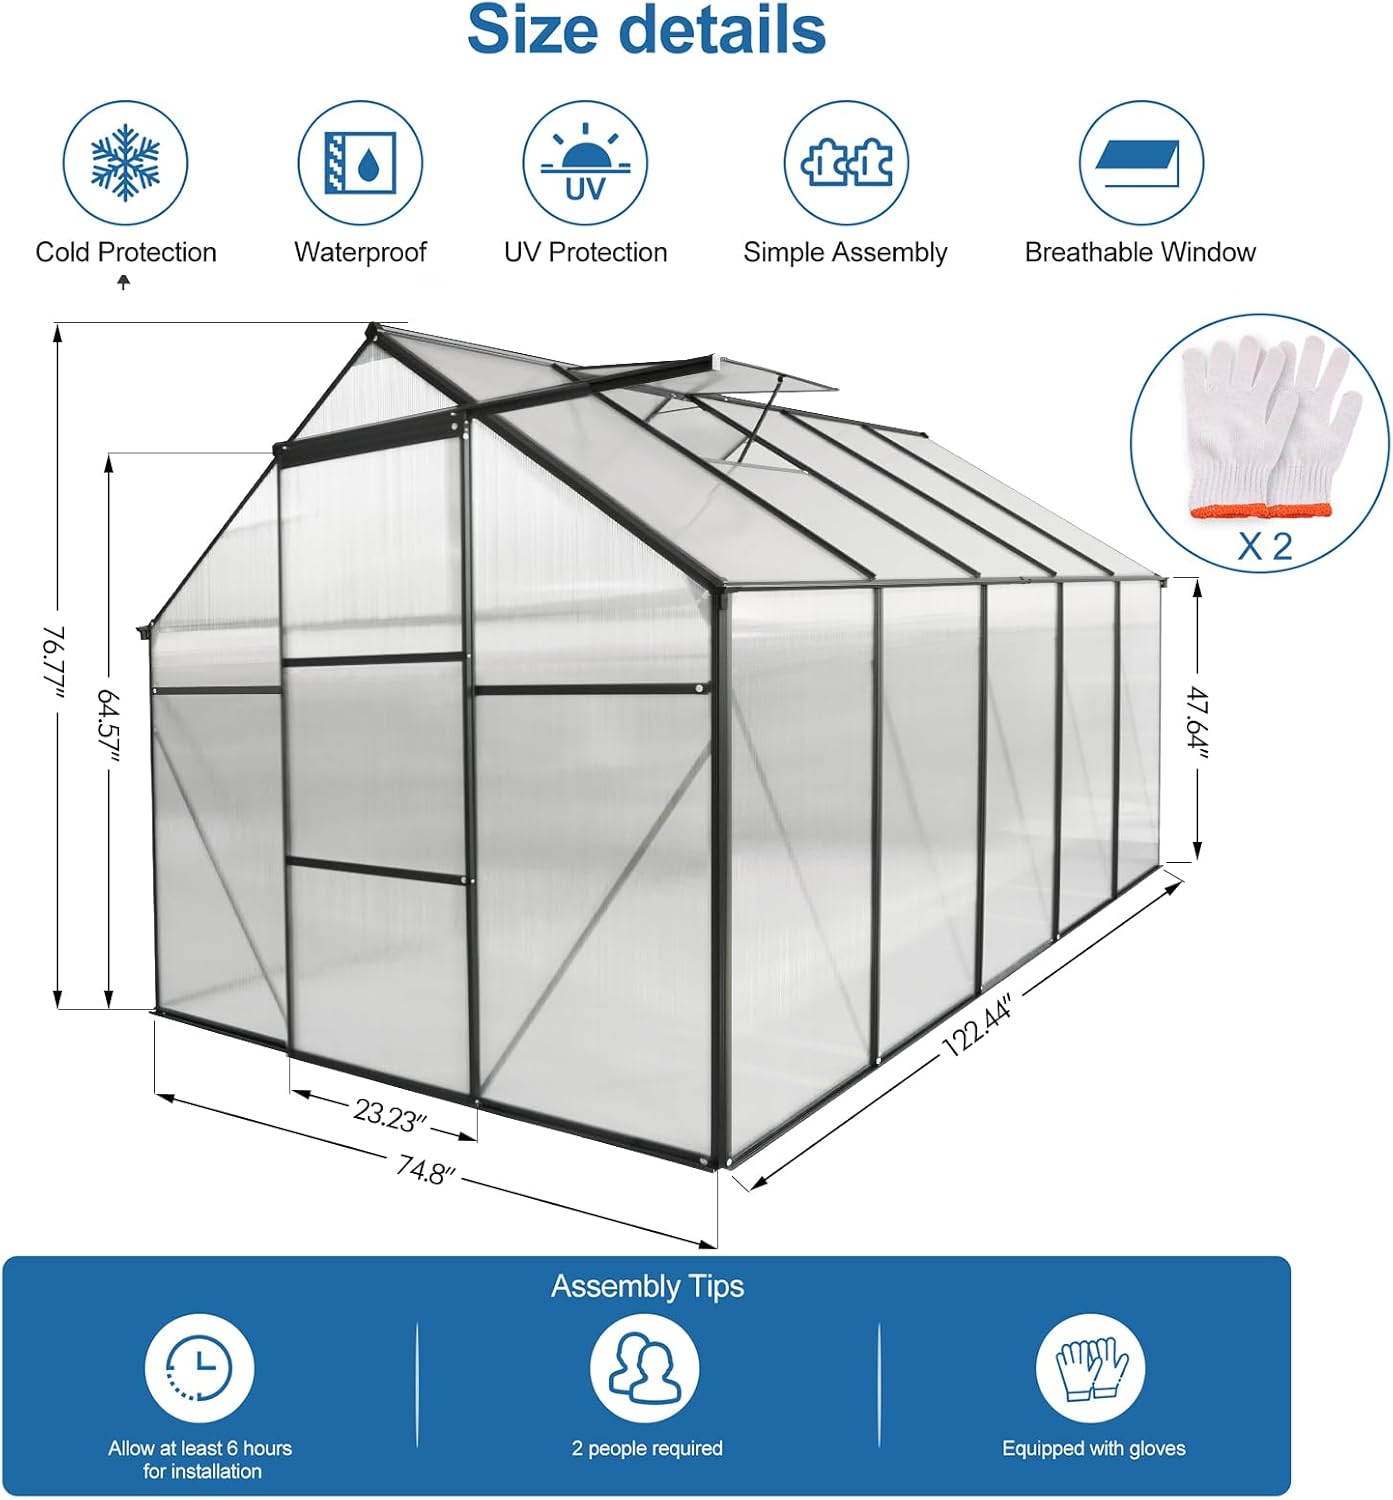
Image: A diagram illustrating the dimensions of the greenhouse (74.8"L x 146.06"W x 76.77"H) and assembly tips, including requiring at least 6 hours, 2 people, and equipped gloves.

Image: Close-up views of the greenhouse frame, showing the interface fixed with multiple screws for stability, adjustable roof vents, added triangular connection board, and deepened grooves for panel sliding.
6. Operating Instructions
Once assembled, your greenhouse is ready for use. Here are key operational aspects:
- Ventilation: Use the adjustable roof vent to control internal temperature and humidity. Open it on hot days to prevent overheating and improve air circulation. The vent has 5 adjustable positions.
- Access: The sliding door provides easy entry and exit. Ensure it slides smoothly and is kept clear of obstructions.
- Water Collection: The integrated rain gutters are designed to collect rainwater. You can direct this water to a collection barrel for irrigation purposes.
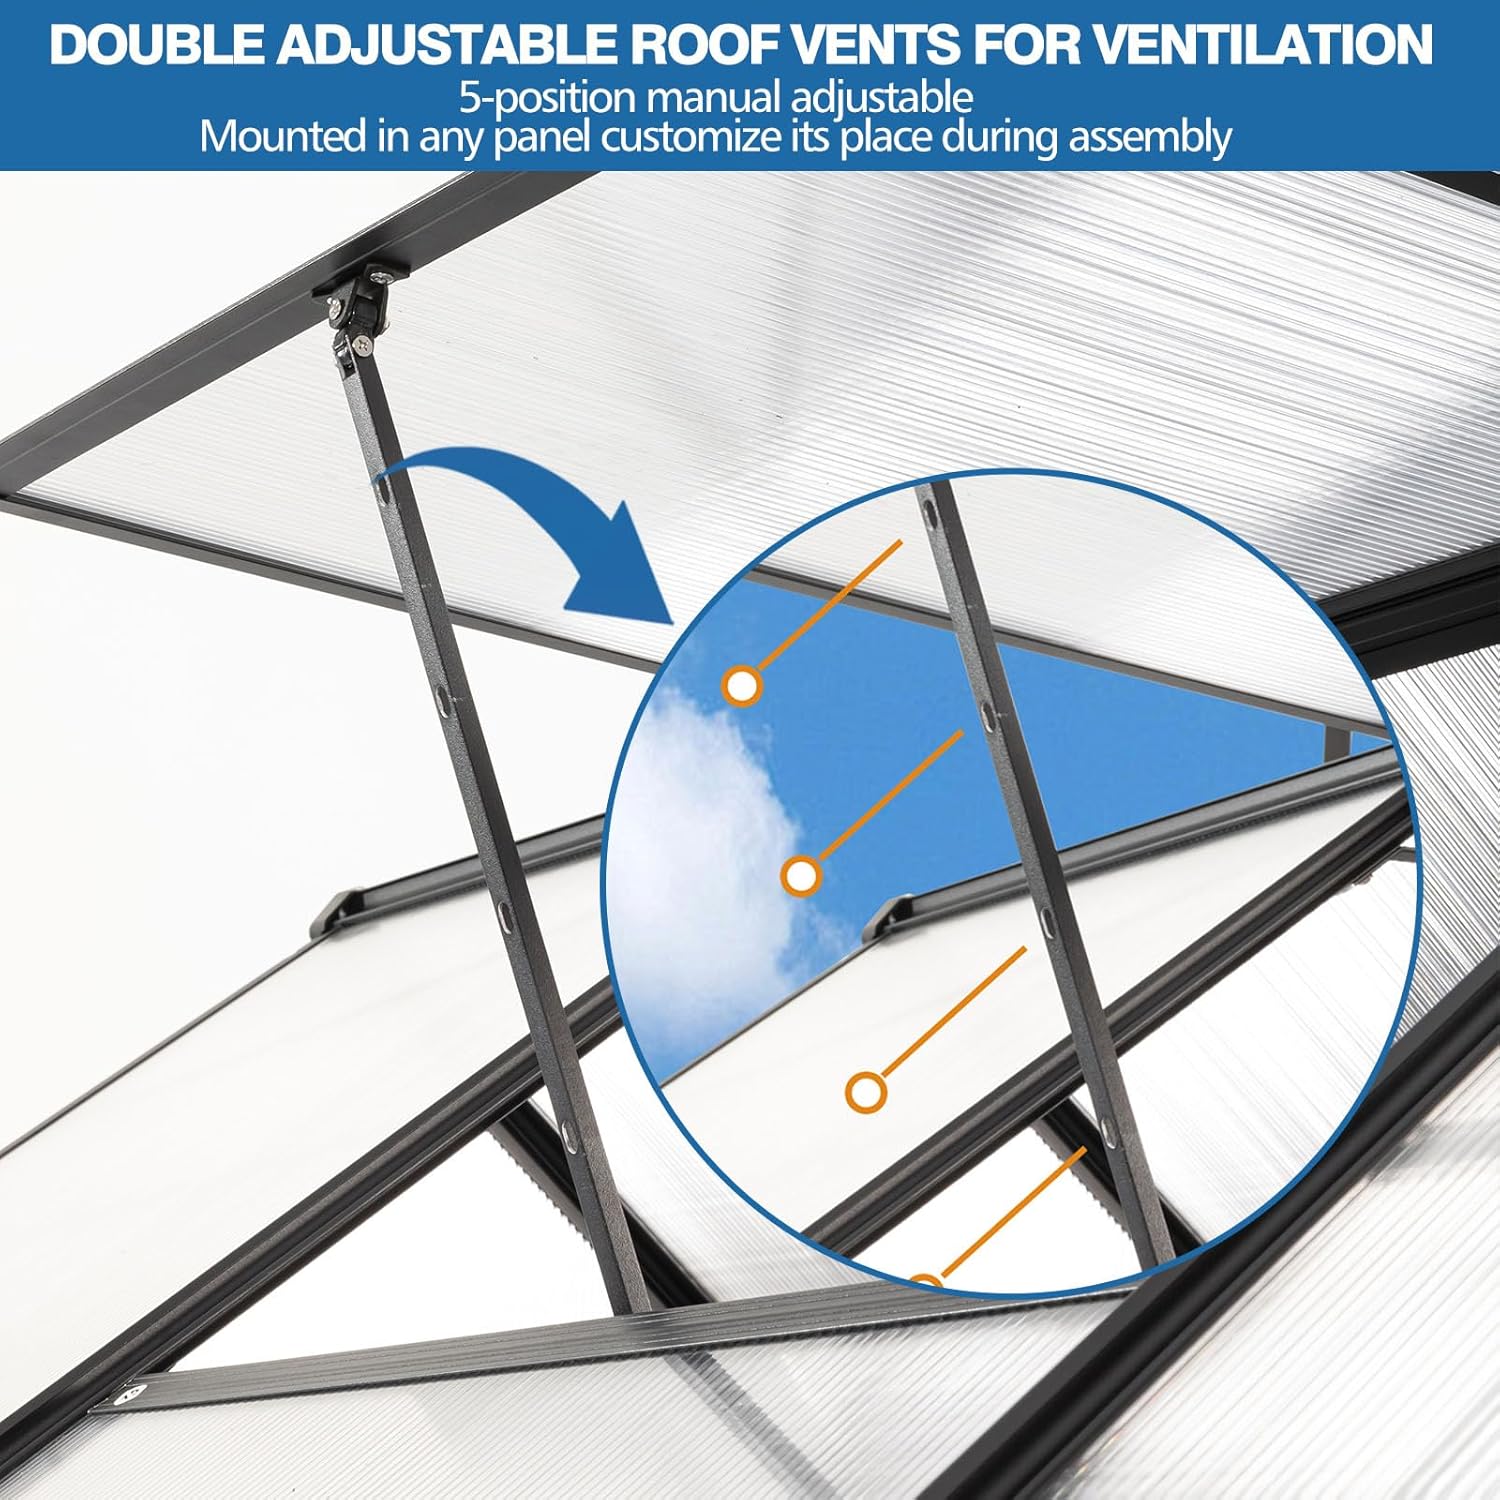
Image: A detailed view of the double adjustable roof vents, showing their 5-position manual adjustment capability for ventilation.

Image: A diagram highlighting key features: the convenient sliding door for easy access, the adjustable roof vent with 5 angles, rain gutters on both sides for effective drainage, and the thickened aluminum frame.
7. Maintenance
Regular maintenance will extend the life of your greenhouse:
- Cleaning: Clean the polycarbonate panels periodically with mild soap and water to ensure maximum light transmission. Avoid abrasive cleaners.
- Frame Inspection: Regularly check all bolts and screws to ensure they remain tight. Tighten any loose fasteners.
- Gutter Maintenance: Keep the rain gutters clear of leaves and debris to ensure proper drainage.
- Snow Removal: In areas with heavy snowfall, gently remove accumulated snow from the roof to prevent excessive load on the structure.
- Door Track: Keep the sliding door track clean to ensure smooth operation.
8. Troubleshooting
| Problem | Possible Cause | Solution |
|---|---|---|
| Panels blowing out or loose | Panels not fully seated in grooves; fasteners loose; insufficient anchoring. | Ensure panels are fully inserted into grooves. Tighten all frame fasteners. Verify greenhouse is securely anchored to the ground. |
| Sliding door sticks or is difficult to open/close | Debris in track; misaligned door; warped frame. | Clean the door track thoroughly. Check door alignment and adjust if necessary. Ensure the greenhouse base is level. |
| Water accumulation inside greenhouse | Clogged gutters; improper panel sealing; insufficient ventilation. | Clear gutters of debris. Inspect panel seals and apply sealant if needed. Increase ventilation by opening roof vents. |
| Greenhouse feels unstable | Improper anchoring; loose frame connections. | Re-check all anchoring points and ensure they are secure. Tighten all frame bolts and screws. |
9. Specifications
- Model: Black--6 x 8ft
- Brand: IMagacFun
- Frame Material: Aluminum
- Cover Material: 4mm Polycarbonate (PC)
- Product Dimensions (L x W x H): 74.8" x 146.06" x 76.77" (190 cm x 371 cm x 195 cm)
- Number of Doors: 1 (Sliding Door)
- Roof Vents: Adjustable
- Color: Black Frame, Clear Panels
- UPC: 786194676534
10. Warranty and Support
IMagacFun is committed to providing high-quality products. For any questions, concerns, or support needs regarding your greenhouse, please contact our customer service team. We aim to respond within 24 hours.
Contact Information: Refer to the contact details provided in your product packaging or visit the official IMagacFun website.

Image: Icons representing customer service, partnership, and technical support, indicating available assistance.