1. Introduction
The AVHzY AC WiFi Watt Meter S1TW is a versatile plug-in device designed for comprehensive electricity monitoring and intelligent temperature control. Featuring a 2.4-inch TFT-LCD HD color display, it provides real-time data on voltage, current, power, energy consumption, and even estimated electricity costs. With built-in Wi-Fi connectivity, it integrates seamlessly with the Tuya Smart or Smart Life mobile applications, allowing for remote control, timer functions, countdowns, and advanced protection settings. This manual provides detailed instructions for setting up, operating, and maintaining your device to ensure optimal performance and safety.

Figure 1.1: AVHzY AC WiFi Watt Meter S1TW with its external temperature probe and power cable.
2. Package Contents
- AVHzY AC WiFi Watt Meter S1TW
- External Temperature Probe
- User Manual (this document)
3. Specifications

Figure 3.1: Overview of the S1 WiFi Power Meter Socket specifications.
| Feature | Description |
|---|---|
| Model | S1TW |
| Material | ABS + PC |
| Measuring Voltage | AC85-265V |
| Internal Relay | 10A (Note: 10A or 16A relay may be delivered randomly. Maximum limit is 16A.) |
| Measuring Current | 0-10A Max16A |
| Max Power | 3680W (120V: 1920W, 230V: 3680W) |
| Energy Measurement Range | 0 ~ 1999KWh |
| Accuracy | ±1% |
| Wireless Consumption | <0.3W |
| Frequency | 50 / 60Hz |
| Power Factor | 0-1.00PF |
| Working Temperature | -10°C ~ +60°C |
| Wi-Fi Frequency | 2.412 ~ 2.484 MHz |
| Working Humidity | <80% |
| Security Type | WEP64 / WEP128 / TKIP / CCMP (AES) |
| Dimensions | 133mm x 76mm x 73mm |
| Weight | 160g |
| Screen Type | 2.4inch TFT-LCD HD Display Panel Graphic 240x320 Dot-matrix |
| Date Function | Month/Day |
4. Setup Guide
4.1 Physical Setup
- Unpack: Carefully remove the Watt Meter and all accessories from the packaging.
- Connect Temperature Probe: Plug the external temperature probe into the designated port on the side of the Watt Meter.
- Power On: Plug the Watt Meter into a standard US wall socket (AC85-265V). The display will light up.
- Connect Device: Plug the appliance you wish to monitor or control into the front socket of the Watt Meter.
4.2 App Installation & Connection
The Watt Meter integrates with the Tuya Smart or Smart Life applications for remote control and advanced features.
- Download App: Search for "Tuya Smart" or "Smart Life" in your device's app store (Apple App Store or Google Play Store) and install the application.
- Register/Login: Open the app and register a new account or log in if you already have one.
- Add Device:
- On the Watt Meter, turn on the power. Long press the "+" button to skip initial detection and enter the Wi-Fi networking configuration interface (showing a QR code and "Waiting network..." / "Pairing in EZ mode").
- In the app, tap the "+" icon to add a device.
- Select the appropriate device type (e.g., "Electrical Meter Sockets" or search for "Power Meter").
- Follow the in-app instructions to connect the device to your Wi-Fi network. Ensure your phone's location and Bluetooth are enabled.
- Confirmation: Once successfully connected, the Watt Meter's display will show "Internet of Things control monitoring - ON" and the device will appear in your app.
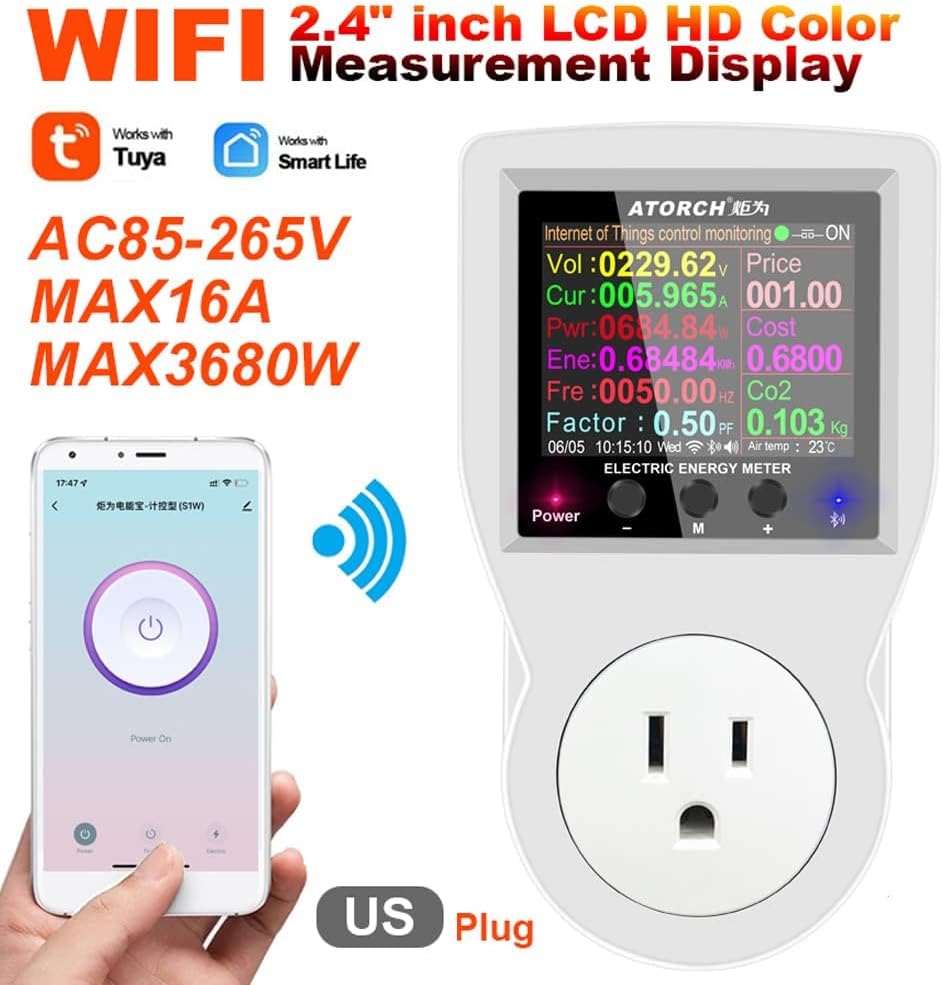
Figure 4.1: The Watt Meter connected to a mobile phone via Wi-Fi.
Video 4.1: Official product video demonstrating initial setup, display navigation, and app connection for the AC WiFi Watt Meter S1TW.
5. Operating Instructions
5.1 Display Navigation
The Watt Meter features a 2.4-inch color display and three buttons: Power, M (Mode/Menu), and + (Plus/Increase). The display cycles through various information screens.
- Short Press "-" or "+": To switch between different homepage displays (e.g., temperature control, energy monitoring, security protection).
- Long Press "M": To enter the settings page.
- Short Press "M" (in settings): To toggle between options.
- Short Press "-" or "+" (in settings): To select or adjust parameters.
- Long Press "M" (after setting): To save and exit settings.

Figure 5.1: Examples of various display interfaces including temperature control, energy monitoring, and security settings.

Figure 5.2: Notice regarding the updated display interface for the Watt Meter.
5.2 Basic Monitoring
The main display provides real-time data:
- Vol: Voltage (V)
- Cur: Current (A)
- Pwr: Instantaneous Power (W)
- Ene: Accumulated Energy Consumption (kWh)
- Fre: Frequency (Hz)
- Factor: Power Factor (PF)
- Co2: Carbon Dioxide Emissions (Kg)
- Cost: Estimated Electricity Cost (based on set unit price)
5.3 Temperature Control
The device can automatically control connected appliances based on temperature readings from the external probe.
- Switch Control Mode: Long press "+" to switch between control modes: "OFF" (manual close), "ON" (manual open), "Heat" (heating mode), "Cool" (cooling mode).
- Set Temperature (Heating Mode):
- In "Heat" mode, short press "M" to write temperature data.
- Use "-" or "+" to adjust the Heating Start Temp and Heating Stop Temp. Ensure the stop temp is at least one degree higher than the start temp.
- The device will automatically turn on when the temperature is lower than the start temp and disconnect when higher than the stop temp.
- Set Temperature (Cooling Mode):
- In "Cool" mode, short press "M" to write temperature data.
- Use "-" or "+" to adjust the Cooling Start Temp and Cooling Stop Temp. Ensure the stop temp is at least one degree lower than the start temp.
- The device will automatically turn on when the temperature is higher than the start temp and disconnect when lower than the stop temp.

Figure 5.3: Examples of temperature control application scenarios.

Figure 5.4: Display showing temperature detection and overload protection parameters.
5.4 Timer and Countdown Functions
Utilize the mobile app to set various timing functions:
- Timer Function: Schedule the device to turn on or off at specific times.
- Countdown Function: Set a countdown for the device to turn off after a specified duration.
5.5 Protection Functions
The Watt Meter includes built-in protection features to safeguard connected appliances:
- Over Current Protection (OCP): Prevents damage from excessive current draw. Default limit is 16A.
- Over Voltage Protection (OVP): Protects against voltage surges. Default limit is 275V.
- Over Power Protection (OPP): Shuts off power if the load exceeds the maximum power rating. Default limit is 3680W.
These limits can be adjusted via the device's settings menu (Long press "M" to enter settings, then navigate to Over-Voltage, Over-Current, Over-Power). The device will automatically disconnect the load if these limits are exceeded.

Figure 5.5: The intelligent power-off feature helps prevent overcharge.
6. Maintenance
6.1 Cleaning
To maintain the device's performance and appearance, wipe it regularly with a soft, dry cloth. Do not use abrasive cleaners or solvents.
6.2 Firmware Updates
Periodically check for firmware updates through the Tuya Smart or Smart Life application. Updates can optimize performance, improve stability, and add new features.
- Check for Updates: In the app, navigate to the device settings or profile to find the firmware update option.
- Update Process: Follow the on-screen prompts. Ensure the device remains powered on and connected to Wi-Fi during the update process. Do not unplug the device until the update is complete.
Figure 6.1: Important notice regarding relay and firmware upgrades, indicating continuous optimization.
7. Troubleshooting
- Device not powering on: Ensure the Watt Meter is securely plugged into a live US wall socket. Check the power outlet with another device.
- Wi-Fi connection issues:
- Ensure your Wi-Fi network is 2.4GHz. The device does not support 5GHz networks.
- Verify your Wi-Fi password is correct.
- Move the device closer to your Wi-Fi router.
- Try resetting the device's Wi-Fi settings via the display menu (Data Zero / Wi-Fi Device Reset) and re-pairing with the app.
- Inaccurate readings: Ensure the device is properly connected and the appliance is drawing power. If issues persist, consider performing a "Data Zero" reset from the device settings.
- Temperature control not working:
- Verify the temperature probe is securely connected.
- Check that the Heating Start/Stop Temp or Cooling Start/Stop Temp settings are correctly configured and that the stop temperature is appropriately offset from the start temperature (e.g., for heating, stop temp > start temp).
- Ensure the device is in the correct mode (Heat or Cool).
- Overload Protection Triggered: If the device frequently trips due to over-current, over-voltage, or over-power, check the connected appliance's power requirements. Ensure it does not exceed the Watt Meter's maximum ratings (16A, 275V, 3680W) or your customized protection limits.
8. Safety Information
- Do not disassemble or modify the device.
- Do not expose the device to water, moisture, or extreme temperatures.
- Ensure the connected appliance's power consumption does not exceed the Watt Meter's maximum ratings.
- Keep out of reach of children.
- Use only with compatible US wall sockets.
9. Warranty and Support
This product comes with a standard manufacturer's warranty. For detailed warranty information, technical support, or service inquiries, please refer to the contact information provided on the product packaging or visit the official AVHzY website. Keep your purchase receipt for warranty claims.