
1. Introduction
This manual provides essential information for the installation, operation, and maintenance of your Geofrey Dynamo. This dynamo is designed as a replacement part compatible with various Kubota equipment, including garden tractors, lawnmowers, excavators, mini tractors, and compact mowers. Please read this manual thoroughly before attempting any installation or maintenance.
2. Safety Information
Warning:
- Always disconnect the battery's negative terminal before working on any electrical components to prevent electrical shock or damage to the system.
- Wear appropriate personal protective equipment (PPE), such as safety glasses and gloves, during installation.
- Installation of this component requires mechanical and electrical knowledge. Professional installation is highly recommended.
- Ensure the engine is off and cooled down before beginning any work.
3. Product Identification and Overview
The Geofrey Dynamo serves as a critical component for your equipment's electrical system, responsible for generating power. Verify that the part number on your existing dynamo matches one of the compatible numbers listed below.
Compatible Part Numbers:
- KH007
- KH35
- KH41
- KH61
- B1550D

Figure 3.1: Front view of the Geofrey Dynamo, highlighting the mounting points and electrical terminals.

Figure 3.2: Side view of the Geofrey Dynamo, illustrating its overall form factor and the pulley shaft.
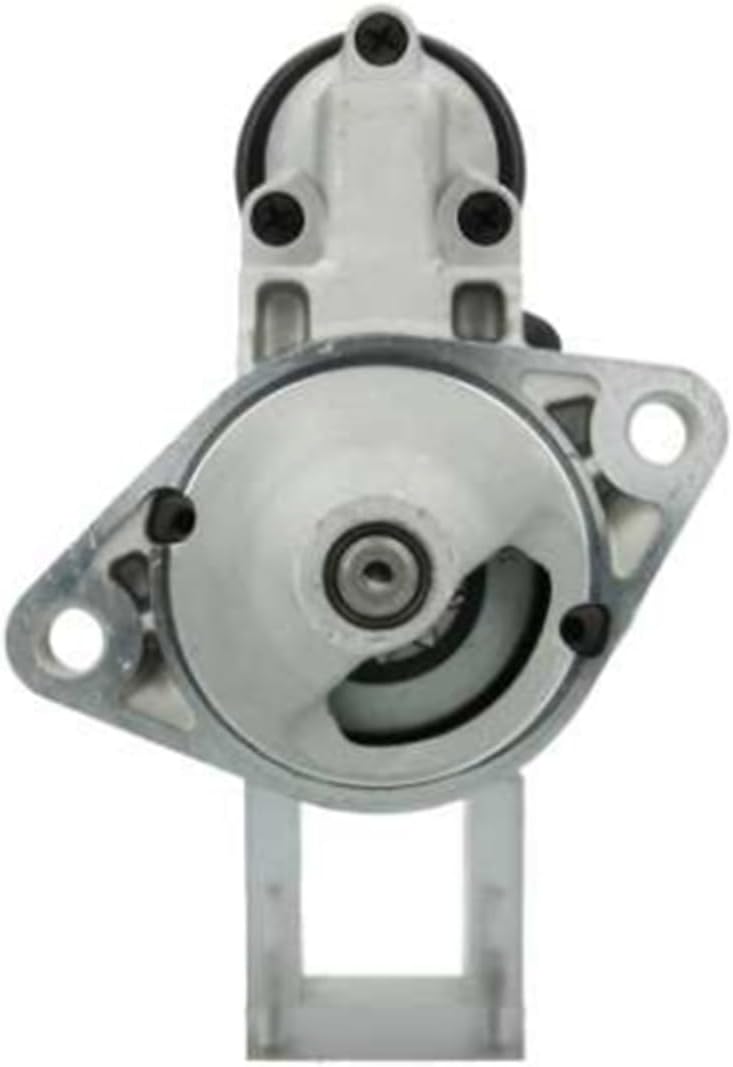
Figure 3.3: Rear view of the Geofrey Dynamo, displaying the cooling fan and additional mounting bracket.
4. Package Contents
Upon opening the package, please ensure all items are present and undamaged.
- 1 x Geofrey Dynamo (Part Number: KH007, KH35, KH41, KH61, or B1550D)
5. Installation
Note: Professional installation is strongly recommended due to the complexity of electrical and mechanical systems.
- Preparation: Ensure the equipment is turned off, the engine is cool, and the battery's negative terminal is disconnected.
- Locate the Old Dynamo: Identify the existing dynamo on your Kubota equipment. Note its mounting position and how all electrical connections are routed. Taking photos can be helpful.
- Remove Old Dynamo: Carefully disconnect all electrical wires from the old dynamo. Unbolt the mounting hardware and remove the old unit.
- Install New Dynamo: Position the new Geofrey Dynamo in the same location as the old one. Secure it with the appropriate mounting bolts, ensuring it is firmly seated.
- Connect Electrical Wires: Reconnect all electrical wires to the new dynamo, ensuring correct polarity and secure connections. Refer to your equipment's service manual for specific wiring diagrams if unsure.
- Reconnect Battery: Once all connections are secure and verified, reconnect the battery's negative terminal.
- Test: Start the equipment and check for proper charging system operation. Monitor the battery voltage and any charging indicator lights.
6. Operation
Once correctly installed, the Geofrey Dynamo operates automatically as part of your equipment's charging system. It converts mechanical energy from the engine into electrical energy to power the equipment's electrical components and recharge the battery. No user intervention is required for its normal operation.
7. Maintenance
The Geofrey Dynamo is designed for durability and requires minimal maintenance. However, periodic checks can help ensure its longevity:
- Visual Inspection: Periodically inspect the dynamo for any signs of physical damage, loose wires, or corrosion on terminals.
- Belt Tension: Ensure the drive belt (if applicable) connected to the dynamo has the correct tension. Refer to your equipment's service manual for specifications.
- Cleanliness: Keep the dynamo free from excessive dirt, debris, and oil buildup, which can hinder cooling.
8. Troubleshooting
If you experience issues with your equipment's charging system after installing the dynamo, consider the following:
- No Charge/Low Voltage:
- Check all electrical connections to the dynamo and battery for tightness and corrosion.
- Verify the drive belt is intact and properly tensioned.
- Inspect the battery for proper voltage and condition.
- Unusual Noise:
- Listen for grinding or squealing sounds, which could indicate a faulty bearing or loose belt.
- Ensure all mounting bolts are tight.
- Overcharging:
- If the battery is consistently overcharged, it may indicate an issue with the voltage regulator (often integrated into the dynamo).
For persistent issues, it is recommended to consult a qualified technician or the equipment's service manual.
9. Specifications
| Attribute | Detail |
|---|---|
| Item Name | Dynamo |
| Part Numbers | KH007, KH35, KH41, KH61, B1550D |
| Application | Kubota Garden Tractor, Lawnmower, Excavator, Mini Tractor, Compact Mower |
| Package Includes | 1 Piece Dynamo |
10. Warranty Information
This Geofrey Dynamo comes with a 180-day warranty from the date of purchase. This warranty covers manufacturing defects. Please retain your proof of purchase for any warranty claims. The warranty does not cover damage due to improper installation, misuse, or normal wear and tear.
11. Support and Contact
If you have any questions regarding the installation, operation, or warranty of your Geofrey Dynamo, please contact the seller or retailer from whom you purchased the product. Provide your product model number and purchase details for efficient assistance.