O OCEAN DIGITAL WR-860
Ocean Digital WR-860 FM Wi-Fi Internet Radio User Manual
Model: WR-860
1. Introduction
This manual provides instructions for the setup, operation, and maintenance of your Ocean Digital WR-860 FM Wi-Fi Internet Radio. Please read this manual thoroughly before using the device to ensure proper functionality and to maximize your listening experience.

2. What's in the Box
Upon unpacking, verify that all the following items are included:
- Ocean Digital WR-860 Internet Radio Unit
- Power Adapter
- Remote Control (batteries included)
- Owner's Manual (this document)
- Quick Start Guide

3. Product Overview
3.1 Front Panel

3.2 Top Panel Controls
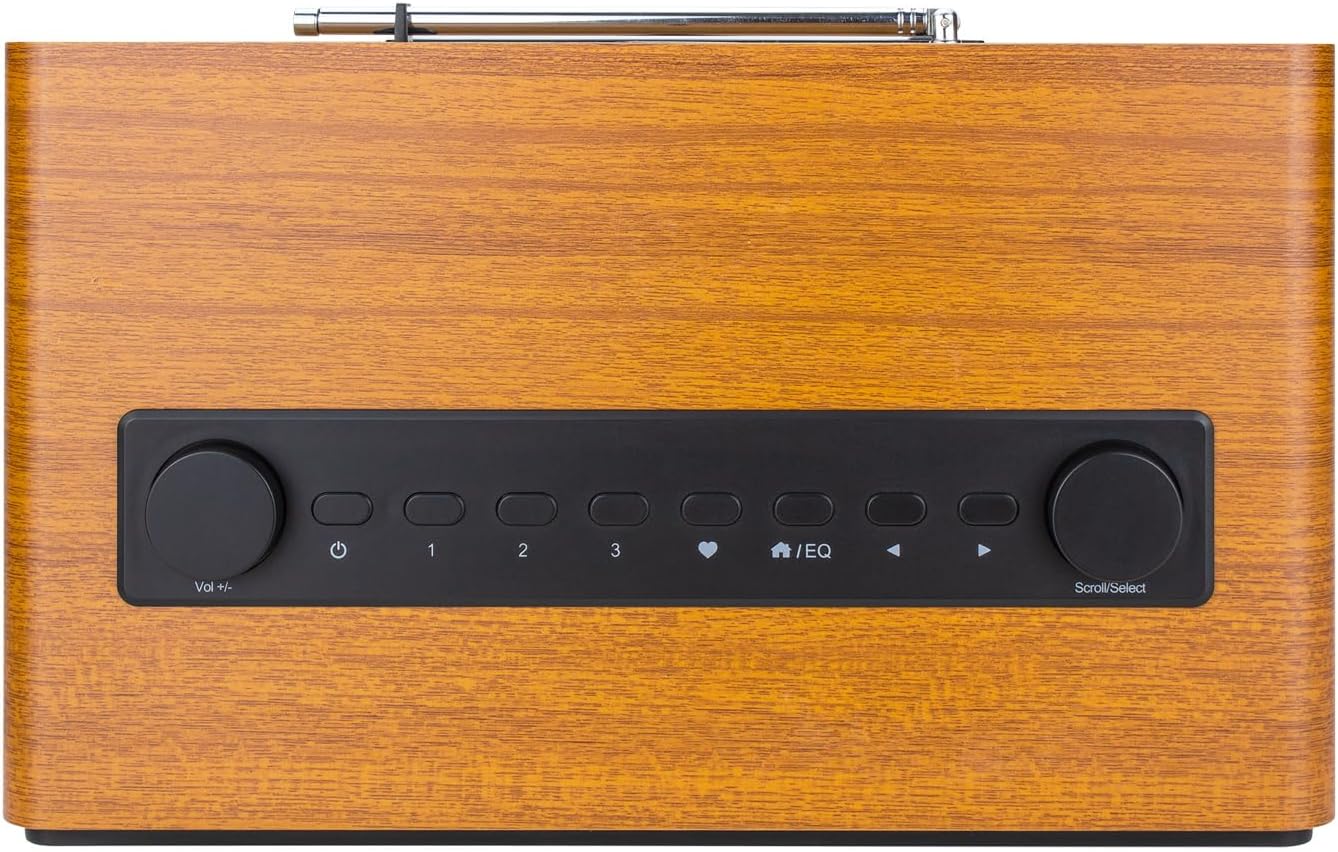
The top panel features the primary control interface:
- Volume Knob (Vol +/-): Rotate to adjust audio volume. Press to mute/unmute.
- Standby/Activate Button: Press to turn the radio on or put it into standby mode.
- Preset Buttons (1, 2, 3): Quickly access saved favorite stations.
- Favorites Button: Access your list of saved favorite stations.
- EQ Button: Adjust equalizer settings.
- Navigation Buttons: Use for menu navigation.
- Scroll/Select Knob: Rotate to scroll through menus and options. Press to confirm a selection.
3.3 Rear Panel Connections

The rear panel provides various connectivity options:
- ON/OFF Switch: Main power switch for the unit.
- DC 12V IN: Power input for the included adapter.
- USB Playback: Connect a USB drive for media playback.
- Micro SD: Insert a Micro SD card for media playback.
- Aux In: Connect external audio devices using a 3.5mm audio cable.
- Line Out: Output audio to external amplifiers or speakers.
- Telescopic Antenna: Extend for optimal FM radio reception.
4. Initial Setup
4.1 Power Connection
- Ensure the ON/OFF switch on the rear panel is in the OFF position.
- Connect the provided power adapter to the DC 12V IN port on the rear of the radio.
- Plug the power adapter into a wall outlet.
- Flip the ON/OFF switch on the rear panel to the ON position.
- Press the Standby/Activate button on the top panel to turn on the radio.
4.2 Network Connection (Wi-Fi)
For Internet Radio functionality, a stable Wi-Fi connection is required.
- Upon first power-on, the radio will guide you through the network setup process.
- Select 'Network Wizard' or navigate to 'Settings' > 'Network' > 'Wi-Fi Network'.
- The radio will scan for available Wi-Fi networks. Select your network from the list.
- Enter your Wi-Fi password using the Scroll/Select knob and navigation buttons. Press the Scroll/Select knob to confirm each character and then to confirm the entire password.
- Once connected, the radio will display a confirmation message.
4.3 FM Antenna
For FM radio reception, extend the telescopic antenna located on the rear panel to its full length and adjust its position for optimal signal strength.
5. Operating Modes
The WR-860 supports multiple audio sources:
- Internet Radio (Wi-Fi)
- FM Radio
- Bluetooth
- USB Playback
- Micro SD Playback
- Aux In

5.1 Internet Radio
Access thousands of radio stations worldwide via your Wi-Fi connection.
- From the main menu, select 'Internet Radio'.
- You can browse stations by location, genre, or search for specific stations.
- Use the Scroll/Select knob to navigate and select stations.
- To save a station as a favorite, press and hold one of the Preset buttons (1, 2, 3) or the Favorites button.
5.2 FM Radio
Listen to local FM broadcasts.
- From the main menu, select 'FM Radio'.
- Extend the telescopic antenna for best reception.
- Use the navigation buttons to tune to frequencies or perform an auto-scan for available stations.
- Press and hold a Preset button to save the current station.
5.3 Bluetooth Mode
Stream audio wirelessly from your Bluetooth-enabled devices.
- From the main menu, select 'Bluetooth'. The radio will enter pairing mode.
- On your external device (e.g., smartphone, tablet), enable Bluetooth and search for 'WR-860'.
- Select 'WR-860' to pair. Once connected, you can play audio from your device through the radio.
5.4 USB / Micro SD Playback
Play audio files directly from a USB drive or Micro SD card.
- Insert a USB drive into the USB Playback port or a Micro SD card into the Micro SD slot on the rear panel.
- From the main menu, select 'Media Center' and then choose 'USB' or 'Micro SD'.
- Navigate through your folders and files using the Scroll/Select knob and navigation buttons.
5.5 Aux In
Connect external audio sources using a 3.5mm audio cable.
- Connect one end of a 3.5mm audio cable to the Aux In port on the rear of the radio.
- Connect the other end to the headphone jack or audio output of your external device.
- From the main menu, select 'Aux In'.
- Control playback from your external device.
6. Additional Features
6.1 Alarm Clock
Set up to two independent alarms.
- Navigate to 'Settings' > 'Alarm'.
- Select 'Alarm 1' or 'Alarm 2'.
- Configure the alarm time, source (buzzer, Internet Radio, FM), volume, and recurrence (daily, once, weekends, weekdays).
- Ensure the alarm is set to 'On'.
6.2 Sleep Timer
Set the radio to automatically turn off after a specified period.
- Navigate to 'Settings' > 'Sleep Timer'.
- Select the desired duration (e.g., 15, 30, 60, 90, 120 minutes).
- The radio will count down and enter standby mode when the timer expires.
6.3 Display Settings
Adjust the display brightness and information shown.
- Dimmer: Navigate to 'Settings' > 'Dimmer' to adjust the brightness level for active and standby modes.
- Display Options: The radio can display a large clock when playing, or go completely off, depending on user preference.
7. Maintenance
7.1 Cleaning
- Always disconnect the power adapter before cleaning.
- Use a soft, dry cloth to wipe the exterior surfaces of the radio.
- Do not use abrasive cleaners, waxes, or solvents as they may damage the finish.
- Avoid spraying liquids directly onto the unit.
7.2 Storage
If storing the radio for an extended period, ensure it is powered off and unplugged. Store in a cool, dry place away from direct sunlight and extreme temperatures.
8. Troubleshooting
| Problem | Possible Cause | Solution |
|---|---|---|
| No power | Power adapter not connected; ON/OFF switch off; Power outlet faulty. | Check power adapter connection; Ensure ON/OFF switch is ON; Test power outlet with another device. |
| No sound | Volume too low; Mute activated; Incorrect source selected. | Increase volume; Press Volume knob to unmute; Select correct operating mode (Internet Radio, FM, BT, etc.). |
| Cannot connect to Wi-Fi | Incorrect password; Router too far; Network issue. | Re-enter Wi-Fi password carefully; Move radio closer to router; Restart router; Check network settings. |
| Poor FM reception | Antenna not extended; Weak signal. | Fully extend and adjust the telescopic antenna; Try repositioning the radio. |
| Bluetooth pairing fails | Device not in pairing mode; Radio not in Bluetooth mode. | Ensure both devices are in pairing mode; Select 'Bluetooth' mode on the radio. |
9. Specifications
- Model: WR-860
- Brand: O OCEAN DIGITAL
- Product Dimensions: 12.2"L x 7.28"W x 5.2"H (30.99 cm L x 18.49 cm W x 13.21 cm H)
- Item Weight: 5.38 pounds (2.44 kg)
- Color: Brown
- Connectivity Technology: Bluetooth, Wi-Fi
- Tuner Technology: Internet Radio, FM
- Special Feature: Built-In Clock, Alarm, Sleep Timer, 2.4" Color Display
- Power Source: Corded Electric (DC 12V)
- Included Components: Owner's Manual, Power Adapter, Quick Start Guide, Remote control (batteries included)

10. Warranty and Support
Ocean Digital products are designed and manufactured to the highest quality standards. For specific warranty information and customer support, please refer to the warranty card included with your product or visit the official Ocean Digital website. Keep your purchase receipt as proof of purchase for warranty claims.