Introduction
This manual provides detailed instructions for the safe and proper installation, operation, and maintenance of your UPGRAVITY Computer Monitor Wall Mount. Designed for 13-34 inch flat or curved screens, this mount features a gas spring system for height adjustment and VESA compatibility up to 200x200mm. Please read this manual thoroughly before installation and retain it for future reference.
Safety Information
- Ensure all components are present and undamaged before installation. Do not use if any parts are missing or faulty.
- This product is designed for installation on wood studs, concrete walls, or brick walls. Do not install into drywall alone, as this may result in instability and potential damage.
- Verify the weight capacity of the mount (up to 26.5 lbs) and the VESA compatibility (75x75mm, 100x100mm, 100x200mm, 150x150mm, 150x200mm, 200x200mm) match your monitor's specifications.
- Always use appropriate tools and follow all installation steps carefully to prevent injury or damage.
- Seek professional assistance if you are unsure about any part of the installation process.
Package Contents
Please check that all the following items are included in your package:
- Monitor Wall Mount Arm Assembly
- Wall Plate
- VESA Plate
- VESA Extension Kit (for 200x200mm patterns)
- Mounting Hardware (screws, anchors, washers for various wall types and monitor sizes)
- Tools (Allen key)
- Instruction Manual

Specifications
| Feature | Specification |
|---|---|
| Compatible Screen Size | 13-34 inches (flat or curved) |
| Weight Capacity | 4.4 - 26.5 lbs |
| VESA Compatibility | 75x75mm, 100x100mm, 100x200mm, 150x150mm, 150x200mm, 200x200mm |
| Material | High-grade Steel & Aluminum |
| Height Adjustment Range | 11.02 inches |
| Tilt Angle | +90°/-45° |
| Swivel Angle | 180° |
| Rotation | 360° (landscape to portrait) |
| Minimum Distance to Wall | 3.39 inches |
| Maximum Extension from Wall | 20 inches |
Setup and Installation
Follow these steps to properly install your monitor wall mount. It is recommended to have a second person assist during certain stages of installation.

Step 1: Mount Spotting and Drilling
- Determine the desired mounting location on a sturdy wall (wood stud, concrete, or brick).
- Hold the wall plate against the wall at the desired height and mark the drilling points.
- Drill pilot holes at the marked locations. Use appropriate drill bits and anchors for your wall type.
- Secure the wall plate to the wall using the provided screws. Ensure it is firmly attached and level.
Step 2: Install Decorative Cover
- Once the wall plate is secured, attach the decorative covers to conceal the mounting screws.
Step 3: Install the VESA Plate to your Monitor
- Place your monitor face down on a soft, clean surface.
- Align the VESA plate with the mounting holes on the back of your monitor.
- Use the appropriate screws and washers from the hardware kit to secure the VESA plate to the monitor. Ensure a snug fit without overtightening.
Step 4: Adjust the Head and Unscrew the Screws
- Before attaching the monitor, adjust the monitor head on the arm to a suitable position.
- Loosen any pre-tightened screws on the monitor head to allow for easier attachment of the monitor.
Step 5: Install the Monitor
- Carefully lift the monitor (with the VESA plate attached) and slide it onto the monitor arm's head.
- Secure the monitor to the arm using the provided thumb screw or locking mechanism.
Step 6: Install Cable Case
- Route your monitor cables through the integrated cable management channels on the arm.
- Close the cable covers to keep the cables neat and organized.
Operating and Adjustment
The UPGRAVITY monitor arm offers flexible adjustments for an ergonomic viewing experience.
Height Adjustment (Gas Spring)
The advanced gas spring system allows for smooth and effortless height adjustments over an 11.02-inch range. Gently push or pull the monitor to the desired height. The arm will hold its position once released.
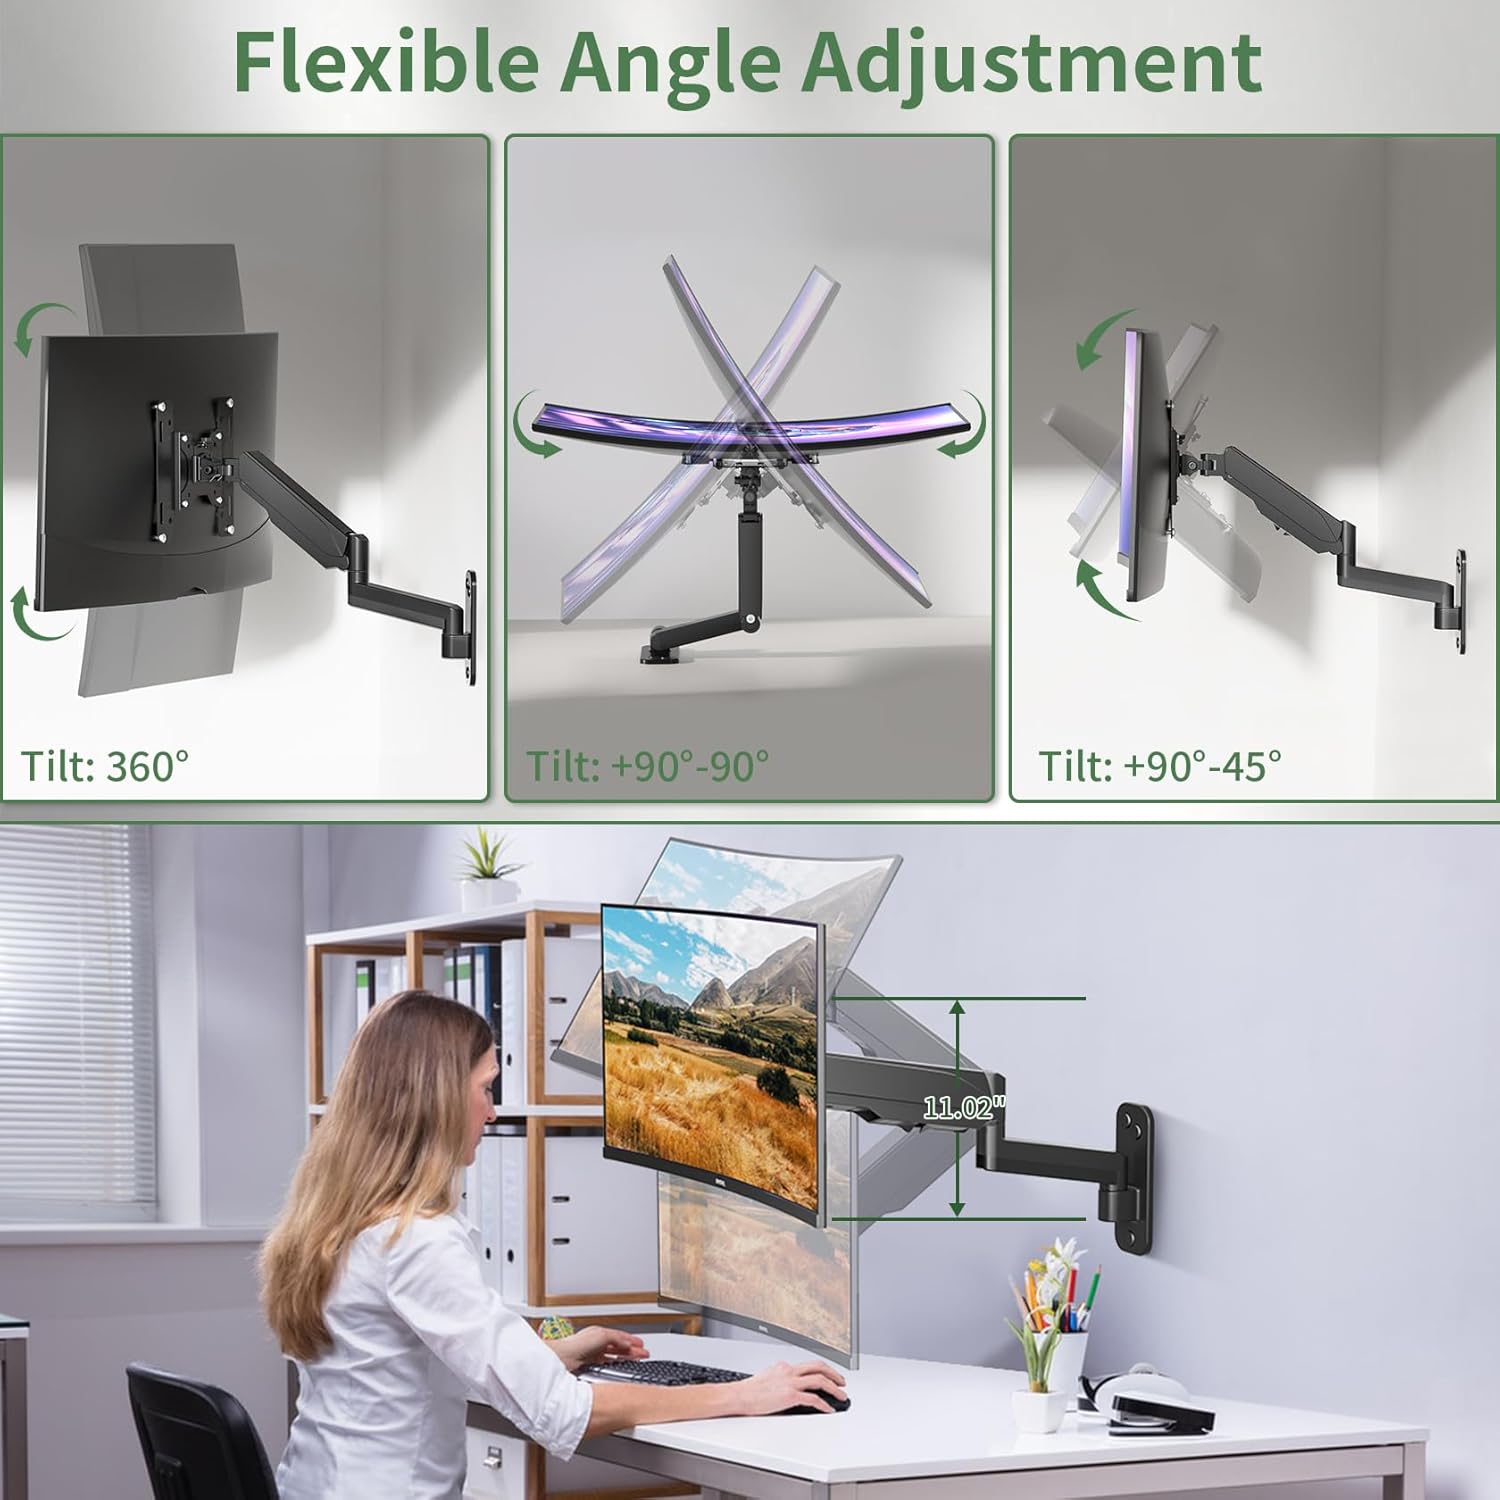
Tilt, Swivel, and Rotation
Customize your viewing angle with the following movements:
- Tilt: Adjust the monitor +90°/-45° to reduce glare and optimize viewing.
- Swivel: Swivel the monitor 180° left or right to share your screen or change viewing direction.
- Rotation: Rotate the monitor 360° to switch between landscape and portrait modes.

Gas Spring Tension Adjustment
If your monitor sags or rises too easily, the gas spring tension may need adjustment. Use the provided Allen key to adjust the tension screw located on the arm. Turn clockwise to increase tension (for heavier monitors) or counter-clockwise to decrease tension (for lighter monitors).

Maintenance
To ensure the longevity and optimal performance of your UPGRAVITY monitor wall mount, follow these maintenance guidelines:
- Cleaning: Wipe the mount with a soft, damp cloth. Avoid using abrasive cleaners or solvents that could damage the finish.
- Periodic Inspection: Regularly check all screws and connections to ensure they remain tight. Re-tighten if necessary.
- Gas Spring: The gas spring is designed for long-term use. If you notice a significant change in its performance, refer to the tension adjustment section.
Troubleshooting
If you encounter any issues with your monitor wall mount, refer to the following common problems and solutions:
- Monitor Sags or Does Not Stay at Desired Height: The gas spring tension may be too low for your monitor's weight. Increase the gas spring tension using the provided Allen key (refer to 'Gas Spring Tension Adjustment' section).
- Monitor is Difficult to Move Up or Down: The gas spring tension may be too high. Decrease the gas spring tension using the provided Allen key.
- Monitor Tilts Forward or Backward Too Easily/Stiffly: The tilt bolt may need adjustment. Loosen or tighten the tilting bolt on the monitor head to achieve the desired resistance (refer to 'Gas Spring Tension Adjustment' image for location).
- Mount Feels Unstable: Recheck all wall mounting screws and monitor attachment screws to ensure they are securely tightened. Verify that the wall type is suitable for installation.
Warranty and Support
UPGRAVITY is committed to delivering high-quality products and exceptional after-sales service. For warranty information, technical support, or any inquiries regarding your product, please visit the official UPGRAVITY store or contact customer service through the platform where you purchased the product.
Visit the UPGRAVITY Store for more information.