
Metal Earth PS2013
Metal Earth Premium Series Golden Gate Bridge 3D Metal Model Kit Instruction Manual
Model: PS2013
Introduction
This manual provides detailed instructions for assembling your Metal Earth Premium Series Golden Gate Bridge 3D Metal Model Kit. This kit allows you to construct a highly detailed replica of the iconic Golden Gate Bridge using precision-etched steel sheets. No glue or solder is required for assembly.
The model is designed for individuals aged 14 and up, offering a moderate difficulty level. Patience and attention to detail are key for a successful build.
Safety Information
- Small Parts: This kit contains small parts and is not suitable for children under 3 years due to choking hazards.
- Sharp Edges: Metal sheets may have sharp edges. Handle with care to avoid cuts.
- Tools: Use recommended tools carefully. Keep tools out of reach of children.
- Adult Supervision: Adult supervision is recommended for younger builders.
What's in the Box
Your Metal Earth Premium Series Golden Gate Bridge kit includes:
- 2.5 precision-etched metal sheets containing all model components.
- Printed assembly instructions.

Image: The back of the product packaging, illustrating the included metal sheets and printed instructions, along with basic assembly diagrams.
Tools Required
While no glue or solder is needed, specific tools are highly recommended for optimal assembly:
- Small Clippers: For cleanly detaching parts from the metal sheets.
- Needle-Nose Pliers: Essential for bending and twisting connection tabs with precision.
- Tweezers: Useful for handling small parts and making delicate adjustments.
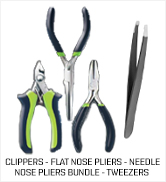
Image: A set of recommended tools including clippers, flat-nose pliers, needle-nose pliers, and tweezers, which aid in precise assembly.
Assembly Instructions
Follow the numbered steps in the included printed instructions. The general process involves detaching parts, bending them into shape, and connecting them using tabs and slots.
Step 1: Detach Parts
Carefully clip each part from the metal sheets. Avoid twisting or tearing, as this can damage the part. Use small clippers for clean removal.

Image: A close-up of a hand using precision clippers to carefully detach a small, intricate metal part from its sheet.
Step 2: Bend and Fold
Many parts require bending or folding to achieve their 3D shape. Use needle-nose pliers or tweezers for accurate bends along designated fold lines. Refer to the diagrams in your instruction booklet for specific angles and directions.

Image: A pair of pliers carefully bending a red metal piece, demonstrating the 'bend and fold' technique for shaping components.
Step 3: Connect Parts Using Tabs and Holes
Align the tabs on one part with the corresponding holes on another. Insert the tabs through the holes.

Image: A close-up view showing how metal tabs are designed to fit into corresponding holes for secure connections.
Step 4: Bend and Twist Tabs to Secure
Once tabs are inserted, bend or twist them to secure the connection. This locks the parts together without the need for adhesives.

Image: A detailed shot illustrating the technique of bending and twisting tabs to firmly secure assembled metal components.
Completed Model

Image: The completed Metal Earth Premium Series Golden Gate Bridge model, showcasing its intricate details and red finish.
Operating and Display
Once assembled, your Metal Earth Golden Gate Bridge model is ready for display. Place it on a stable, flat surface away from direct sunlight or extreme temperatures to preserve its finish. This model is intended for static display and is not designed for play.
Maintenance
To maintain the appearance of your metal model, gently dust it with a soft, dry cloth or a soft brush. Avoid using abrasive cleaners or liquids, as these can damage the metal finish. Store the model in a dry environment to prevent tarnishing.
Troubleshooting Tips
- Parts are too small/fragile: Work slowly and use fine-tipped tweezers for better control. If a part breaks, consider using a tiny amount of super glue as a last resort, though the kit is designed to be glue-free.
- Difficulty with bends: Ensure you are bending along the etched lines. Use the edge of a ruler or a flat tool to assist with straight bends. For curved parts, use a cylindrical object (like a pen) as a guide.
- Tabs not fitting: Double-check the orientation of the parts. Sometimes tabs need a slight adjustment with pliers to fit perfectly into the holes.
- Model is wobbly: Ensure all tabs are securely bent or twisted. Revisit connections that seem loose.
- Patience is key: This is a detailed model. Take breaks if you feel frustrated and return to it with fresh eyes.
Specifications
| Feature | Detail |
|---|---|
| Brand | Metal Earth |
| Model Name | Golden Gate Bridge |
| Model Number | PS2013 |
| Assembled Dimensions (L x W x H) | 14.45 x 0.94 x 2.95 inches |
| Scale | 1:7535 |
| Material | Steel |
| Number of Pieces | 105 |
| Difficulty Level | Moderate |
| Recommended Age | 14 years and up |
Warranty and Support
Metal Earth products are manufactured by Fascinations. For any questions regarding missing parts, assembly issues, or product defects, please contact Fascinations directly. Specific warranty information may be available on the manufacturer's official website.
You can find more information and potentially a 360-degree view of the model at the official Metal Earth website: www.metalearth.com/360/PS2013
Ask a question about this manual
Ask about setup, troubleshooting, compatibility, parts, safety, or missing instructions. Manuals+ will review the question and use this page’s manual context to help answer it.