Introduction
This manual provides detailed instructions for the installation, operation, and maintenance of your new EagleNav 12.1 Inch Android 13 Car Radio. This advanced car stereo system is designed to enhance your driving experience with features such as Wireless CarPlay, Android Auto, Digital Sound Processor (DSP), Bluetooth, WiFi connectivity, Steering Wheel Control (SWC), and MirrorLink functionality. Please read this manual thoroughly before installation and use to ensure proper function and safety.
Compatibility
This EagleNav 12.1 Inch Car Radio is specifically designed for Ford F-150 models manufactured between 2013 and 2014. It is engineered for plug-and-play installation, ensuring seamless integration with your vehicle's existing systems. Please verify your vehicle's model year before proceeding with installation.

Image: The EagleNav 12.1 Inch Car Radio shown installed in a Ford F-150 dashboard, highlighting compatibility with 2013-2014 models and their original radio interfaces.
What's in the Box
The package includes all necessary components for a standard installation and operation:
- EagleNav 12.1 Inch Android 13 Car Radio Unit
- Main Harness Adaptor
- RCA Audio Output Cables
- AUX Input Cables
- Camera Input Cables
- 54P Reverse Camera Converter
- 12 Reverse Camera Converter
- 8P USB Harness
- 10 Pin USB Line
- Radio Antenna Cable
- GPS Antenna Cable
- WiFi Antenna Cable
- MIC Cable (External Microphone)
- Dynamic Guide Line Adapter
- Canbox

Image: A visual representation of all cables, adapters, and the main unit included with your EagleNav car radio.
Setup and Installation
The EagleNav 12.1 Inch Car Radio is designed for straightforward installation. For a visual guide, please refer to the official installation video provided below. It demonstrates the process of removing existing components and connecting the new unit.
Video: Official installation guide for the EagleNav 12.1 Inch Car Radio in a Ford F-150 2013-2014 model. This video demonstrates the step-by-step process of removing the old radio and installing the new unit, including wiring connections.
Post-Installation Air Conditioning Settings
After installation, it is crucial to adjust the air conditioning settings according to your specific vehicle model to ensure proper climate control functionality. Follow these steps:
- Navigate to APPS on the main screen.
- Select Car Settings.
- Choose Air Mode Setting.
- Select either High Configuration or Low Configuration based on your vehicle's original AC system.

Image: A visual guide illustrating the menu navigation to configure the air conditioning settings after installing the car radio.
Operating Instructions
Wireless CarPlay and Android Auto
The unit supports both Wireless CarPlay and Android Auto, allowing seamless integration with your smartphone for navigation, music, calls, and more. The operating speed is dependent on your phone's performance.
- For Wireless CarPlay: Enable Bluetooth on your iPhone and pair it with the car radio. Then, open the 'PhoneLink' application on the car radio.
- For Wired Android Auto: Ensure the Android Auto app is installed on your cell phone. Connect your phone to the radio via the original USB cable.

Image: The car radio screen displaying the Wireless CarPlay interface, with a smartphone mirroring its screen below.

Image: A graphic detailing the steps to connect both Wireless CarPlay and Wired Android Auto to the car stereo system.
Android System and Display
The unit features a 12.1-inch T-Style large vertical screen with advanced IPS (In-Plane Switching) technology, providing clear viewing from various angles. It operates on a stable Android System with 4GB RAM and 64GB ROM for smooth performance and quick response times.
GPS Navigation and WiFi Connectivity
The car radio supports both offline navigation (requires map purchase) and online navigation applications like Waze and Google Maps. Built-in GPS satellite positioning ensures accurate location tracking. The integrated WiFi module allows for easy internet access via WiFi or mobile hotspot, enabling real-time map updates and application downloads from the Application Store.
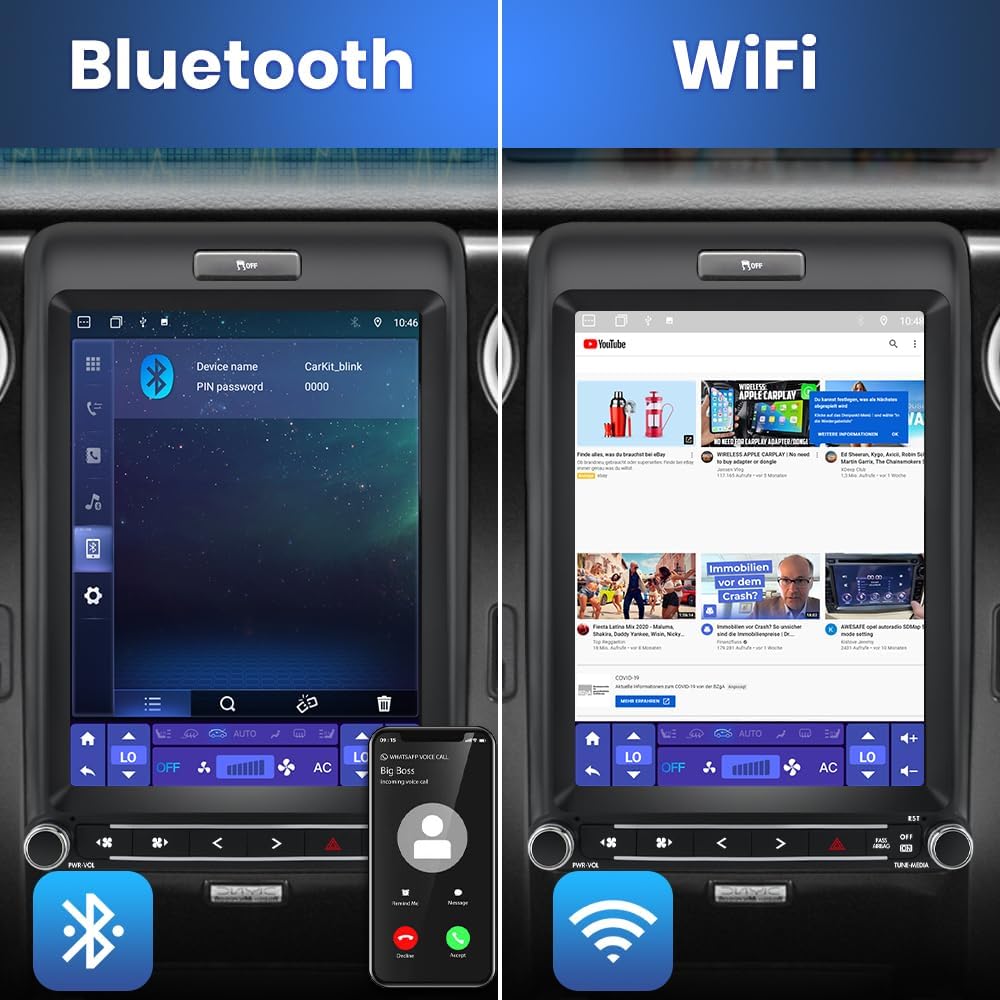
Image: The car radio screen showing active Bluetooth and WiFi connections, demonstrating its wireless capabilities.
Multifunctional Features
Beyond core functions, the unit offers a range of features:
- Mirror Link: Project your smartphone screen onto the car radio display.
- FM RDS Radio: Enjoy high-quality radio reception with RDS information.
- USB & AUX-IN: Connect external devices for media playback.
- Reversing Camera Support: Compatible with reversing cameras (camera not included, contact customer service for purchase options).

Image: The car radio display showcasing a variety of application icons, illustrating its capability to support numerous apps.
Split Screen Functionality
The unit supports split-screen mode, allowing you to run two applications simultaneously on the display. For example, you can use navigation while controlling music playback.

Image: The car radio screen displaying two applications side-by-side, such as a navigation map and a music player, in split-screen mode.
Bluetooth Hands-Free & Steering Wheel Control
A built-in microphone supports Bluetooth hands-free calling, compatible with both Android and iOS phones. The steering wheel control function allows you to safely manage calls, adjust volume, and switch songs without taking your hands off the wheel. If call volume is too low, an external microphone can be connected for enhancement.
Multiple Media Playback Modes
Equipped with a professional DSP for sound optimization and high-quality FM radio with automatic/semi-automatic station search. Features include DSP noise reduction, sound field adjustment, and a stereo equalizer with Jazz/Rock/Pop/Classical modes. Supports both offline multimedia playback and online music/video streaming.

Image: The car radio screen showing the interface for AM/FM radio tuning and playback.
On-Screen Climate Control
The large vertical screen integrates climate control functions, allowing you to adjust temperature, fan speed, and air direction directly from the display.

Image: The car radio screen showing the digital climate control interface, allowing touch-based adjustments of temperature and fan settings.
HDMI Output
The unit includes HDMI output capabilities, allowing you to connect to external displays, such as rear-seat monitors, for extended entertainment options.

Image: A rear-seat entertainment screen displaying video content, connected to the EagleNav car radio via HDMI output.
Maintenance
To ensure the longevity and optimal performance of your EagleNav car radio, follow these maintenance guidelines:
- Screen Cleaning: Use a soft, lint-free cloth to gently wipe the screen. For stubborn smudges, slightly dampen the cloth with water or a screen-safe cleaner. Avoid harsh chemicals or abrasive materials.
- Software Updates: Periodically check for available software updates to ensure you have the latest features and performance enhancements. Follow the on-screen prompts for updates.
- Cable Connections: Ensure all cables are securely connected. Loose connections can lead to intermittent functionality.
- Avoid Extreme Temperatures: Do not expose the unit to extreme heat or cold for prolonged periods, as this can affect its electronic components.
Troubleshooting
If you encounter issues with your EagleNav car radio, refer to the following common solutions:
- Unit Not Powering On: Check all power connections and ensure the vehicle's fuse for the radio is intact. A blown fuse can prevent the unit from receiving power.
- Air Conditioning Control Issues: If climate control is not functioning correctly after installation, verify that the air conditioning settings have been adjusted as described in the Setup section (APPS > Car Settings > Air Mode Setting > High/Low Configuration).
- Low Call Volume (Bluetooth): The built-in microphone may have limitations in certain environments. Consider connecting an external microphone (included) to improve call clarity and volume.
- Wireless CarPlay/Android Auto Disconnection: Ensure your phone's Bluetooth and Wi-Fi are active and that the 'PhoneLink' app (for CarPlay) is running. For Android Auto, ensure the USB cable is securely connected and the app is installed on your phone.
- Lag or Slow Response: While the unit is designed for smooth operation, performance can be affected by the number of running applications or the complexity of tasks. Close unnecessary apps or restart the unit if performance degrades.
- Backup Camera Not Working: Ensure the backup camera is correctly connected to the appropriate input. If using an aftermarket camera, confirm it is compatible and properly wired.
For persistent issues not covered here, please contact customer support.
Specifications
| Feature | Detail |
|---|---|
| Item Weight | 5.87 pounds |
| Package Dimensions | 13.39 x 11.85 x 6.18 inches |
| Item Model Number | DW9F15024-314 |
| Display Size | 10.4 Inches (Note: Product title states 12.1 Inch, specification lists 10.4 Inches. Please refer to product packaging for accurate display size.) |
| Voice Command | Microphone, Touchscreen |
| Brand | EagleNav |
| Vehicle Service Type | Truck |
| Special Feature | Android Auto, Apple CarPlay, Built-In Bluetooth, Built-In Wi-Fi |
| Connectivity Technology | Bluetooth |
| Map Type | North America |
| Audio Output Mode | Stereo |
| Mounting Type | Dashboard Mount |
Warranty Information
This EagleNav product comes with a one-year warranty from the date of purchase. This warranty covers manufacturing defects and malfunctions under normal use. Please retain your proof of purchase for warranty claims.
For any quality issues or questions regarding the operation and installation of the product, please contact customer service.
Customer Support
For technical assistance, troubleshooting, or any inquiries regarding your EagleNav 12.1 Inch Car Radio, please contact our customer support team:
- Email: EagleNav-us@outlook.com
Our team is available to provide excellent after-sales service and support.

Image: Customer service representatives ready to assist with product inquiries.