
1. Introduction
Thank you for choosing the Leikefitness Hydraulic Rowing Machine. This manual provides essential information for the safe assembly, operation, and maintenance of your new fitness equipment. Designed for full-body, low-impact workouts, this machine engages major muscle groups including the back, legs, arms, abs, and glutes, offering a smooth and quiet exercise experience. Please read this manual thoroughly before use and keep it for future reference.

Image: The Leikefitness Hydraulic Rowing Machine, showcasing its compact design and hydraulic resistance system.
2. Safety Instructions
- Consult your physician before starting any exercise program.
- Keep children and pets away from the machine during operation.
- Place the rowing machine on a flat, stable surface with adequate clearance around it.
- Inspect the machine for loose parts or damage before each use. Do not use if damaged.
- Wear appropriate athletic footwear and clothing.
- Do not exceed the maximum user weight capacity of 300 lbs (approximately 136 kg).
- Stop exercising immediately if you feel faint, dizzy, or experience pain.
- Ensure all bolts and nuts are securely tightened before and after each use. Regularly check for loosening, especially around the foot pedals and hydraulic cylinders.
3. Package Contents
Please verify that all parts are present before assembly. If any parts are missing or damaged, contact customer support.
- Main Frame Assembly
- Hydraulic Cylinders (2)
- Rowing Arms with Handles (2)
- Seat
- Foot Pedals with Straps (2)
- LCD Monitor
- Hardware Kit (bolts, nuts, washers, tools)
- User Manual (this document)
- AA Batteries (2) for LCD Monitor
4. Assembly Instructions (Setup)
The Leikefitness Rowing Machine comes partially pre-installed for easier setup. Follow these steps for complete assembly. It is recommended to use your own tools, such as a ratchet, for better tightening of bolts.
- Unpack Components: Carefully remove all parts from the packaging and lay them out on a clean, flat surface.
- Attach Stabilizers: Secure the front and rear stabilizer bars to the main frame using the provided bolts and nuts. Ensure they are tightly fastened for stability.
- Install Seat: Slide the seat onto the rail of the main frame. Ensure it moves smoothly along the rail.
- Connect Rowing Arms: Attach the rowing arms to the main frame and connect the hydraulic cylinders to the arms and the base. Ensure the connections are secure.
- Mount Foot Pedals: Secure the foot pedals to the designated points on the frame. Ensure they are firmly attached and do not wobble.
- Install LCD Monitor: Insert the two AA batteries into the LCD monitor. Attach the monitor to its designated holder on the machine and connect any necessary sensor cables.
- Final Check: Before first use, double-check all bolts, nuts, and connections to ensure they are secure. Test the movement of the seat and rowing arms.
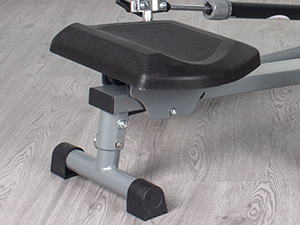
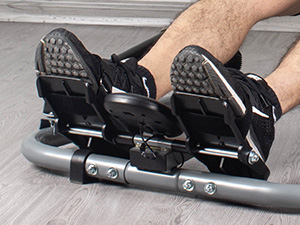
Image: Close-up views of the comfortable engineering seat and the anti-slip foot pedals, highlighting key components for assembly.
5. Operating Instructions
5.1 Adjusting Resistance
The Leikefitness Hydraulic Rowing Machine features adjustable hydraulic resistance. You can increase or decrease the resistance by rotating the manual control knob located on the hydraulic cylinders. The knob typically has settings from 1 to 12, with higher numbers indicating stronger resistance.

Image: Detail of the hydraulic resistance adjustment knob, showing settings from 1 to 12 for varying intensity.
5.2 Using the LCD Monitor
The integrated LCD monitor tracks your workout data in real-time. It typically displays:
- TIME: Duration of your workout.
- COUNT: Total number of strokes.
- REPS/MIN: Strokes per minute.
- CAL: Estimated calories burned.
- SCAN: Cycles through all metrics automatically.
Use the "MODE" button to select the desired display function and the "RESET" button to clear all data.

Image: Close-up of the LCD monitor, showing its display and control buttons for tracking workout data.
5.3 Proper Rowing Technique
To maximize your workout and prevent injury, follow these steps for proper rowing form:
- The Catch: Sit on the seat with knees bent, shins vertical, and arms extended forward. Grip the handles firmly.
- The Drive: Push off with your legs, then lean back slightly from the hips, and finally pull the handles towards your abdomen.
- The Finish: Legs are extended, body is leaned back slightly, and handles are pulled to the abdomen.
- The Recovery: Extend arms forward, then lean forward from the hips, and finally bend knees to slide the seat back to the catch position.

Image: A sequence of five images demonstrating the proper rowing motion, from the catch to the recovery phase.

Image: An illustration showing a person on the rowing machine with highlighted muscle groups (biceps, pectoral, elbow joint, abdominal, thigh, gluteus, calf) indicating the comprehensive full-body workout.
6. Maintenance
- Cleaning: Wipe down the machine with a damp cloth after each use to remove sweat and dust. Avoid abrasive cleaners.
- Lubrication: Periodically check the seat rail for smooth movement. If needed, apply a small amount of silicone-based lubricant to the rail.
- Bolt and Nut Check: Regularly inspect all bolts and nuts, especially those connecting the foot pedals and hydraulic cylinders, for tightness. Re-tighten as necessary to ensure safety and stability.
- Hydraulic Cylinders: It is normal for hydraulic cylinders to become warm during extended use. If they become excessively hot, allow the machine to cool down before continuing your workout.
- Storage: When not in use, the rowing machine can be folded to save space. Ensure it is stored in a dry, cool place away from direct sunlight.
7. Troubleshooting
| Problem | Possible Cause | Solution |
|---|---|---|
| Machine feels unstable or wobbly. | Loose bolts or nuts; uneven surface. | Check and tighten all assembly bolts and nuts. Move the machine to a flat, stable surface. |
| LCD monitor not displaying data. | Batteries dead or incorrectly installed; loose sensor connection. | Replace batteries (2 AA). Ensure batteries are inserted with correct polarity. Check that all sensor cables are securely connected to the monitor. |
| Resistance feels too weak or too strong. | Resistance knob setting is incorrect. | Adjust the hydraulic resistance knob on the cylinders to your desired level (1-12). |
| Squeaking or grinding noise during use. | Lack of lubrication on seat rail; loose components. | Apply silicone-based lubricant to the seat rail. Check and tighten any loose bolts or connections. |
| Hydraulic cylinders get very hot. | Normal operation during intense or prolonged use. | This is normal. Allow the machine to cool down between intense sessions. If heat is excessive or accompanied by unusual smells, discontinue use and contact support. |
8. Specifications
| Feature | Detail |
|---|---|
| Model Number | GM60303 |
| Brand | Leikefitness |
| Resistance Mechanism | Hydraulic |
| Display Type | LCD |
| Frame Material | Alloy Steel |
| Color | Silver |
| Product Dimensions (L x W x H) | 111.51 x 31.5 x 18.03 cm (approx. 43.9 x 12.4 x 7.1 inches) |
| Item Weight | 16.74 kg (approx. 36.9 lbs) |
| Max User Weight Capacity | 300 lbs (approx. 136 kg) |
| Power Source (Monitor) | Battery Powered (2 AA batteries included) |

Image: Diagram illustrating the key dimensions of the Leikefitness Hydraulic Rowing Machine, including length, width, and height.
9. Warranty and Support
Leikefitness is committed to providing quality fitness equipment and excellent customer service.
- Warranty: We offer unconditional replacement within one month of purchase for brand new products. Free replacement parts are available for one year from the date of purchase.
- Customer Service: For any questions or concerns regarding your product, please contact us. Our customer service team is available 24 hours to provide a satisfied solution.
- How to Contact Seller:
- Login to your Amazon account.
- Go to "Your orders".
- Find the order ID for your Leikefitness Rowing Machine.
- Click on "Contact seller".