1. Introduction
This manual provides detailed instructions for the setup, operation, and maintenance of your McbeAn Multifunction Digital Weather Station, model TS-3310-BK. This device is designed to provide accurate indoor and outdoor temperature, humidity, and air pressure readings, along with weather forecasts and timekeeping functions.
Please read this manual thoroughly before using the product to ensure correct operation and to maximize its lifespan.
2. Package Contents
Upon unpacking, please verify that all items listed below are present and in good condition:
- 1 x Digital Weather Station (Main Unit)
- 1 x USB Cable
- 1 x Wireless Outdoor Sensor
- 1 x User Manual (This document)
Note: 2 x AAA batteries for the main unit and 2 x AA batteries for the remote sensor are not included and must be purchased separately.
3. Product Features
The McbeAn Multifunction Digital Weather Station offers a range of features for comprehensive environmental monitoring:
- Indoor and Outdoor Monitoring: Real-time display of temperature and humidity for both indoor and outdoor environments.
- Temperature and Humidity Records: Tracks highest and lowest temperature and humidity readings.
- Barometric Pressure: Displays current barometric pressure and trend changes.
- Weather Forecast: Predicts weather conditions for the next 12 hours based on air pressure data.
- Time and Date: Displays current time, date, and day of the week.
- Alarm Clock & Snooze: Integrated alarm function with a snooze option.
- Moon Phase Display: Shows the current moon phase.
- Adjustable Brightness: Large LCD screen with 4 levels of brightness adjustment for optimal viewing.
- Dual Power Modes: Can be powered by an AC adapter (USB cable included) or AAA batteries.
- Wireless Sensor: Outdoor sensor transmits data wirelessly up to 60 meters in an open area, supporting up to 3 channels.
4. Setup Guide
4.1 Powering the Main Unit
- Battery Installation: Open the battery compartment on the back of the main unit. Insert 2 x AAA batteries (not included) according to the polarity markings (+/-).
- USB Power: Alternatively, connect the provided USB cable to the main unit's power port and plug the other end into a USB power adapter (not included) or a compatible USB port.
Note: Using the USB cable provides continuous power and allows for brightness adjustment. Batteries serve as a backup or for portable use.
4.2 Powering the Wireless Outdoor Sensor
- Open the battery compartment on the back of the wireless outdoor sensor.
- Insert 2 x AA batteries (not included) according to the polarity markings (+/-).
- Close the battery compartment securely.
Ensure the sensor is placed in a shaded, dry location outdoors, protected from direct sunlight and rain, for accurate readings. The maximum transmission range is 60 meters in an open area.
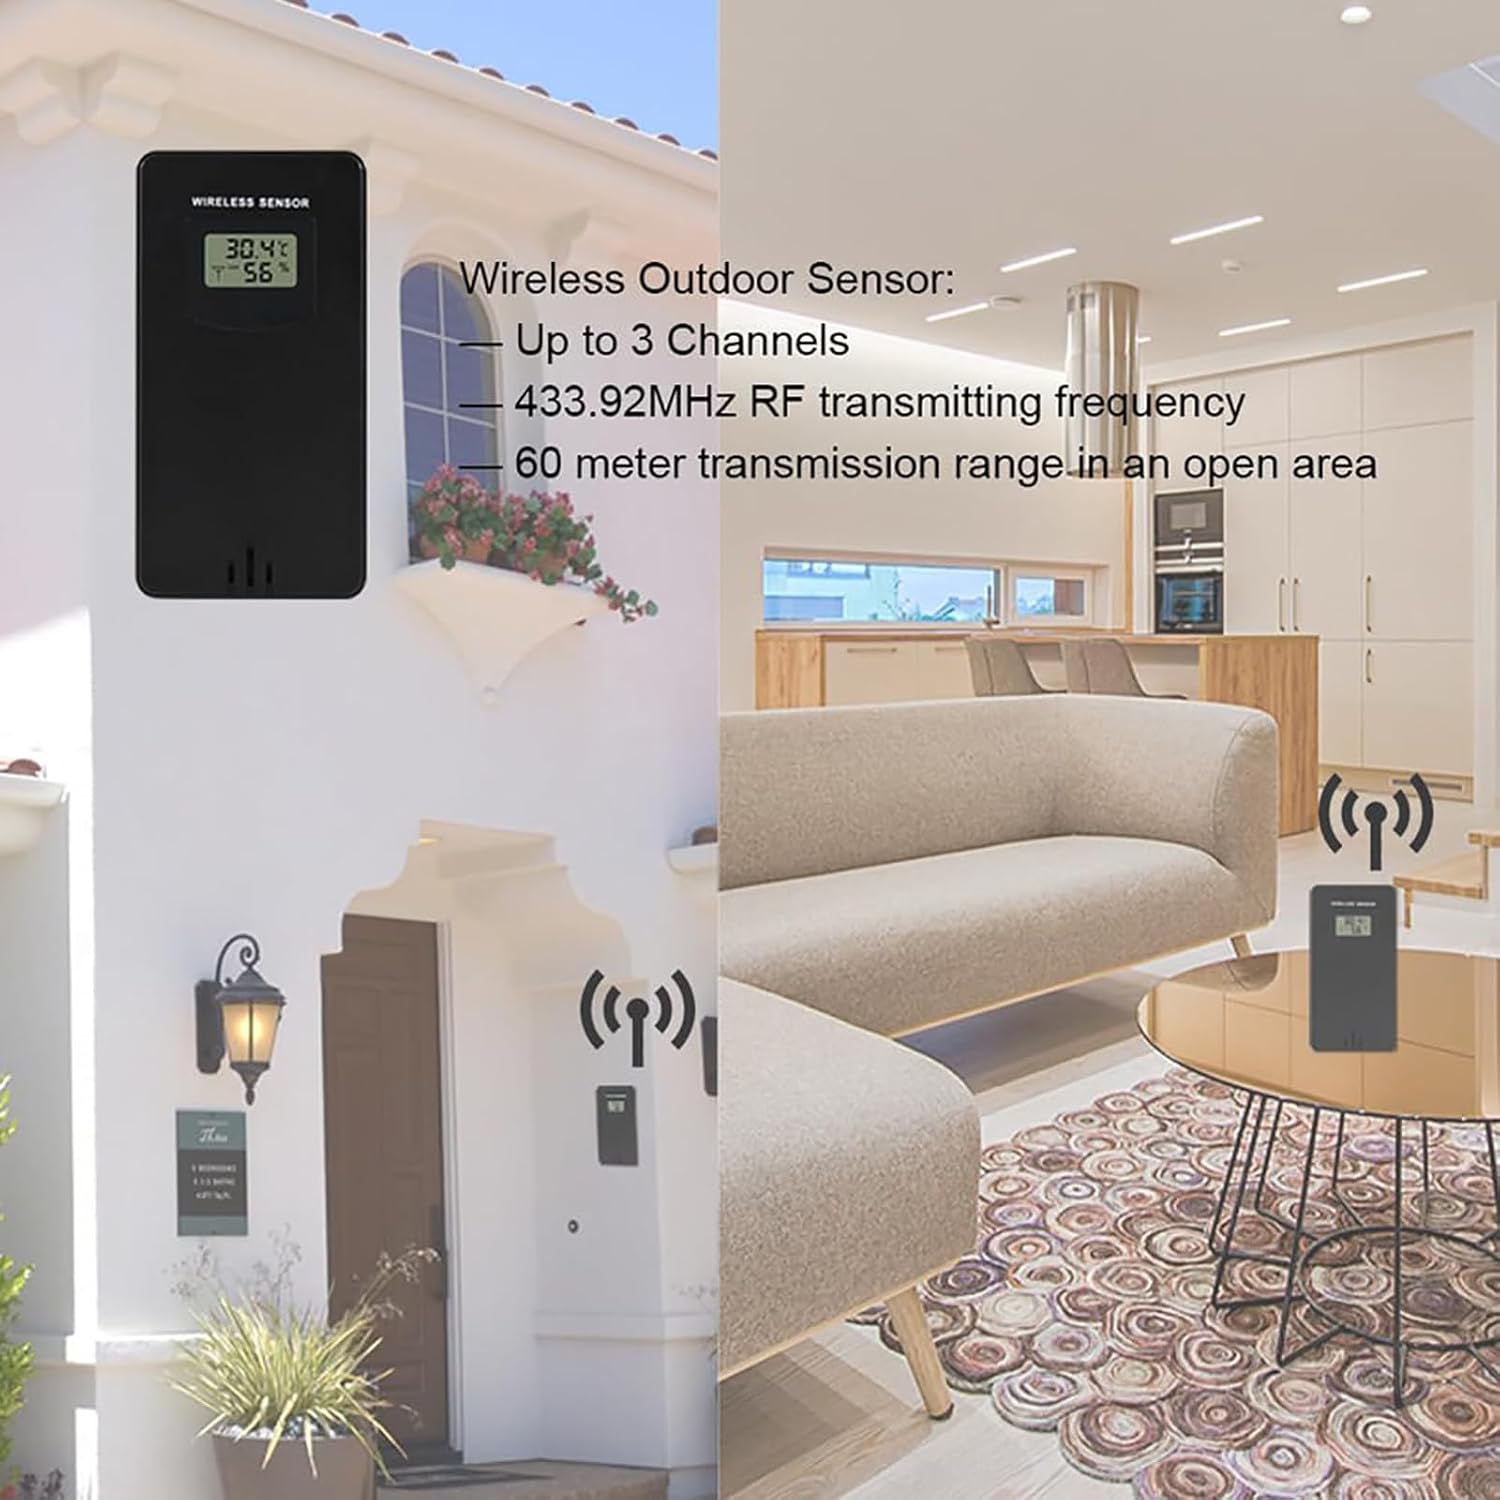
Image Description: This image shows the wireless outdoor sensor mounted on the exterior wall of a house, displaying temperature and humidity. On the right, the main weather station unit is placed on a table indoors, illustrating the wireless connection between the two devices. The image highlights the sensor's wireless capability and optimal placement.
4.3 Pairing the Sensor with the Main Unit
Once both units are powered, the main unit will automatically search for the outdoor sensor. The outdoor temperature and humidity should appear on the main unit's display within a few minutes. If not, follow these steps:
- Press and hold the "CHAN" button on the main unit to initiate a manual search for the sensor.
- Ensure the sensor is within range and not obstructed by thick walls or large metal objects.
- If pairing fails, remove and reinsert batteries from both units, then try again.
5. Operating Instructions
5.1 Display Overview
The large LCD screen displays various information simultaneously. Refer to the diagram below for key display areas:

Image Description: This image displays the main unit's LCD screen, clearly showing the current time (13:26), date (30-12 SUN), indoor temperature (39.8°C) and humidity (42%), outdoor temperature (33.9°C) and humidity (60%), and a weather forecast icon (partly cloudy). The moon phase is also visible in the upper right corner.
5.2 Setting Time and Date
- Press and hold the "TIME" button to enter time setting mode.
- Use the "UP" or "DOWN" buttons to adjust the flashing value (e.g., hour, minute, year, month, day).
- Press "TIME" again to confirm the setting and move to the next parameter.
- Repeat until all time and date settings are complete.
5.3 Setting Alarm
- Press the "ALARM" button once to display the alarm time.
- Press and hold the "ALARM" button to enter alarm setting mode.
- Use "UP" or "DOWN" to adjust the hour and minute.
- Press "ALARM" to confirm.
- To activate/deactivate the alarm, press the "ALARM" button briefly when the alarm time is displayed. An alarm icon will appear/disappear.
5.4 Snooze Function
When the alarm sounds, press the "SNZ" button to activate the snooze function. The alarm will temporarily stop and sound again after approximately 5 minutes.
5.5 Temperature Unit Selection (°C/°F)
Briefly press the "UP" button to switch between Celsius (°C) and Fahrenheit (°F) temperature display.
5.6 Brightness Adjustment
When powered by the USB cable, briefly press the "DOWN" button to cycle through 4 levels of screen brightness.
5.7 Weather Forecast
The weather station calculates a weather forecast for the next 12 hours based on changes in barometric pressure. The forecast is represented by intuitive icons:

Image Description: This image illustrates the five weather forecast icons used by the station: Sunny, Slightly Cloudy, Cloudy, Rainy, and Snowy. Below the icons, text explains that the weather station forecasts the next 12 hours based on barometric pressure trends.
- Sunny
- Slightly Cloudy
- Cloudy
- Rainy
- Snowy
Note: The weather forecast is an estimation and may not always be 100% accurate. It is based on local barometric pressure changes, not satellite data.
5.8 Comfort Level Indicator
The main unit features a comfort level indicator based on indoor humidity, helping you maintain a comfortable indoor environment.

Image Description: This image shows a 5-level comfort indicator bar with labels for "Dry", "Comfortable", and "Moist" zones. It indicates the indoor comfort level based on humidity, helping users understand their environment at a glance.
6. Maintenance
- Cleaning: Wipe the main unit and sensor with a soft, damp cloth. Do not use abrasive cleaners or solvents.
- Battery Replacement: Replace batteries in both units when the low battery indicator appears on the display. Ensure correct polarity.
- Placement: Ensure the outdoor sensor remains in a protected, shaded location for optimal performance and longevity.
7. Troubleshooting
| Problem | Possible Cause | Solution |
|---|---|---|
| No display on main unit | Low or no batteries; USB cable not connected/faulty. | Install fresh AAA batteries or connect the USB cable to a working power source. |
| Outdoor readings not displayed or inaccurate | Outdoor sensor batteries low/dead; sensor out of range; interference; sensor exposed to direct elements. | Replace AA batteries in the sensor. Move sensor closer to the main unit. Relocate sensor to a shaded, protected area. Press "CHAN" on main unit to re-sync. |
| Incorrect time/date | Time/date not set correctly. | Follow instructions in Section 5.2 to set time and date. |
| Weather forecast seems wrong | Forecast is an estimation based on local barometric pressure. | Understand that the forecast is a general trend and not a precise prediction. Allow time for the station to gather sufficient pressure data. |
8. Specifications
- Indoor Temperature Range: -9.9°C (14.2°F) to 50°C (122°F)
- Outdoor Temperature Range: -40°C (-40°F) to 70°C (158°F)
- Humidity Range: 20%RH to 95%RH
- Temperature Units: Celsius (°C) / Fahrenheit (°F) switchable
- Wireless Transmission: 433.92MHz RF, up to 60 meters (open area)
- Power Supply (Main Unit): 2 x AAA batteries (not included) or USB cable (included)
- Power Supply (Sensor): 2 x AA batteries (not included)
- Material: ABS
- Color: Black + Clear glass
- Waterproof Rating (Sensor): IPX4
- Display Type: LCD with 4 brightness levels

Image Description: This image highlights the temperature measurement ranges for both indoor and outdoor environments. It shows the main unit displaying indoor temperature from -9.9°C (14.2°F) to 50°C (122°F) and outdoor temperature from -40°C ((-40°F) to 70°C (158°F).
9. Product Video Overview
Video Description: This video provides a brief overview of a similar weather station, showcasing its multi-language display support, power port (USB interface), and the wireless connection between the main unit and the outdoor sensor. It demonstrates the device's design and basic functionality.
10. Warranty and Support
McbeAn products are designed for reliability and performance. This product comes with a standard manufacturer's warranty against defects in materials and workmanship. Please refer to the packaging or contact customer support for specific warranty terms and conditions.
For technical support, troubleshooting assistance, or warranty claims, please contact McbeAn customer service through your retailer or the official McbeAn website.