Gaderth B0CJ91773M
Gaderth Ebike Motor Controller LCD Display Kit User Manual (24V/36V)
Model: B0CJ91773M
1. Introduction
This manual provides comprehensive instructions for the installation, operation, and maintenance of your Gaderth Ebike Motor Controller and LCD Display Kit. This kit is designed to enhance the performance and control of electric bicycles, scooters, and similar vehicles, offering both 24V and 36V compatibility. Please read this manual thoroughly before installation and use to ensure proper function and safety.
2. Product Overview
The Gaderth Ebike Motor Controller LCD Display Kit includes a brushless motor controller, an LCD display panel, and a brake handle. It is available in two main configurations:
- 24V Version: Features a 5.5-inch square screen controller, instrument display, and complete brake handle.
- 36V Version: Features a 6.5-inch square screen controller, instrument display, and complete brake handle.
This kit is constructed from durable, lightweight, and rainproof materials, ensuring reliable performance in various conditions. The brushless controller provides silent operation, precise speed control, and responsive braking. The LCD display offers a clear, backlit interface for monitoring essential data and easy operation.
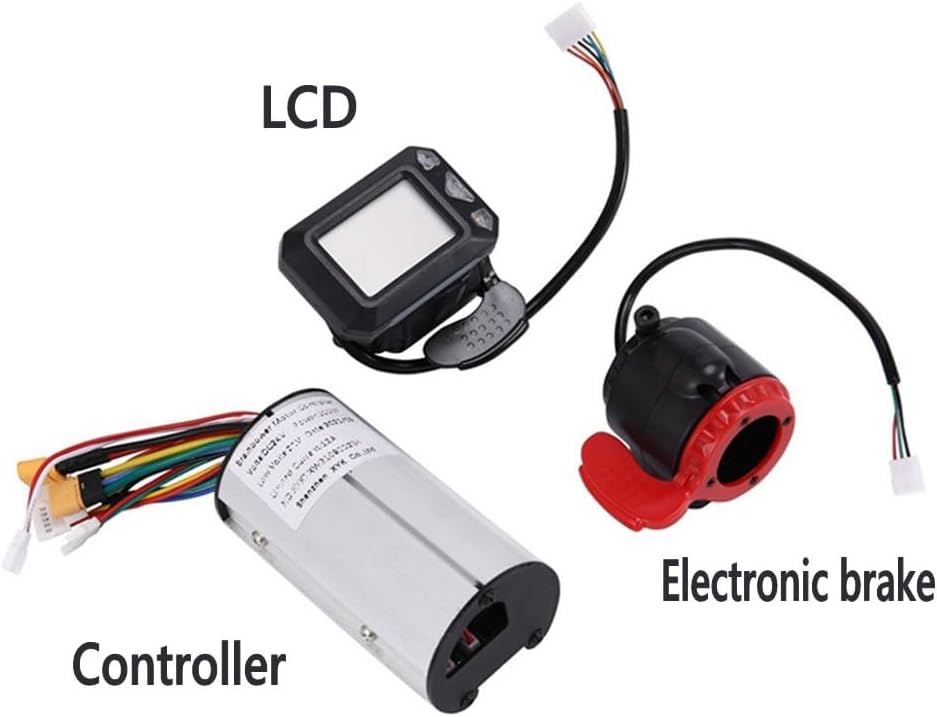
Image Description: A clear view of the three main components of the kit: the cylindrical motor controller with multiple wires, the rectangular LCD display unit, and the electronic brake handle.
3. Package Contents
Upon opening the package, verify that all components are present and undamaged. The complete set includes:
- 1x Brushless Motor Controller
- 1x LCD Display Panel (5.5-inch for 24V, 6.5-inch for 36V)
- 1x Brake Handle (complete)

Image Description: An overview of the kit components, including the motor controller, LCD display, and brake handle, alongside a graphic representation of a folding scooter to illustrate application.
4. Setup and Installation
Installation of the Gaderth Ebike Motor Controller Kit requires basic electrical knowledge. If you are unsure about any steps, it is recommended to seek professional assistance. Always ensure the power is off before connecting or disconnecting any components.
4.1. Component Identification
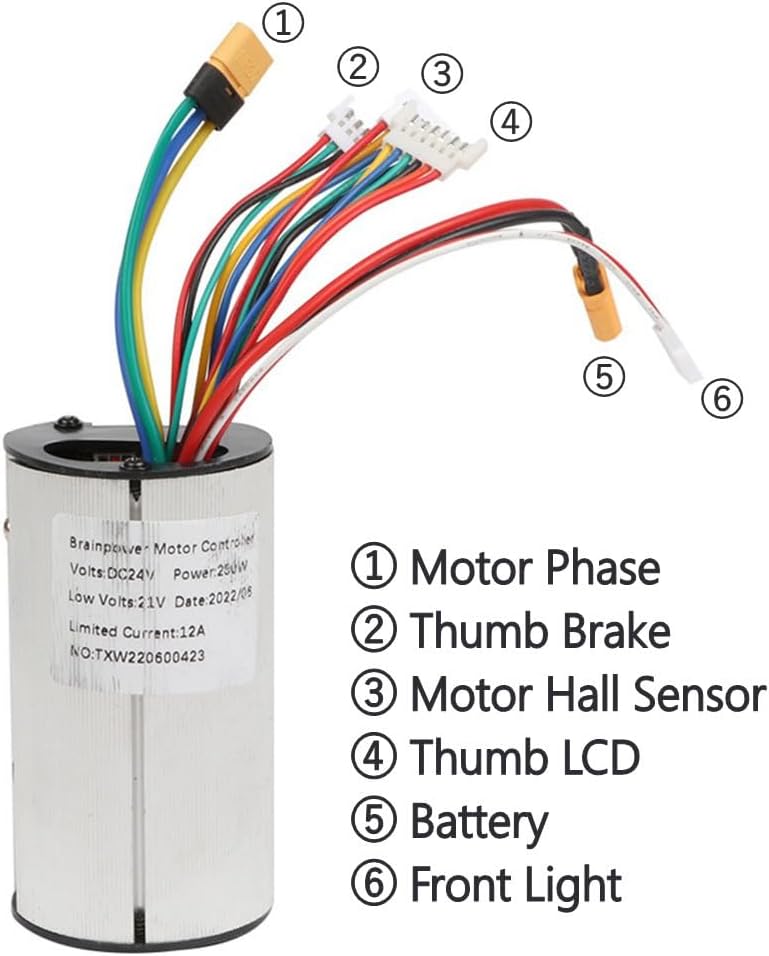
Image Description: A detailed view of the motor controller, highlighting its various wire connections with numbered labels for identification: (1) Motor Phase, (2) Thumb Brake, (3) Motor Hall Sensor, (4) Thumb LCD, (5) Battery, (6) Front Light.
- Motor Phase (1): Connect these wires to the corresponding motor phase wires.
- Thumb Brake (2): Connect to the brake lever or sensor.
- Motor Hall Sensor (3): Connect to the motor's Hall sensor wires.
- Thumb LCD (4): Connect to the LCD display unit.
- Battery (5): Connect to your ebike's battery pack. Ensure correct polarity.
- Front Light (6): Optional connection for a front light.
4.2. General Installation Steps
- Mount the LCD display panel securely on your handlebars using the provided mount.
- Install the brake handle on the handlebars.
- Connect the wires from the motor controller to the motor, battery, LCD display, and brake handle according to the labels and your vehicle's wiring diagram. Pay close attention to the Motor Hall Sensor connections.
- Secure the motor controller in a protected location on your vehicle.
- Once all connections are made, power on your ebike and proceed to the operating instructions for initial setup.
Important Note: If the motor does not operate after installation, ensure that the Hall sensor wires are correctly connected. If issues persist, try disconnecting the Hall sensor wires and attempting operation again, as some motors can run in sensorless mode.
5. Operating Instructions
The LCD display provides real-time information and allows for configuration of various parameters.
5.1. LCD Display Functions

Image Description: A close-up of the LCD display screen, showing various metrics and controls. Numbered indicators point to: (1) Power display, (2) Current gear, (3) Current speed, (4) Riding mileage, (5) Increase gear button, (6) Switch button, (7) Downshift button.
- Power Display (1): Shows current battery level.
- Current Gear (2): Indicates the current assist level or gear.
- Current Speed (3): Displays real-time speed.
- Riding Mileage (4): Shows distance traveled (ODO for odometer).
- Increase Gear (5): Button to increase assist level/gear.
- Switch (6): Power on/off or mode switch button.
- Downshift (7): Button to decrease assist level/gear.
5.2. Parameter Settings (P-Settings)
The LCD display allows access to advanced settings (P-settings) to customize the controller's behavior. Access these settings by holding specific buttons (refer to your display's specific button combination, usually power and up/down buttons simultaneously).
| Parameter | Description | Default/Options |
|---|---|---|
| P0 | Lack Voltage (Battery voltage below this value will disable operation). | Configurable |
| P1 | Wheel Diameter. | Configurable (e.g., 8, 10, 12 inches) |
| P2 | Motor Pole Pairs. | Configurable |
| P3 | Speed Signal Choice (Speed from Hall sensor or LCD meter). | Configurable |
| P4 | Unit of Measurement (0 for km, 1 for Miles). | 0 (km) / 1 (Miles) |
| P5 | Start Mode (0 for zero start, 1 for non-zero start). | 0 (Zero Start) / 1 (Non-Zero Start) |
| P6 | Choice (Related to scooter model). | 0 / 1 |
| P7 | Choice (Related to scooter model, 0 or 1 is hard). | 0 / 1 |
| P8 | Percentage of Output Power. | Configurable |
Caution: Incorrect P-settings can affect performance or damage components. Adjust these parameters only if you understand their function and impact.
6. Maintenance
Regular maintenance ensures the longevity and optimal performance of your Ebike Motor Controller Kit.
- Cleaning: Wipe the LCD display and controller with a soft, damp cloth. Avoid using harsh chemicals or abrasive materials.
- Water Exposure: While the kit is designed to be rainproof, avoid prolonged exposure to heavy rain or submersion in water. Ensure all connections are dry before operating after exposure to moisture.
- Connection Checks: Periodically inspect all wire connections for tightness and signs of wear or corrosion. Re-secure any loose connections.
- Physical Damage: Check the controller and display for any physical damage. Replace damaged components immediately.

Image Description: A close-up of the LCD display mounted on bicycle handlebars, with water droplets visible, illustrating its rainproof design.
7. Troubleshooting
This section addresses common issues you might encounter with your Ebike Motor Controller Kit.
- Motor Not Working:
- Ensure all wire connections (Motor Phase, Hall Sensor, Battery) are secure and correctly connected.
- Check battery voltage; if it's below the P0 setting, the motor will not operate.
- Try disconnecting the Hall sensor wires and re-testing. Some controllers can operate in sensorless mode if Hall sensors are faulty or incompatible.
- Verify that the throttle/brake handle is functioning correctly.
- LCD Display Not Powering On:
- Check the battery connection to the controller.
- Ensure the connection between the controller and the LCD display (Thumb LCD) is secure.
- Verify the battery has sufficient charge.
- Incorrect Speed/Mileage Readings:
- Check P1 (Wheel Diameter) setting and adjust it to match your wheel size.
- Verify P3 (Speed Signal Choice) is set correctly for your setup (Hall sensor or LCD meter).
- Motor Lacks Power or Stalls:
- Check P8 (Percentage of Output Power) setting; ensure it is not set too low.
- Verify that the motor's wattage is compatible with the controller's capabilities.
- Ensure battery is fully charged and providing adequate current.
If you continue to experience issues after following these troubleshooting steps, please contact customer support.
8. Specifications
| Feature | Detail |
|---|---|
| Brand | Gaderth |
| Model Number | B0CJ91773M |
| Voltage Options | 24V / 36V |
| LCD Display Size (24V) | 5.5-inch square screen |
| LCD Display Size (36V) | 6.5-inch square screen |
| Controller Type | Brushless |
| Material | Durable, Lightweight, Rainproof |
| Item Weight | 9.88 Ounces (approx. 280g) |
| Package Weight | 9.6 ounces (approx. 272g) |
| Item Package Dimensions | 5.9 x 3.9 x 0.8 inches (approx. 15 x 10 x 2 cm) |

Image Description: A side view of the cylindrical motor controller with measurements indicating its dimensions: approximately 8.6 cm (3.39 inches) in length, 4.6 cm (1.81 inches) in width, and 4 cm (1.57 inches) in height.
9. Warranty and Support
For warranty information or technical support, please refer to the retailer's return policy or contact the manufacturer directly. Keep your purchase receipt as proof of purchase.
The standard return policy for this product is 30 days for refund/replacement.
For further assistance, you may visit the Gaderth Store on Amazon.
Ask a question about this manual
Ask about setup, troubleshooting, compatibility, parts, safety, or missing instructions. Manuals+ will review the question and use this page’s manual context to help answer it.