Product Overview
The KIDLEDUCT Wireless Remote Sensor is designed to detect outdoor temperature and humidity, providing real-time environmental data to a compatible main unit (Models WS002/WS003). This sensor allows for convenient monitoring of conditions in various locations, such as gardens, greenhouses, or wine cellars, without needing to be physically present at the sensor's location.
Key features include:
- 3 available channels for versatile monitoring.
- Wireless transmission range up to 330ft (100m) in open air.
- Temperature display in Celsius (°C) or Fahrenheit (°F).
- Flexible placement options: wall mount or table stand.
- IPX4 waterproof level, offering protection against splashing water.
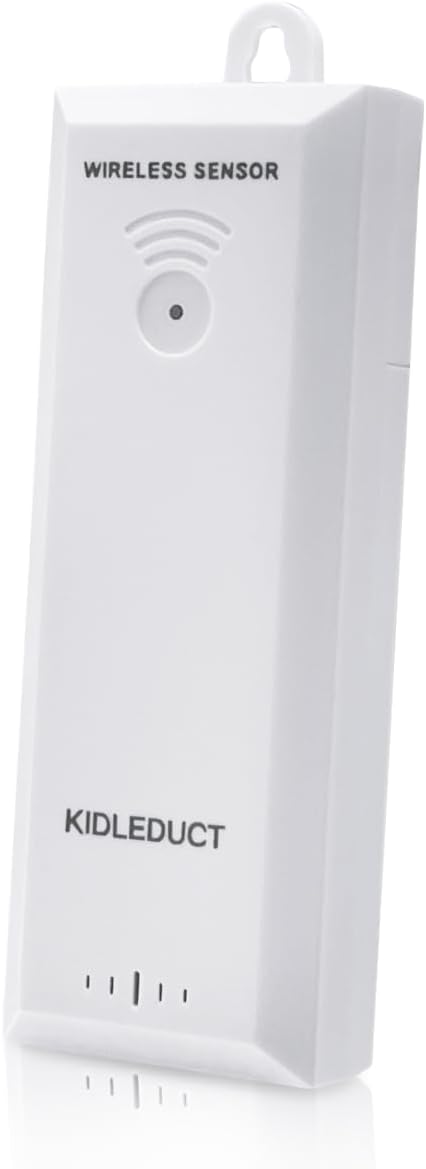
Figure 1: KIDLEDUCT Wireless Remote Sensor (Front View)
This image displays the front of the KIDLEDUCT Wireless Remote Sensor, highlighting its compact, rectangular design and the signal indicator lights at the bottom. A small hanging loop is visible at the top for easy installation.
Component Identification

Figure 2: Sensor Components and Functions
This diagram illustrates the various parts of the wireless remote sensor and their functions:
- Mounting Hole: Located at the top, used for hanging the sensor.
- RF Signal LED: Flashes once every 30 seconds to indicate signal transmission.
- TX Button: Transmits RF signal manually when pressed.
- Remote Channel Switch (1/2/3): Allows selection of one of three available channels for communication with the main unit.
- Battery Compartment: Located at the back, holds 2 x AA batteries (not included).
Setup Guide
1. Battery Installation
- Locate the battery compartment on the back of the sensor (refer to Figure 2).
- Slide the battery cover downwards to open.
- Insert 2 x AA batteries (not included) into the compartment, ensuring correct polarity (+/-).
- Replace the battery cover, sliding it upwards until it clicks into place.
2. Channel Selection
Before closing the battery compartment, use the Remote Channel Switch to select a channel (1, 2, or 3). This channel must match the channel selected on your compatible main unit (WS002/WS003) for proper communication. If using multiple sensors, ensure each sensor is set to a unique channel.
3. Sensor Placement
The sensor can be placed on a flat surface using its built-in stand or mounted on a wall using the mounting hole. For optimal performance and accuracy, consider the following:
- Place the sensor in a location that provides accurate readings for the area you wish to monitor (e.g., garden, greenhouse, wine cellar).
- Ensure the sensor is within the 330ft (100m) transmission range of the main unit. Walls and other obstructions may reduce this range.
- While the sensor has an IPX4 waterproof rating (splash-proof), it is recommended to place it in a sheltered area to prolong its lifespan and ensure consistent readings, especially in heavy rain or direct sunlight. Avoid direct exposure to extreme weather conditions.

Figure 3: Flexible Placement and Features
This image highlights the sensor's versatility, showing it can be used on a tabletop or wall-mounted. It also visually confirms its IPX4 waterproof level and indicates a data update frequency. Note: While the image suggests 5-second updates, the product diagram (Figure 2) indicates the RF signal LED flashes every 30 seconds, which is the actual data transmission interval.
Operating Instructions
Once the sensor is set up and batteries are installed, it will automatically begin transmitting temperature and humidity data to your compatible main unit (WS002/WS003) on the selected channel. Ensure your main unit is also powered on and set to receive data on the corresponding channel.
- Data Transmission: The sensor transmits data approximately every 30 seconds, indicated by a flash of the RF Signal LED.
- Manual Transmission: Press the "TX" button on the sensor to manually transmit data immediately. This can be useful for verifying connection or updating readings on demand.
- Temperature Units: The main unit will display temperatures in either Celsius (°C) or Fahrenheit (°F), depending on its settings. The sensor itself only transmits raw data.
Maintenance
Battery Replacement
When the batteries in the sensor are low, the main unit may display a low battery indicator for that specific sensor channel. Replace the batteries promptly to ensure continuous and accurate data transmission. Follow the battery installation steps outlined in the Setup Guide.
Cleaning
Wipe the sensor periodically with a soft, damp cloth to remove dust or dirt. Do not use abrasive cleaners or immerse the sensor in water.
Environmental Considerations
Although the sensor is weather-resistant (IPX4), extreme temperatures or prolonged direct exposure to harsh weather elements (e.g., heavy rain, snow, direct intense sunlight) can affect its performance and lifespan. For best results, place the sensor in a shaded, protected area outdoors.
Troubleshooting
| Problem | Possible Cause | Solution |
|---|---|---|
| No temperature/humidity reading on main unit. |
|
|
| Inaccurate readings. |
|
|
| Short transmission range. |
|
|
Specifications
- Model: TR03
- Brand: KIDLEDUCT
- Power Source: 2 x AA Batteries (not included)
- Connectivity Technology: RF (Radio Frequency)
- Transmission Range: Up to 330ft (100m) in open air
- Temperature Accuracy: ±1°C
- Upper Temperature Rating: 122°F (50°C)
- Special Feature: Weather Resistant (IPX4)
- Dimensions: Approximately 5.55 x 2.01 x 1.54 inches
- Item Weight: Approximately 2.08 ounces
- Display Type: N/A (Sensor only, data displayed on main unit)
Warranty and Support
For information regarding warranty coverage, technical support, or replacement parts, please refer to the documentation provided with your main unit (Models WS002/WS003) or visit the official KIDLEDUCT website. Please retain your purchase receipt for warranty purposes.
For further assistance, you may also contact KIDLEDUCT customer service through the contact information available on their official product support pages.


