1. Introduction
This manual provides essential instructions for the safe and effective operation, setup, and maintenance of your HANSNOK MIG-140 140A 3-in-1 Welding Machine. This versatile inverter welder supports MIG (Flux Core), Lift TIG, and Stick (MMA) welding processes, offering adaptability for various welding tasks. Please read this manual thoroughly before operating the machine to ensure safety and optimal performance.
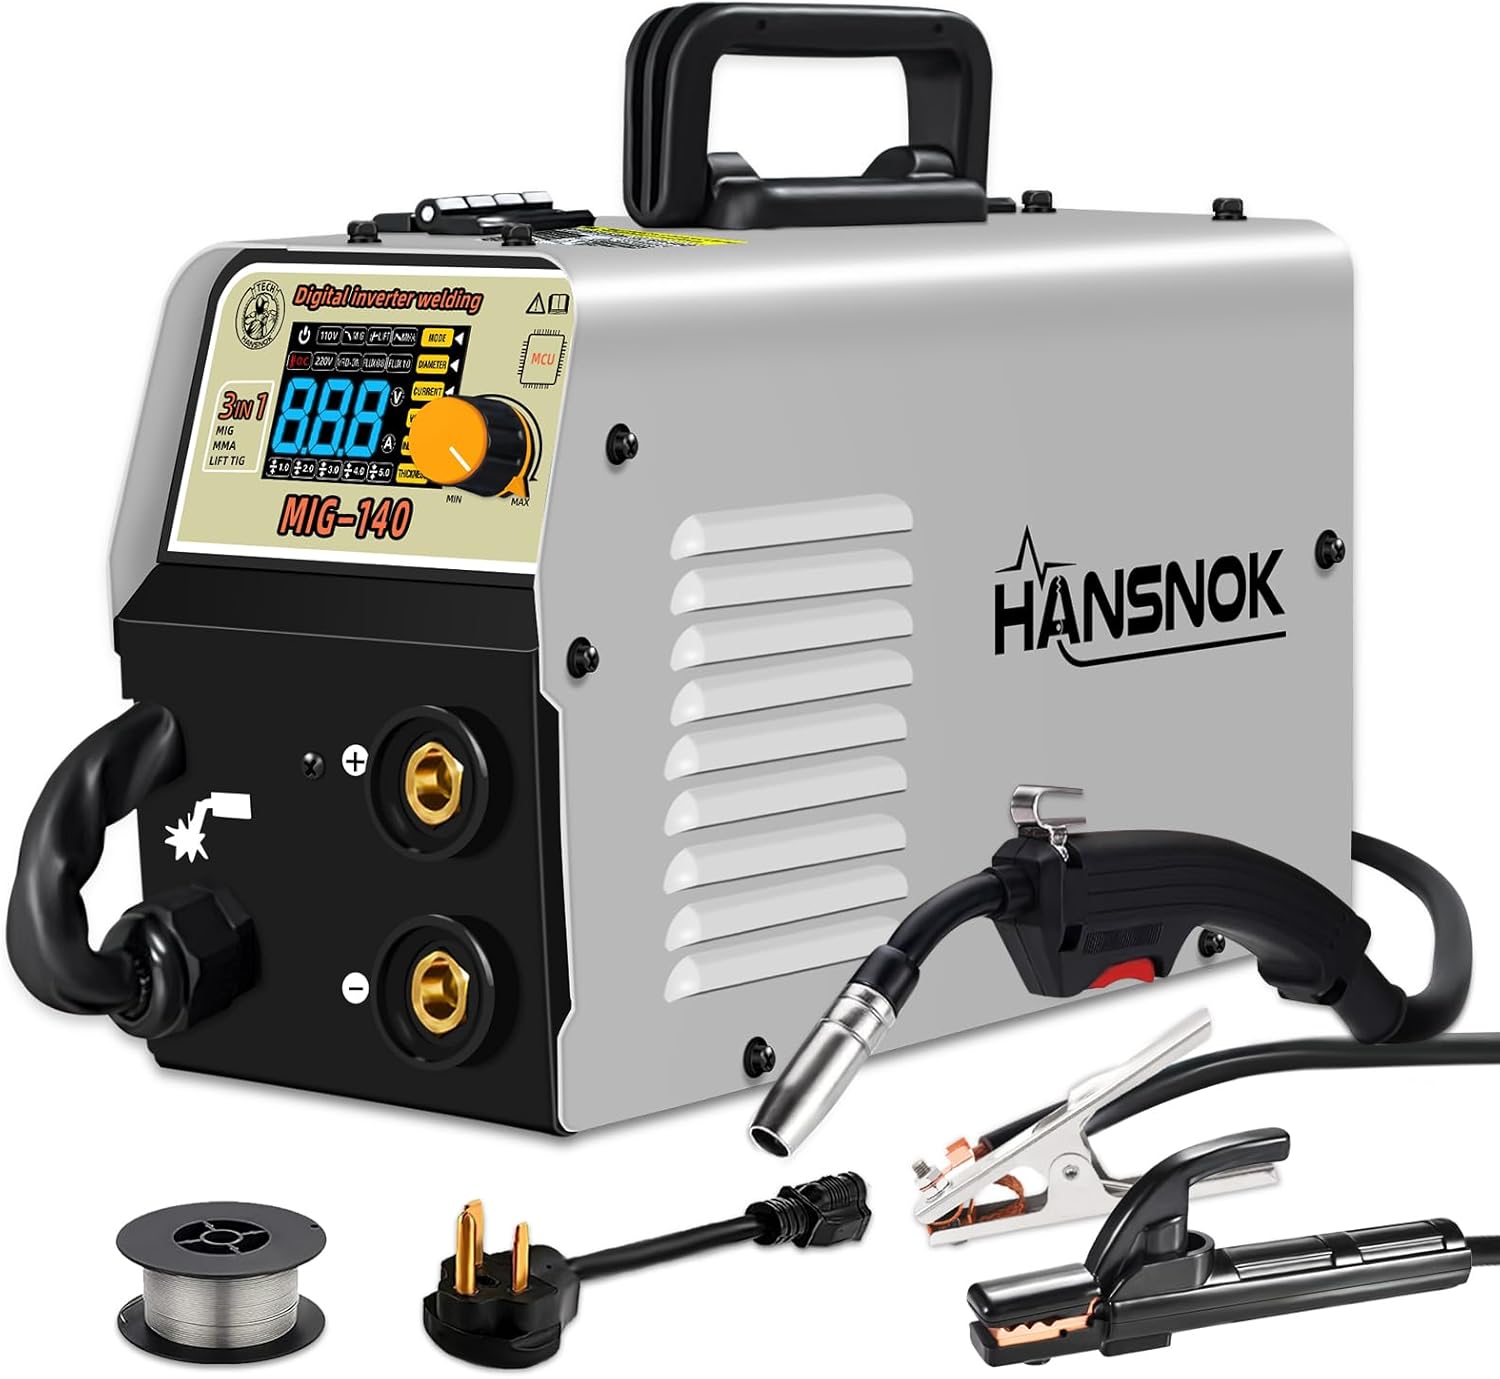
Image 1.1: The HANSNOK MIG-140 3-in-1 Welder, showcasing its compact design and included accessories such as the welding gun, earth clamp, electrode holder, and a spool of welding wire.
2. Safety Information
WARNING: Welding can be hazardous. Always follow safety precautions to prevent injury or death.
- Electric Shock: Can kill. Do not touch live electrical parts. Wear dry welding gloves and protective clothing. Ensure the work area is dry.
- Fumes and Gases: Can be hazardous to your health. Keep your head out of the fumes. Use ventilation or exhaust to remove fumes from the breathing zone.
- Arc Rays: Can burn eyes and skin. Wear a welding helmet with a proper shade filter. Wear safety glasses with side shields. Wear protective clothing.
- Fire and Explosion: Welding sparks can cause fire or explosion. Keep flammable materials away from the welding area. Have a fire extinguisher readily available.
- Hot Parts: Can cause severe burns. Do not touch hot parts with bare hands. Allow equipment to cool before handling.
- Read the Manual: Always read and understand the entire instruction manual before installation or operation.
3. Product Overview and Components
Familiarize yourself with the main components of the HANSNOK MIG-140 welding machine.
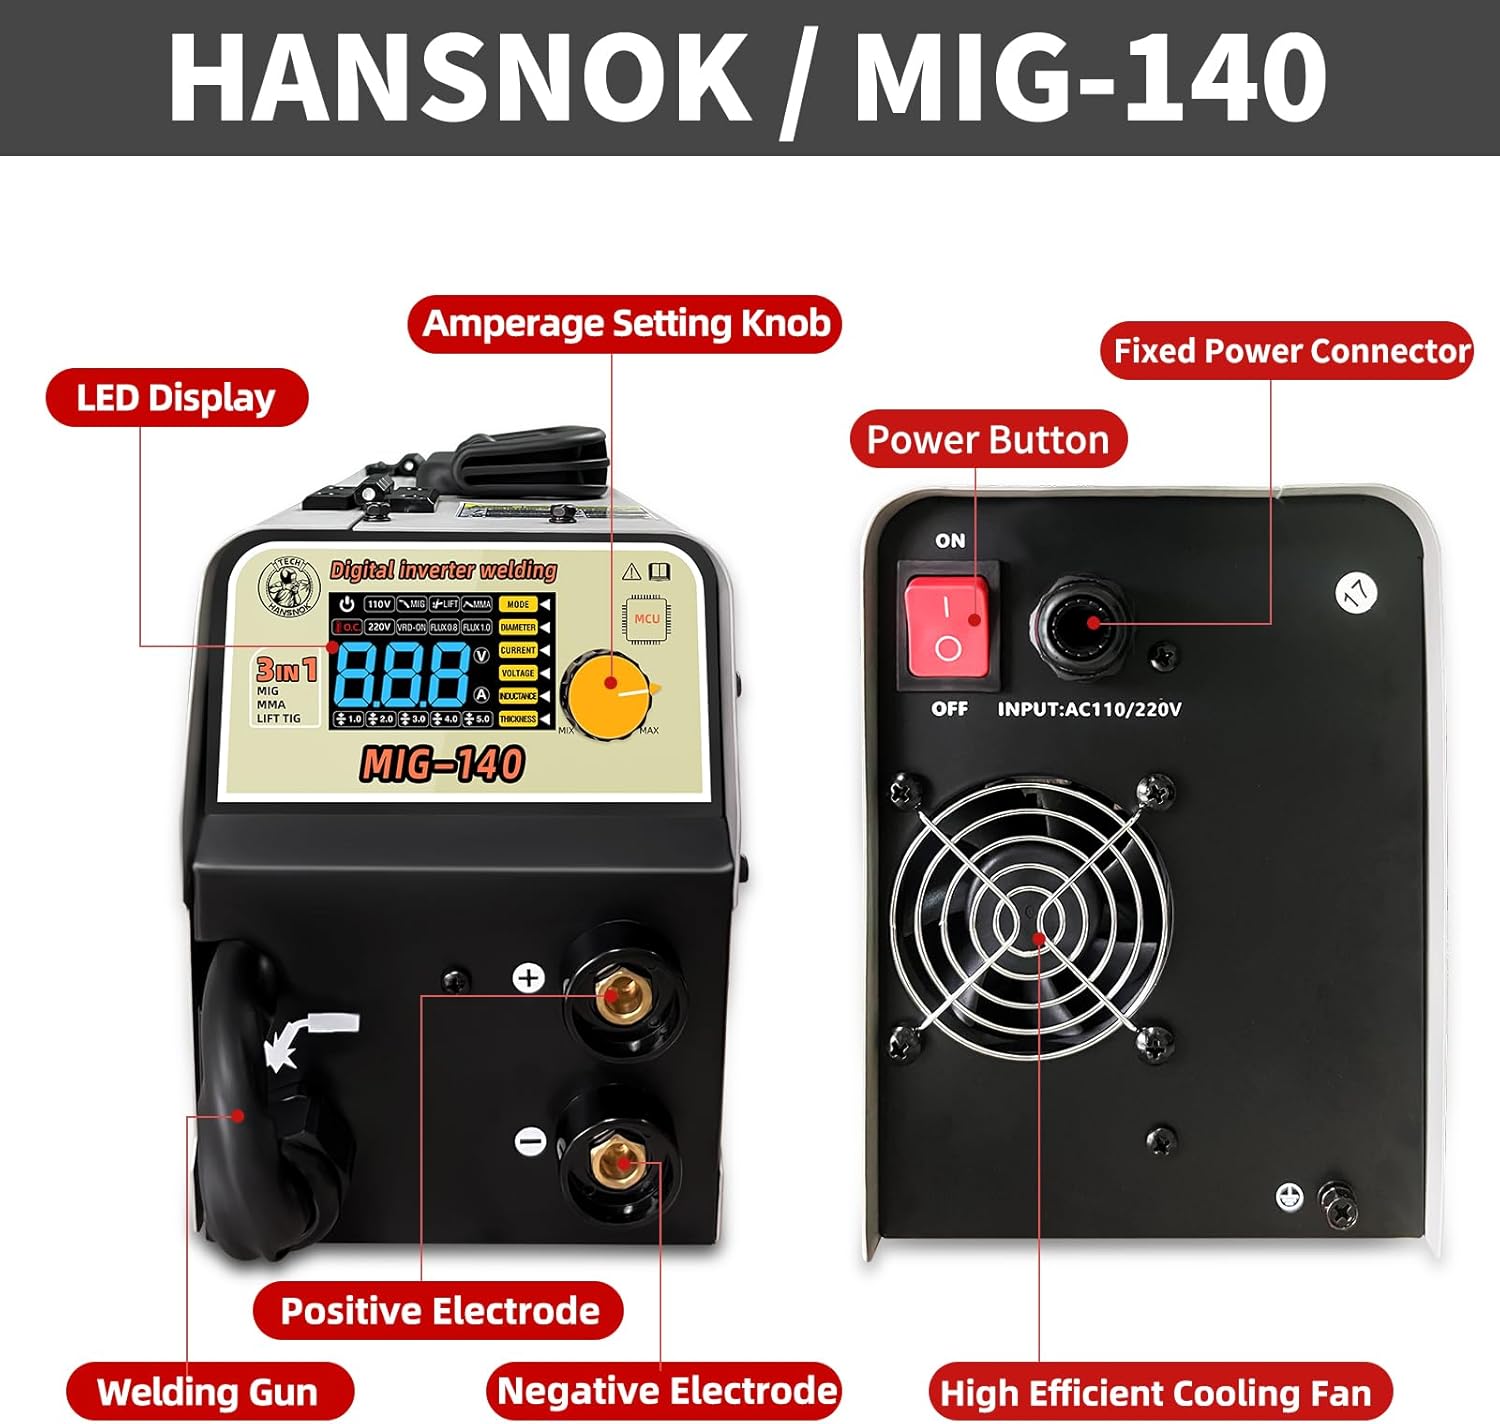
Image 3.1: Detailed view of the HANSNOK MIG-140 welder's front and rear panels, highlighting the LED display, amperage setting knob, positive and negative electrodes, welding gun connection, power button, fixed power connector, and high-efficiency cooling fan.
Front Panel Controls and Connections:
- LED Display: Shows current welding parameters (amperage, voltage).
- Amperage Setting Knob: Adjusts the output current for welding.
- Positive Electrode (+): Connection point for the electrode holder (Stick) or work clamp (MIG/TIG, depending on polarity).
- Negative Electrode (-): Connection point for the work clamp (Stick) or electrode holder (MIG/TIG, depending on polarity).
- Welding Gun Connection: Port for connecting the MIG welding gun.
Rear Panel Controls and Connections:
- Power Button: Turns the welding machine ON/OFF.
- Fixed Power Connector: Input for the main power cable (AC110V/220V).
- High Efficient Cooling Fan: Provides necessary cooling for internal components during operation.
4. Setup and Installation
4.1 Power Connection
The HANSNOK MIG-140 supports dual voltage input (110V/220V). Ensure the power source matches the machine's requirements and use the appropriate adapter if necessary.
- Connect the power cable to the fixed power connector on the rear panel.
- Plug the power cable into a suitable grounded electrical outlet.
4.2 Wire Installation (MIG/Flux Core)
For Flux Core MIG welding, install the welding wire spool as follows:

Image 4.1: Internal view of the HANSNOK MIG-140, illustrating the welding wire spool, damped disc shaft, and wire feeder mechanism for flux-cored wire installation.
- Open the side panel of the welder to access the wire feeder compartment.
- Place the welding wire spool onto the damped disc shaft. Ensure it rotates freely.
- Feed the welding wire through the wire feeder mechanism, ensuring it is properly seated in the drive rollers.
- Close the wire feeder tension arm and adjust the tension as needed.
- Connect the MIG welding gun to its designated port on the front panel.
- Press the trigger on the welding gun to feed the wire through the liner and out of the contact tip. Ensure the contact tip is removed during this process to prevent wire jamming.
This Flux Core Welder fits .030" (0.8mm) & .035" (1.0mm) flux core wire.
4.3 Connecting Welding Accessories
- Work Clamp (Ground Clamp): Connect the work clamp cable to the appropriate electrode terminal (positive or negative, depending on the welding process and polarity requirements). Securely attach the clamp to the workpiece or welding table, ensuring good electrical contact.
- Electrode Holder (Stick Welding): For Stick (MMA) welding, connect the electrode holder cable to the appropriate electrode terminal. Insert the welding electrode into the holder.
- Lift TIG Torch (Not Included): If performing Lift TIG welding, connect your compatible Lift TIG torch to the appropriate terminal. Note that a Lift TIG torch is not included with this machine.
5. Operating Instructions
The HANSNOK MIG-140 offers three welding modes: MIG (Flux Core), Lift TIG, and Stick (MMA).

Image 5.1: Visual representation of the three welding processes supported by the machine: Gasless (Flux Core) MIG welding, Stick (MMA) welding, and Lift TIG welding.
5.1 Mode Selection and Parameter Adjustment
The intelligent LED screen allows for easy reading and adjustment of output current parameters. Use the amperage setting knob to fine-tune your welding current.
5.2 MIG Welding (Flux Core)
- Ensure flux core wire is correctly installed and the MIG gun is connected.
- Set the machine to MIG mode.
- Adjust the amperage using the knob according to the wire diameter and material thickness. The machine features synergy, which helps optimize settings.
- Begin welding, maintaining a consistent travel speed and arc length.
5.3 Stick Welding (MMA)
- Connect the electrode holder and work clamp with appropriate polarity for your chosen electrode.
- Insert an E6013 rod (or other compatible rod) into the electrode holder.
- Set the machine to MMA mode.
- Adjust the amperage based on the electrode diameter and material thickness.
- Strike an arc and maintain a steady arc length and travel speed.
5.4 Lift TIG Welding
- Connect a compatible Lift TIG torch (not included) and work clamp.
- Ensure a tungsten electrode is properly installed in the torch.
- Set the machine to Lift TIG mode.
- Adjust the amperage.
- Initiate the arc by gently touching the tungsten to the workpiece and lifting slightly.
6. Specifications
Key technical specifications for the HANSNOK MIG-140 welding machine.

Image 6.1: Technical parameters table for the HANSNOK MIG-140, detailing input voltage, frequency, protection class, insulation class, cooling method, and welding output specifications for both 110V and 220V operations in MIG mode.
| Parameter | Value |
|---|---|
| Model | MIG-140 |
| Input Voltage | 110V/220V |
| Frequency | 50Hz/60Hz |
| Protection Class | IP21S |
| Insulation Class | F |
| Cooling Method | Fan Cool |
| Item Weight | 16.66 pounds (approx. 7.56 kg) |
| Product Dimensions | 11.81 x 5.51 x 7.48 inches |
| Max Welding Plate Thickness | Up to 3.0mm (mild steel) |
| Compatible Flux Core Wire | .030" (0.8mm) & .035" (1.0mm) |
| Compatible ARC Rods | E6013 |
Additional Features:
- Automatic compensation for voltage fluctuation.
- Over current protection.
- Overload protection.
- Overheating system with auto fan function.
- IGBT Inverter Technology.
7. Maintenance
Regular maintenance ensures the longevity and safe operation of your welding machine.
- Cleaning: Periodically clean the internal components and cooling fan vents to prevent dust and debris buildup, which can hinder cooling and performance. Use compressed air for this purpose.
- Cable Inspection: Regularly inspect all welding cables, connections, and the power cord for damage, fraying, or loose connections. Replace damaged parts immediately.
- Wire Feeder: Keep the wire feeder mechanism clean and free of debris. Check the drive rollers for wear and ensure proper tension.
- Storage: Store the welding machine in a clean, dry environment when not in use.
8. Troubleshooting
This section addresses common issues you might encounter with your welding machine.
| Problem | Possible Cause | Solution |
|---|---|---|
| Machine does not power on. | No power supply; faulty power cable; internal fuse blown. | Check power outlet and cable connections. Ensure power button is ON. Consult a qualified technician if fuse is suspected. |
| No welding arc. | Loose connections; incorrect mode selection; faulty electrode/wire; insufficient ground. | Verify all cable connections (work clamp, welding gun/electrode holder). Confirm correct welding mode. Check electrode/wire condition. Ensure good ground contact. |
| Poor weld quality (e.g., excessive spatter, weak penetration). | Incorrect amperage/voltage settings; improper travel speed/arc length; contaminated workpiece. | Adjust welding parameters according to material and wire/electrode type. Practice maintaining consistent technique. Clean workpiece thoroughly before welding. |
| Overheat indicator active. | Exceeded duty cycle; blocked cooling vents; high ambient temperature. | Allow the machine to cool down. Ensure cooling vents are clear. Operate in a well-ventilated area. |
If you encounter issues not listed here or if troubleshooting steps do not resolve the problem, please contact customer support.
9. Warranty and Support
The HANSNOK MIG-140 welding machine typically comes with a manufacturer's warranty, often for one year from the date of purchase. Please refer to your purchase documentation for specific warranty terms and conditions.
For technical assistance, warranty claims, or spare parts, please contact Hansnoktech customer support through your retailer or the official Hansnoktech website. When contacting support, please have your model number (MIG-140) and purchase date readily available.


