Important Safety Information
Read all instructions carefully before using the appliance. Keep this manual for future reference. Improper installation, adjustment, alteration, service, or maintenance can cause injury or property damage. Refer to this manual. For assistance or additional information, consult a qualified installer, service agency, or the gas supplier.
General Safety Warnings
- This product is designed for Natural Gas (NG) fuel only. Do not use with liquefied petroleum gas (LPG) unless specifically converted by a qualified technician.
- Do not use a pressure regulator not supplied with the product.
- Ensure proper ventilation in the kitchen area during operation.
- Keep flammable materials away from the cooktop.
- Supervise children when the appliance is in use.
- In case of a gas leak, immediately turn off the gas supply, open windows, and do not operate any electrical switches or appliances. Contact a qualified technician.
- The appliance must be installed by a qualified professional in accordance with local codes and regulations.
Flame-out Protection and Anti-Backfire System
This cooktop is equipped with a flame-out protection device that automatically cuts off the gas supply if the flame extinguishes. It also features anti-backfire protection for enhanced safety.
Product Overview
The banborba 2 Burner Gas Stove Cooktop features a tempered glass surface, two high-efficiency burners, and user-friendly controls.
Components
- Tempered Glass Surface
- Left Burner (4.2KW)
- Right Burner (5.2KW)
- Control Knobs (2)
- Pan Supports (Grates)
- Burner Caps
- Ignition System (Electronic Pulse Ignition)
- Thermocouple (Flame-out Protection)

Figure 1: Top-down view of the banborba 2 Burner Gas Stove Cooktop, highlighting its 73cm (28.74 inch) width and 41cm (16.14 inch) depth.
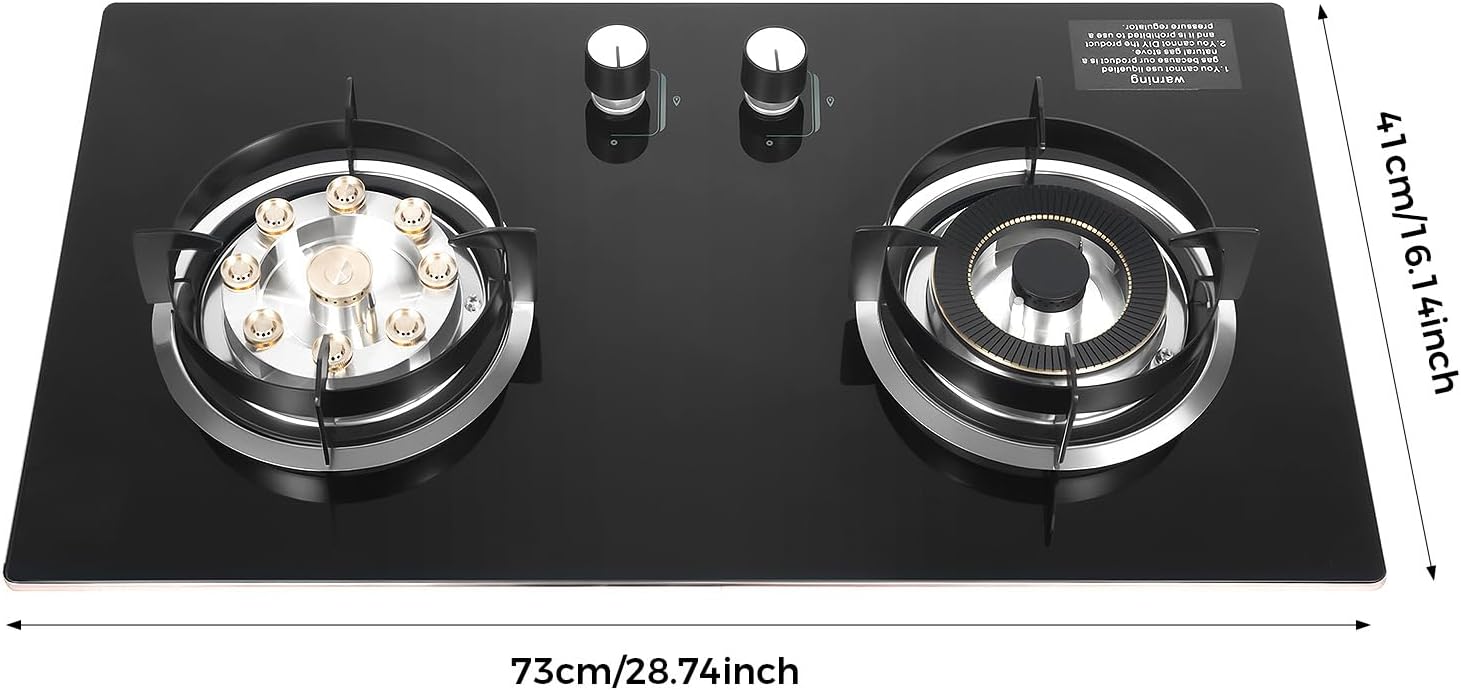
Figure 2: Exploded view of the cooktop components, showing the burner parts, pan supports, and control knobs. An instruction manual is also visible.
Setup and Installation
This gas cooktop can be installed as a countertop unit or embedded into a kitchen counter. Professional installation is recommended to ensure safety and compliance with local regulations.
Installation Requirements
- Fuel Type: Natural Gas (NG).
- Hole Size for Embedded Installation: 640mm x 350mm (25.2 inches x 13.78 inches).
- Power: Left Burner 4.2KW, Right Burner 5.2KW.
- Ensure adequate ventilation in the installation area.
- A qualified gas technician must connect the gas supply.
Steps for Component Assembly (Refer to Figure 2)
- Place the burner base onto the cooktop, ensuring it is seated correctly.
- Position the burner cap correctly on the burner base.
- Place the pan support (grate) over the burner assembly, ensuring stability.
- Install the control knobs by aligning them with the control shafts and pressing firmly until they click into place.

Figure 3: Diagram illustrating the required hole size for embedded installation: 64cm (25.2 inches) in length and 35cm (13.78 inches) in width.
Video 1: Demonstration of how to install the rotary control knobs on a gas stove. This video shows the process of attaching the knobs to the control shafts.
Video 2: Product display video of the banborba 2 Burner Gas Stove Cooktop, showcasing its features and design. This video provides a visual overview of the cooktop.
Operating Instructions
Ignition
- Ensure the gas supply to the cooktop is open.
- Press down and rotate the desired control knob counter-clockwise to the "High" flame setting.
- The electronic pulse ignition will automatically spark to ignite the burner.
- Once the flame is lit, continue to hold the knob down for a few seconds (approximately 3-5 seconds) to allow the flame-out protection thermocouple to heat up and engage.
- Release the knob. If the flame extinguishes, repeat the process.
Adjusting Flame
After ignition, rotate the control knob to adjust the flame intensity from high to low. The left burner offers a 4.2KW output for gentle stewing, while the right burner provides a 5.2KW output for high-heat stir-frying, allowing for versatile cooking.

Figure 4: The two efficient cooking burners in operation, demonstrating their different power outputs for various cooking methods like stewing, frying, and stir-frying.

Figure 5: Illustration of the ignition process, showing how to press and rotate the knob. It also highlights the thermocouple design for automatic flame-out protection and backfire prevention.
Maintenance and Cleaning
Regular cleaning and maintenance will ensure the longevity and optimal performance of your cooktop.
Cleaning the Tempered Glass Surface
- Allow the cooktop to cool completely before cleaning to prevent burns and damage.
- Use a soft cloth and mild detergent to wipe off oil stains and spills.
- Avoid abrasive cleaners, harsh chemicals, or scouring pads that can scratch or damage the glass surface.
- For stubborn stains, use a non-abrasive glass cleaner specifically designed for cooktops.
Cleaning Burner Components
- The pan supports and burner caps are detachable for easy cleaning. Remove them once the cooktop is cool.
- Wash these components with warm, soapy water. For baked-on food, they can be soaked briefly.
- Ensure all parts are completely dry before reassembling them to prevent ignition issues.
- Regularly check burner ports for blockages (e.g., food debris) and clean with a soft brush or a thin wire if necessary.

Figure 6: Demonstrates the ease of cleaning the tempered glass surface and the detachable design of the pan supports for thorough maintenance.
Troubleshooting
If you encounter issues with your cooktop, refer to the following common problems and solutions. If the problem persists, contact a qualified technician.
Burner Does Not Ignite
- Gas Supply: Check if the main gas supply valve is open.
- Control Knob: Ensure the control knob is pressed down fully and rotated to the ignition position during the ignition sequence.
- Burner Components: Verify that the burner components (cap, base) are correctly assembled and seated.
- Burner Ports: Check for blockages in the burner ports. Clean if necessary.
- Battery: The electronic pulse ignition requires an R20S D-size battery (not included). Ensure it is installed correctly and has sufficient charge.
Flame is Irregular or Yellow
- Burner Cleanliness: Check if burner ports are clean and free from food debris or grease.
- Burner Cap: Ensure the burner cap is correctly seated on the burner base.
- Air/Gas Mixture: If the issue persists after cleaning, it may indicate an air/gas mixture problem. Contact a qualified technician.
Gas Odor
- Immediate Action: Immediately turn off the gas supply to the appliance and the main gas valve.
- Ventilation: Open windows and doors for maximum ventilation.
- Avoid Ignition Sources: Do not operate any electrical switches, light matches, or use any appliances that could create a spark.
- Contact Professional: Contact a qualified gas technician or emergency services immediately.
Specifications
| Feature | Specification |
|---|---|
| Brand | banborba |
| Model Number | HG-ZYLLFY-7014-LJH |
| Product Dimensions (L x W x H) | 73 x 41 x 17 cm (28.74 x 16.14 x 6.69 inches) |
| Hole Size (Embedded) | 640 x 350 mm (25.2 x 13.78 inches) |
| Net Weight | Approx. 7.5 kg (16.53 lbs) |
| Fuel Type | Natural Gas (NG) |
| Left Burner Power | 4.2 KW |
| Right Burner Power | 5.2 KW |
| Thermal Efficiency | 63% |
| Ignition Method | Electronic Pulse Ignition |
| Safety Features | Flame-out Protection, Anti-Backfire Protection |
| Surface Material | Tempered Glass |
| Control Type | Knob |
| Installation Type | Countertop/Embedded |
Warranty and Support
For warranty information or technical support, please refer to the contact details provided with your purchase or visit the manufacturer's official website. Keep your proof of purchase for any warranty claims or service requests.