
1. Introduction
This manual provides detailed instructions for the installation, operation, and maintenance of your Hikity Android 13 Carplay Autoradio. This device features a 9-inch touchscreen, Android 13 operating system, 2GB RAM, 64GB ROM, built-in Wi-Fi, GPS, Bluetooth, FM/RDS radio, and supports wireless Carplay and wired Android Auto. It is designed for compatibility with various VW, Skoda, and Passat models.

Image 1.1: Hikity Android 13 Carplay Autoradio with external microphone, Carplay/Android Auto interface, and AHD backup camera.
2. Setup and Installation
2.1 Package Contents
Before installation, verify that all components are present:

Image 2.1: Product dimensions and a list of included accessories such as power cable, RCA cables, USB cables, camera input, GPS antenna, AHD rear camera, Canbus, and radio cable.
- Main Autoradio Unit (9-inch display)
- Power Cable
- RCA Input / Output Cables
- USB Cables (2)
- Camera Input Cable
- GPS Antenna
- AHD Rear Camera
- Canbus Decoder (if applicable for your vehicle model)
- Radio Cable
- External Microphone
2.2 Vehicle Compatibility
This autoradio is compatible with various VW, Skoda, and Passat models. Refer to the following list for common compatible vehicles. Ensure your vehicle's dashboard dimensions and wiring harness match the product specifications.
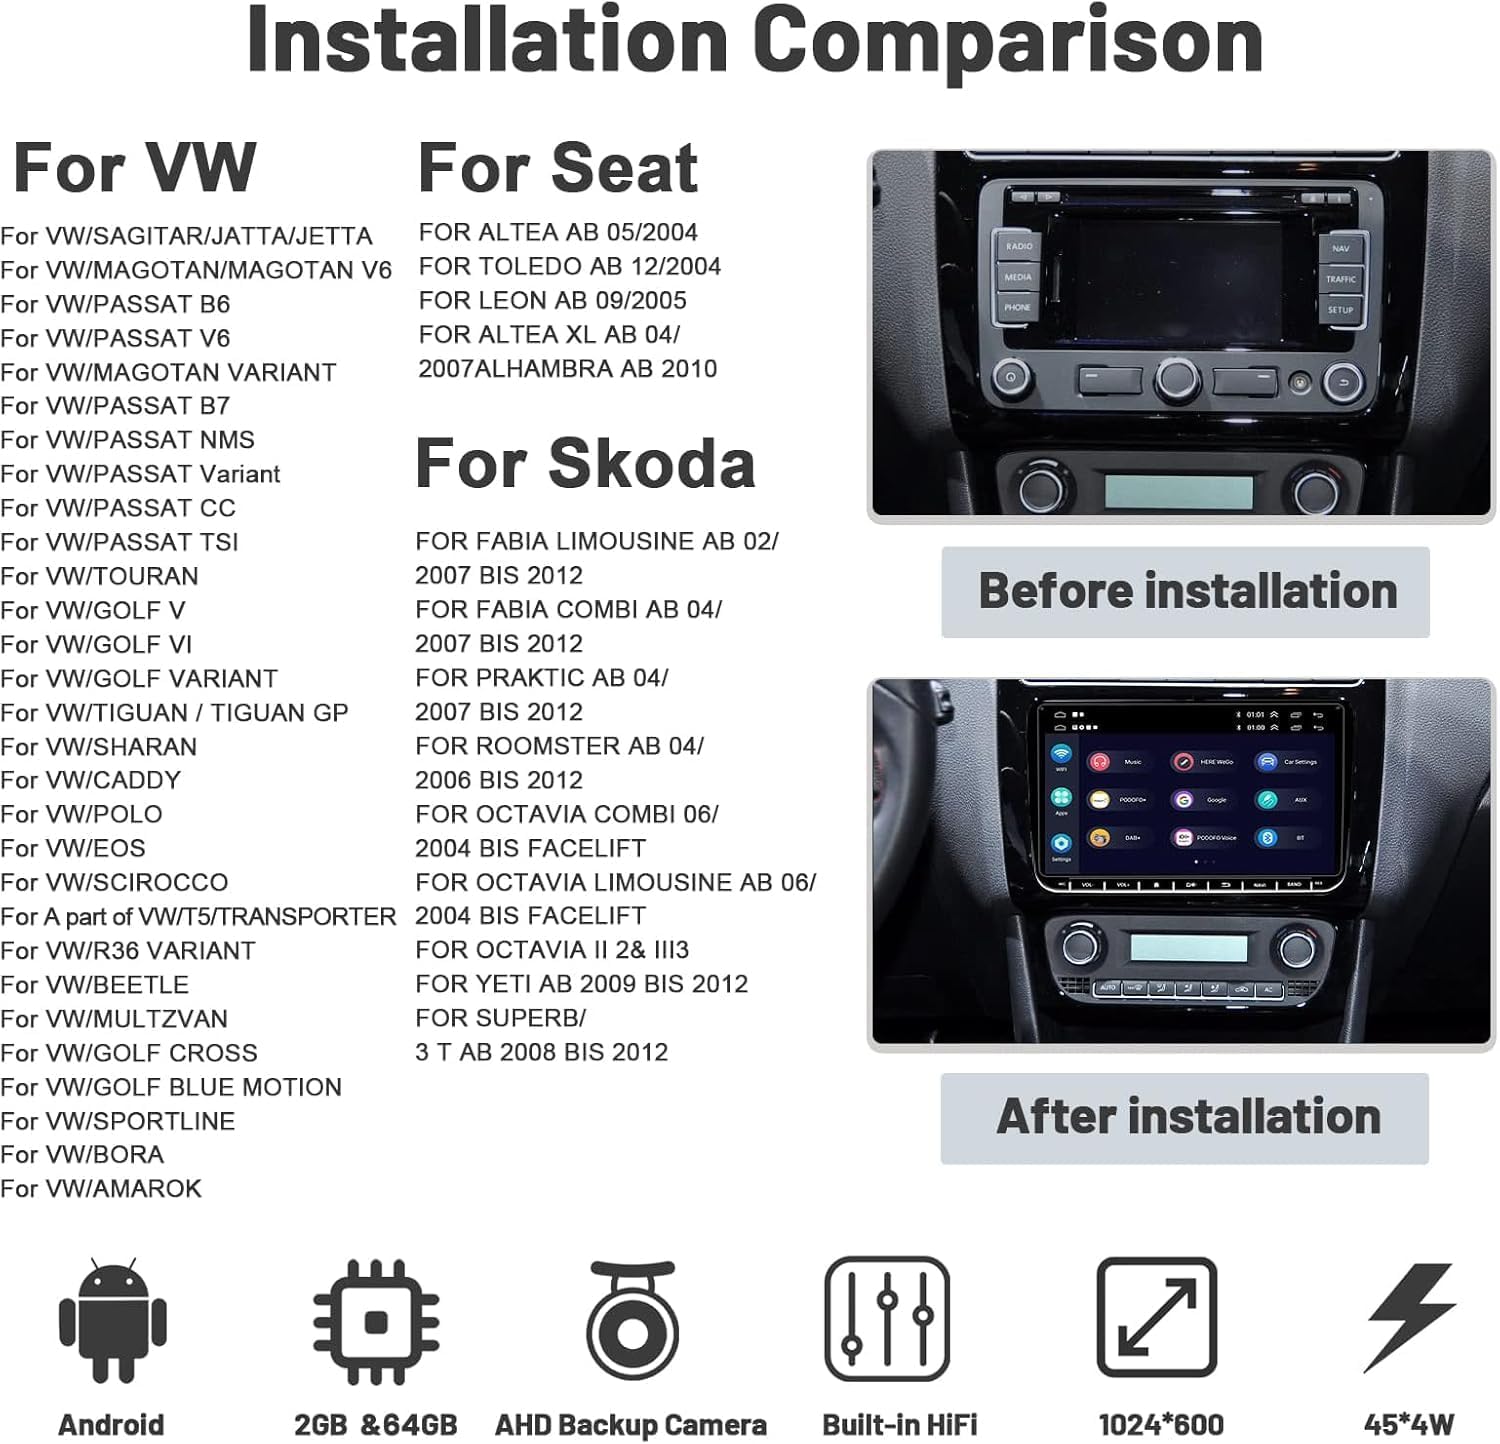
Image 2.2: A visual comparison of a car dashboard before and after the installation of the Hikity autoradio, alongside a list of compatible VW, Seat, and Skoda models.
2.3 Wiring Diagram and Connections
Follow these general steps for wiring. Professional installation is recommended.
- Power Connection: Connect the main power cable to your vehicle's power supply. Ensure correct polarity (ACC, B+, GND).
- Speaker Connections: Connect the speaker wires to the corresponding vehicle speaker outputs.
- USB Ports: Connect the two USB cables for external storage or device charging.
- GPS Antenna: Mount the GPS antenna in a location with a clear view of the sky, typically on the dashboard or under the windshield, and connect it to the unit.
- Radio Antenna: Connect the vehicle's radio antenna to the unit.
- AHD Rear Camera: Connect the AHD rear camera cable to the camera input on the autoradio. Ensure the camera's power is connected to the vehicle's reverse light circuit for automatic activation.
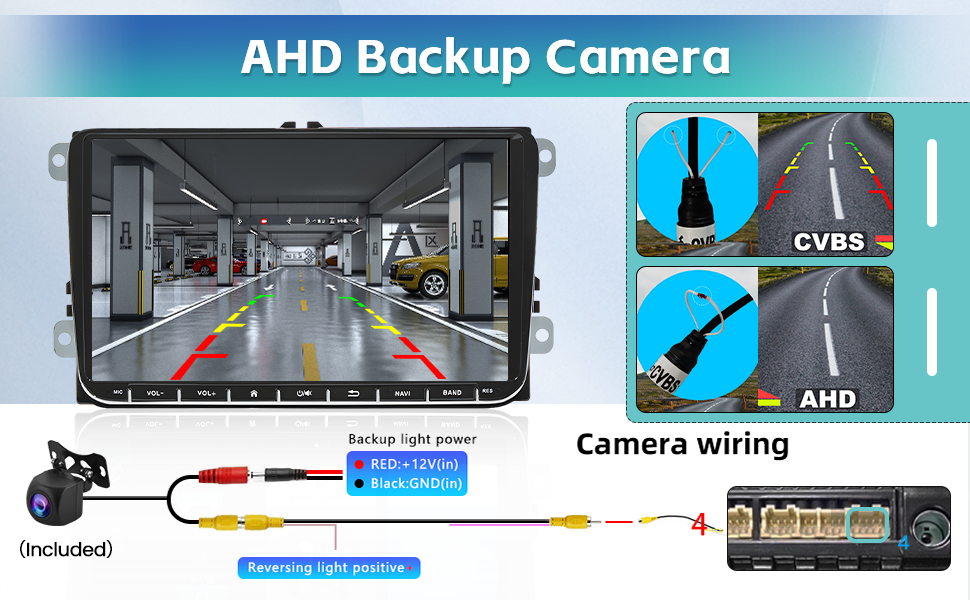
Image 2.3: Detailed wiring diagram for the AHD backup camera, showing connections for power (RED +12V), ground (BLACK GND), and the reversing light positive.
2.4 Canbus Integration
For vehicles that support original car features like steering wheel controls or door/AC information display, a Canbus decoder is included. Connect the Canbus unit as per the vehicle-specific wiring instructions. Some higher versions of cars may require an additional wiring harness/Canbus for full functionality.

Image 2.4: Illustration demonstrating the retention of original car features such as steering wheel control functions and door/AC information through the use of a Canbus module.
3. Operating Instructions
3.1 Initial Power On and System Overview
After successful installation, turn on your vehicle's ignition. The autoradio will boot up, displaying the Android 13 interface. The 9-inch touchscreen allows for intuitive navigation through menus and applications.

Image 3.1: Various screenshots showcasing the Hikity autoradio's user interface, including home screens, settings, media playback, and radio functions.
3.2 Wireless Carplay & Android Auto
Connect your smartphone wirelessly for Carplay or Android Auto functionality. This allows access to navigation, calls, messages, and music directly from your phone's interface on the autoradio screen.
- Wireless Carplay: For iPhone users, enable Wi-Fi and Bluetooth on your phone, then pair with the autoradio. Follow on-screen prompts to activate Carplay.
- Wired Android Auto: For Android users, connect your phone via a USB cable. Ensure Android Auto is installed on your phone.
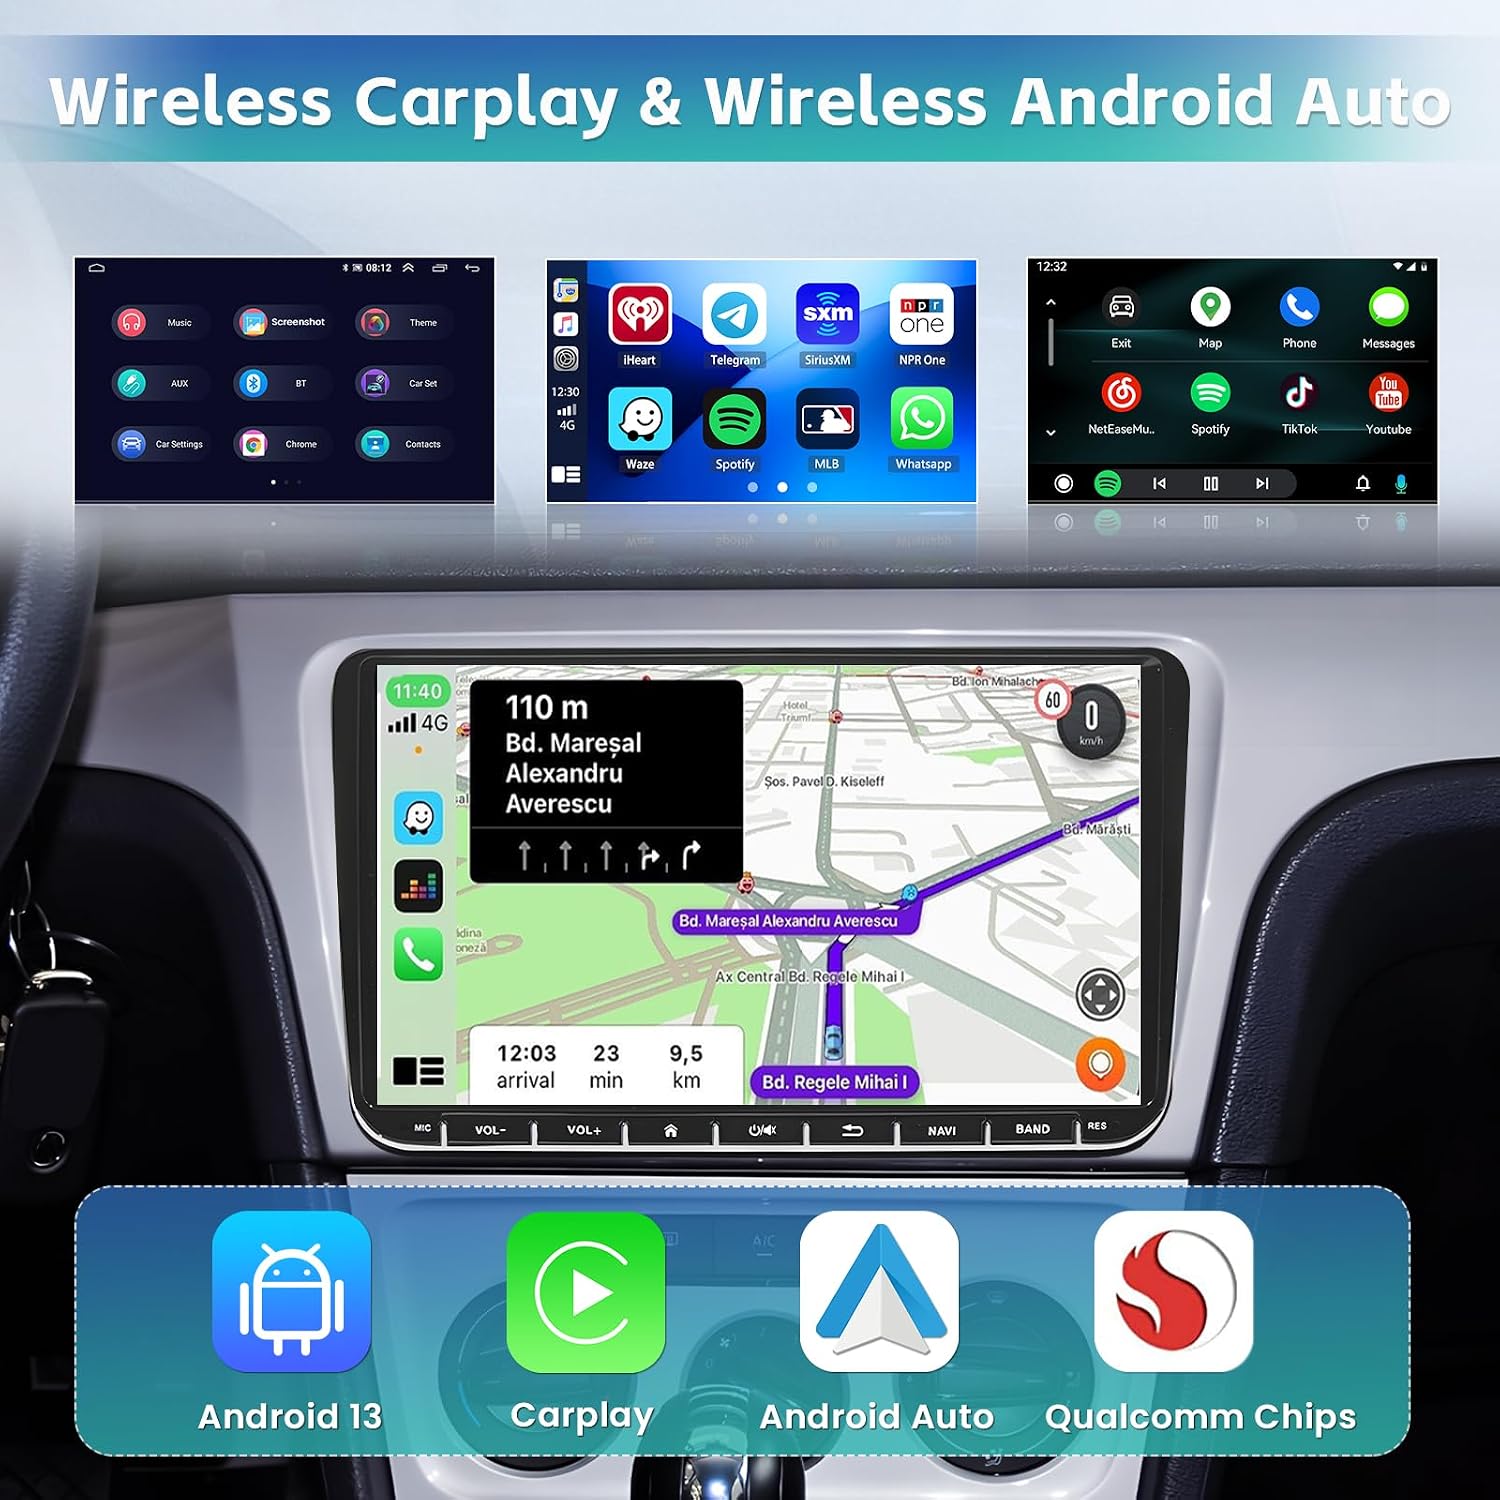
Image 3.2: Display of the Wireless Carplay and Android Auto interfaces on the autoradio, showing various applications like maps, music, and communication tools.
3.3 GPS Navigation and Wi-Fi
The unit comes with built-in GPS and supports offline navigation via applications like Here WeGo. Connect to Wi-Fi or a mobile hotspot to download online maps, traffic updates, and other applications.

Image 3.3: The GPS navigation screen displaying a map with route information, and an illustration of the Wi-Fi connection feature for downloading apps.
3.4 Bluetooth and FM/RDS Radio
Utilize Bluetooth for hands-free calling and A2DP music streaming. The FM/RDS radio tuner provides access to local radio stations with 18 preset options and HiFi sound quality.

Image 3.4: Displays of the Bluetooth calling interface, FM RDS radio tuner with frequency display, built-in HiFi equalizer settings, and steering wheel control (SWC) function setup.
3.5 Touchscreen and Split Screen Functionality
The responsive touchscreen allows for easy interaction. The split-screen feature enables running two applications simultaneously, such as navigation and music playback.

Image 3.5: Visual representation of various touchscreen gestures for interaction with the device.

Image 3.6: A screenshot demonstrating the split-screen functionality, showing two applications running side-by-side.
3.6 AHD Backup Camera
When the vehicle is shifted into reverse, the autoradio automatically displays the feed from the included AHD infrared backup camera. This camera offers a 170° wide viewing angle and night vision capabilities.
4. Maintenance
Proper maintenance ensures the longevity and optimal performance of your autoradio.
- Screen Cleaning: Use a soft, lint-free cloth to gently wipe the touchscreen. For stubborn smudges, slightly dampen the cloth with water or a screen-safe cleaner. Avoid harsh chemicals.
- Software Updates: Periodically check for system updates via the Wi-Fi connection in the device settings. Keeping the software updated can improve performance and add new features.
- Environmental Conditions: Avoid exposing the unit to extreme temperatures, direct sunlight for prolonged periods, or excessive moisture.
5. Troubleshooting
If you encounter issues, refer to the following common troubleshooting steps:
- No Power: Check all power connections. Ensure the ACC and B+ wires are correctly connected and receiving power. Verify vehicle fuses.
- No Sound: Check speaker wiring connections. Ensure the volume is not muted or set too low. Verify audio output settings.
- GPS Signal Loss: Ensure the GPS antenna is properly connected and mounted in a location with a clear view of the sky. Try restarting the unit.
- Bluetooth Connection Issues: Ensure Bluetooth is enabled on both the autoradio and your smartphone. Delete previous pairings and attempt to re-pair.
- Carplay/Android Auto Not Connecting: For wireless connections, ensure Wi-Fi and Bluetooth are active. For wired connections, try a different USB cable and port. Verify phone compatibility and software versions.
- Rear Camera Not Displaying: Check the camera's power connection to the reverse light. Ensure the camera input cable is securely connected to the autoradio.
If problems persist after attempting these steps, contact customer support.
6. Specifications
| Feature | Specification |
|---|---|
| Brand | Hikity |
| Model Number | Manju-A3041A4UP |
| Operating System | Android 13 |
| RAM | 2 GB |
| ROM | 64 GB |
| Screen Size | 9 Inch (23 cm) |
| Resolution | 1024 x 600 |
| Connectivity | Wi-Fi, Bluetooth |
| Output Power | 45 Watts |
| USB Ports | 2 |
| Compatible Devices | Smartphone |
| Mounting Type | Dashboard Mount |
| Product Dimensions | 21.8 x 5.3 x 13 cm |
| Product Weight | 1.23 kg |
7. Warranty and Support
For warranty information, please refer to the documentation provided at the time of purchase or contact your retailer. For technical support or further assistance, please reach out to Hikity customer service through the contact details provided on their official website or your purchase platform.