1. Important Safety Instructions
Please read all instructions carefully before using your new portable air conditioner and retain this manual for future reference. Always follow basic safety precautions to reduce the risk of fire, electric shock, or injury.
- Ensure the unit is placed on a flat, stable surface to prevent tipping.
- Do not operate the unit with a damaged cord or plug. If the supply cord is damaged, it must be replaced by the manufacturer, its service agent, or similarly qualified persons to avoid a hazard.
- Do not block air inlets or outlets. Maintain at least 20 cm (8 inches) clearance from walls and other objects.
- Do not insert fingers or foreign objects into the air inlet/outlet.
- This appliance is not intended for use by persons (including children) with reduced physical, sensory or mental capabilities, or lack of experience and knowledge, unless they have been given supervision or instruction concerning use of the appliance by a person responsible for their safety.
- Always unplug the unit before cleaning or servicing.
- Use only the power supply specified on the rating label.
2. Product Overview
The Hisense AP0621CR1W-cr is a versatile 3-in-1 portable air conditioner designed to provide cooling, dehumidification, and fan-only operation for your space. Its ultra-slim design allows for easy placement and mobility.
Unit Components
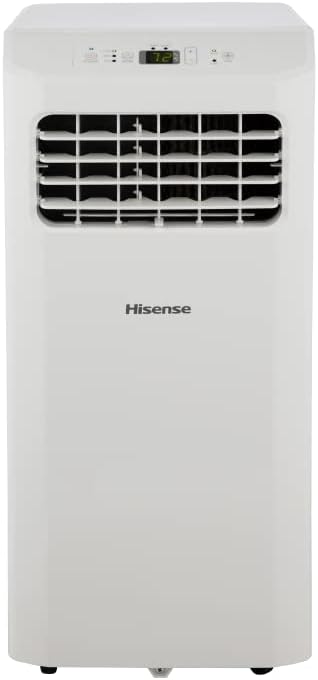
Figure 2.1: Front View. This image displays the front of the Hisense portable air conditioner, highlighting the main air outlet grille and the Hisense branding. The control panel is visible at the top.

Figure 2.2: Control Panel. A detailed view of the top-mounted control panel, showing buttons for Power, Mode, Fan Speed, Temperature adjustment, and the digital display.
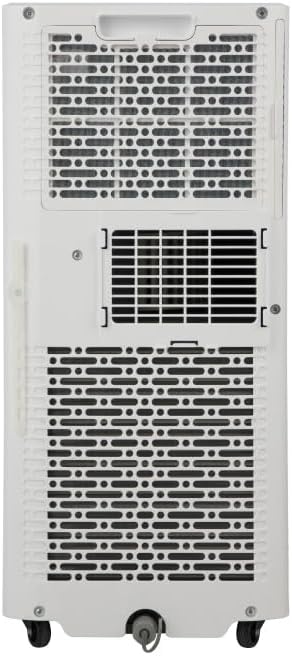
Figure 2.3: Rear View. This image shows the back of the unit, including the exhaust air outlet, air intake grilles, and the continuous drain port.
3. Setup and Installation
Proper installation is crucial for the efficient operation of your portable air conditioner. This unit is designed for window installation to exhaust hot air.
3.1 Unpacking
- Carefully remove the unit from its packaging.
- Remove all packing materials and ensure no components are missing.
- Allow the unit to stand upright for at least 2 hours before operation if it was not stored upright.
3.2 Window Kit Installation
The window kit is designed to fit most standard vertical and horizontal windows. Adjust the window slider kit to the width or height of your window opening and secure it.
3.3 Exhaust Hose Connection
- Attach the exhaust hose connector to the exhaust outlet on the rear of the unit.
- Connect the other end of the exhaust hose to the window slider kit.
- Ensure the hose is not kinked or bent sharply, as this will reduce efficiency.

Figure 3.1: Exhaust Hose Connection. This image illustrates the side of the portable AC, indicating where the exhaust hose would connect to expel hot air.
3.4 Power Connection
Plug the power cord into a properly grounded 12 Volt electrical outlet. Do not use extension cords or adapter plugs.
4. Operating Instructions
Your Hisense portable air conditioner can be operated using the control panel on the unit or the included remote control.
4.1 Control Panel Functions
- Power Button: Turns the unit ON or OFF.
- Mode Button: Cycles through Cooling, Dehumidifying, and Fan modes.
- Fan Speed Button: Adjusts fan speed (Low, Medium, High) in Cool and Fan modes.
- Temperature Up/Down Buttons: Adjusts the desired temperature in Cooling mode.
- Timer Button: Sets the auto-on or auto-off timer.
4.2 Operating Modes
- Cool Mode: Provides cooling. Set your desired temperature using the Up/Down buttons.
- Dehumidify Mode: Removes moisture from the air. The fan speed is typically fixed to low in this mode.
- Fan Mode: Circulates air without cooling. Select your preferred fan speed.
4.3 Remote Control
The remote control provides convenient access to all functions from a distance. Refer to the remote control section in the full manual for detailed button descriptions.
5. Maintenance
Regular maintenance ensures optimal performance and extends the lifespan of your air conditioner.
5.1 Air Filter Cleaning
The air filter should be cleaned every two weeks or more frequently depending on usage. A dirty filter reduces cooling efficiency.
- Unplug the unit from the power outlet.
- Remove the air filter from the rear of the unit.
- Wash the filter with lukewarm water and a mild detergent. Rinse thoroughly.
- Allow the filter to air dry completely before reinstalling.
5.2 Draining Water
During dehumidification or heavy cooling, water will accumulate inside the unit. The unit has a self-evaporative system, but in high humidity, manual draining may be necessary.
- Place a shallow pan or bucket under the continuous drain port at the rear of the unit.
- Remove the drain plug to allow water to flow out.
- Replace the drain plug securely once draining is complete.
5.3 Storage
When storing the unit for an extended period:
- Drain all accumulated water.
- Clean the air filter.
- Run the unit in Fan mode for a few hours to dry the interior.
- Store the unit in a dry, upright position, covered to protect from dust.
6. Troubleshooting
Before contacting customer service, please refer to the following common issues and solutions:
| Problem | Possible Cause | Solution |
|---|---|---|
| Unit does not turn on | No power; Power cord not plugged in; Circuit breaker tripped | Check power supply; Plug in securely; Reset circuit breaker |
| Unit does not cool sufficiently | Air filter dirty; Room too large; Doors/windows open; Exhaust hose blocked/leaking | Clean air filter; Ensure room size is appropriate; Close doors/windows; Check exhaust hose for proper installation |
| Water leakage | Drain plug loose; Unit not level; Drain pan full (in high humidity) | Secure drain plug; Place unit on a level surface; Drain water manually |
| Loud noise | Unit not level; Obstruction in fan; Air filter dirty | Ensure unit is level; Check for obstructions; Clean air filter |
7. Specifications
Key technical specifications for the Hisense AP0621CR1W-cr portable air conditioner:
- Model: AP0621CR1W-cr
- Brand: Hisense
- Cooling Power: 6000 British Thermal Units (BTU)
- Capacity: 0.5 Tons
- Functions: Cooling, Dehumidifier, Fan
- Product Dimensions: 11.81 x 12.99 x 26.38 inches
- Noise Level: 49 dB
- Voltage: 12 Volts
- Refrigerant: R 410A
- Installation Type: Window (with included kit)
- Color: White
- Form Factor: Portable
8. Warranty and Support
For warranty information, please refer to the warranty card included with your product at the time of purchase. This document outlines the terms and conditions of your product's warranty.
For technical support, service, or to order replacement parts, please contact Hisense customer service. Contact details can typically be found on the manufacturer's official website or on your product's packaging.