1. Introduction
This manual provides comprehensive instructions for the installation, operation, and maintenance of your ANNKE 32-Channel 12MP NVR PoE Security Camera System. This system is designed to provide advanced surveillance capabilities for both home and business environments, featuring high-resolution cameras, intelligent detection, and robust recording.
Please read this manual thoroughly before using the product to ensure proper setup and optimal performance. Keep this manual for future reference.
2. What's in the Box
Verify that all components listed below are included in your package. If any items are missing or damaged, please contact ANNKE customer support.
- 1 x ANNKE 32-Channel 12MP NVR with 2TB Security-Grade Hard Drive
- 20 x Wired 3K PoE IP Cameras
- 20 x Network Cables (various lengths: 30m & 18m)
- 1 x Power Adapter for NVR
- 1 x 1m Ethernet Cable
- 1 x USB Mouse
- 1 x Quick Instruction Guide

Figure 2.1: Overview of the ANNKE 32-Channel NVR PoE Security Camera System components, including the NVR, PoE switch, 2TB HDD, and 20 3K PoE IP cameras.
3. Product Features
The ANNKE 32-Channel 12MP NVR PoE Security Camera System incorporates several advanced features to enhance your surveillance experience:
- Smart Dual-Light Technology: Cameras automatically switch between infrared and white light modes upon human or vehicle detection, providing both covert and illuminated surveillance.
- 3K Clarity and Wide Viewing Experience: Enjoy high-resolution 3K (3072x1728) video with a 16:9 aspect ratio for clear and immersive footage.
- Enhanced Person and Vehicle Detection: Deep Learning Algorithms reduce false alerts by accurately distinguishing between humans, vehicles, and other movements.
- IP67 Waterproof Rating and Audio: Cameras are built to withstand harsh weather conditions and include a sensitive microphone for real-time audio monitoring.
- Efficient H.265+ Compression: Advanced video compression technology optimizes storage space without compromising video quality.
- Flexible Storage Options: Cameras support on-board storage up to 256GB via an SD card slot, and the NVR includes a 2TB hard drive.

Figure 3.1: Illustration of 3K (3072x1728) resolution with a 16:9 aspect ratio, providing a wider and clearer viewing experience compared to 4:3.

Figure 3.2: Depiction of Smart Dual-Light technology, where a spotlight illuminates a person detected in a dark outdoor setting.

Figure 3.3: Comparison of night vision modes, showing up to 66ft color night vision and up to 100ft infrared night vision for comprehensive surveillance in low-light conditions.

Figure 3.4: Example of human and vehicle detection, illustrating how the system identifies and outlines detected subjects, triggering app push notifications, emails, and buzzer alerts.

Figure 3.5: Demonstration of the Region of Interest (ROI) setting, allowing users to define specific areas for enhanced monitoring and clearer evidence capture.

Figure 3.6: Visual representation of key camera functions: a built-in Listen-In Mic for noise-cancelling audio recording and an IP67 rating for dust and weatherproof durability.
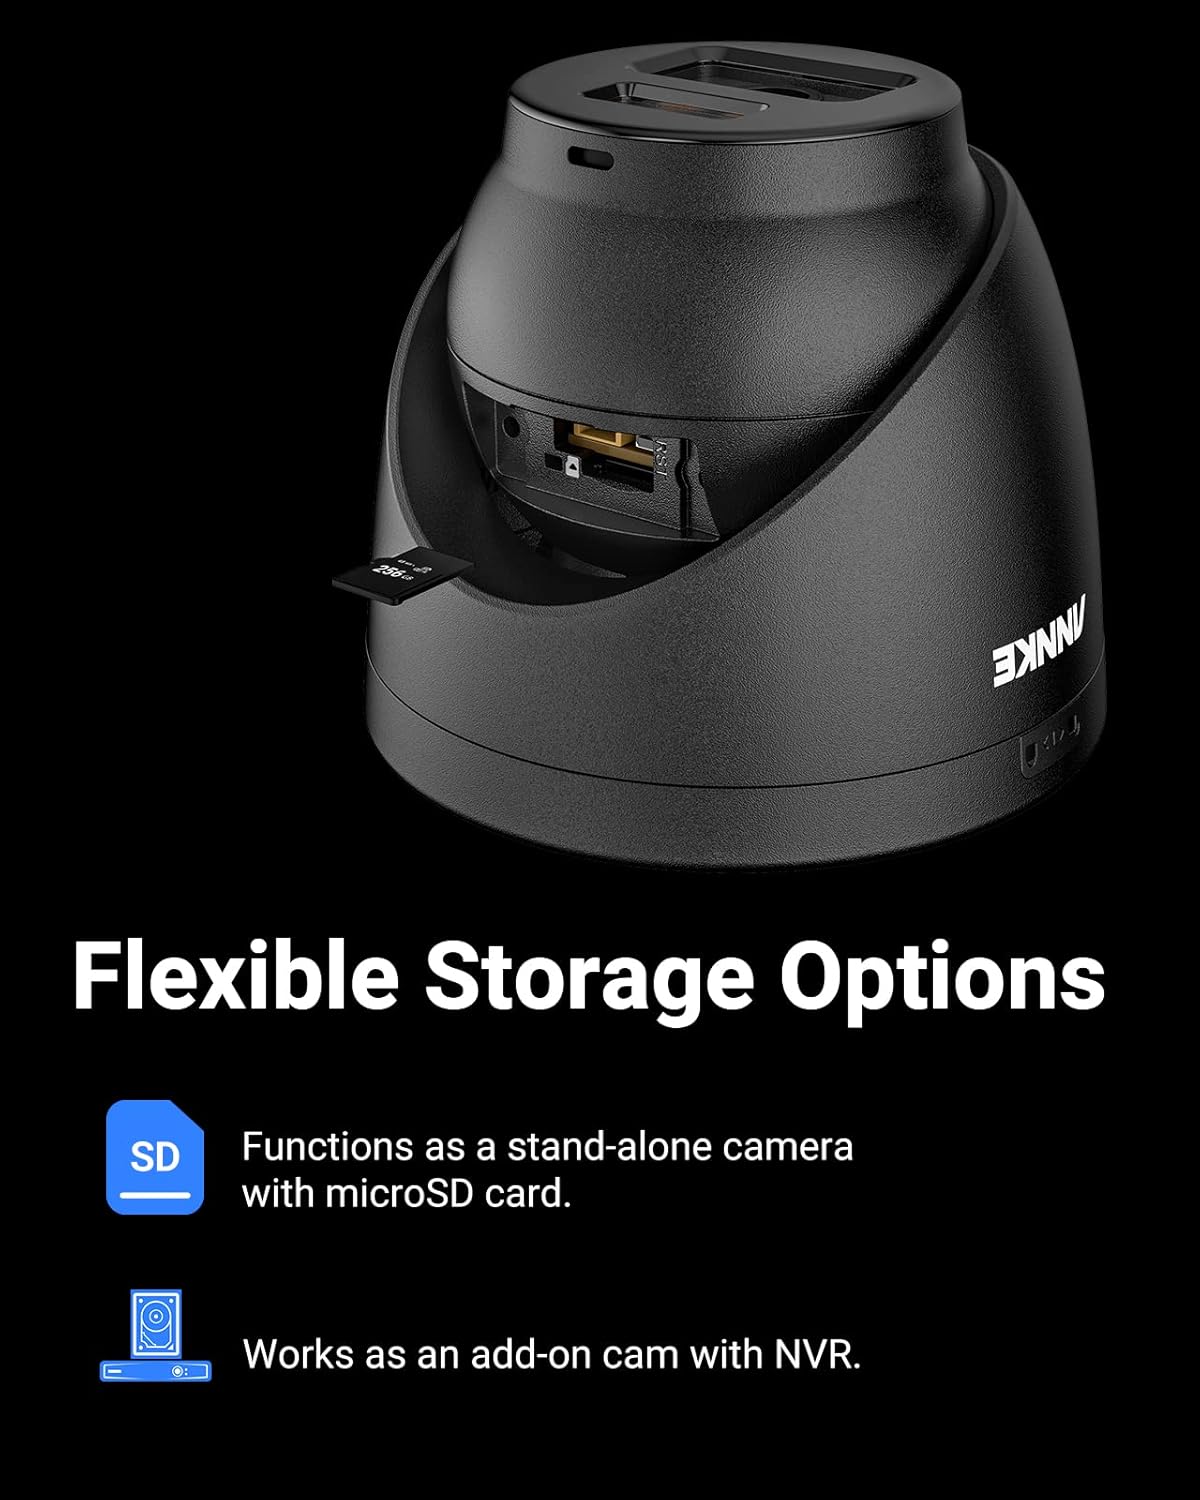
Figure 3.7: Illustration of flexible storage options, showing a camera with a microSD card slot for standalone recording and its compatibility as an add-on camera with the NVR.
4. Setup and Installation
This section guides you through the physical installation and initial configuration of your ANNKE security system. Ensure all components are present and power sources are accessible.
4.1 NVR Setup
- Connect the NVR:
- Connect the NVR to a monitor using an HDMI or VGA cable.
- Connect the USB mouse to a USB port on the NVR.
- Connect the NVR to your network router using the provided Ethernet cable.
- Connect the power adapter to the NVR and plug it into a power outlet. The NVR will power on automatically.
- Initial Configuration: Follow the on-screen prompts to set up the NVR, including language, date/time, and creating a strong password.
4.2 Camera Installation
- Mounting Location: Choose strategic locations for your cameras that provide optimal coverage and are within reach of the network cables. Consider areas prone to intrusion, entry points, and high-traffic zones.
- Connect PoE Cameras:
- Connect one end of the network cable to the camera's Ethernet port.
- Connect the other end of the network cable to an available PoE port on the NVR or the PoE switch. The cameras will receive power and data through this single cable.
- Secure Mounting: Use the provided screws and anchors to securely mount each camera to a wall or ceiling. Adjust the camera angle for the desired field of view.
- Verify Connection: Once connected, the cameras should automatically appear on the NVR monitor. If a camera does not appear, check the cable connection and power status.
5. Operating the System
This section covers the basic operation of your ANNKE security system, including live view, recording, playback, and remote access.
5.1 Live View
After initial setup, the NVR will display the live feed from all connected cameras. You can switch between single-camera view, multi-camera grid view, and customize the display layout using the NVR's interface and USB mouse.
5.2 Recording Settings
The NVR is pre-configured for continuous recording. You can adjust recording settings via the NVR menu:
- Continuous Recording: Records 24/7.
- Motion Detection Recording: Records only when motion is detected. Configure sensitivity and detection zones.
- Scheduled Recording: Set specific times for recording.
- Event Recording: Records based on specific events like human/vehicle detection.
Access these settings through Menu > Record > Schedule or Menu > Event.
5.3 Playback and Backup
To review recorded footage:
- Go to Menu > Playback.
- Select the desired camera(s) and date/time range.
- Use the timeline to navigate through recordings.
To back up footage, connect a USB flash drive to the NVR and follow the instructions under Menu > Export.
5.4 Remote Access (ANNKE Vision App)
For remote monitoring and control, download the ANNKE Vision app on your smartphone or tablet.
- Download and install the "ANNKE Vision" app from your device's app store.
- Create an account and log in.
- Add your NVR by scanning the QR code displayed on the NVR's monitor (Menu > Configuration > Network > P2P) or by manually entering the device's serial number.
- Once added, you can view live feeds, play back recordings, and receive alerts remotely.
6. Maintenance
Regular maintenance ensures the longevity and optimal performance of your security system.
- Camera Cleaning: Periodically clean camera lenses with a soft, damp cloth to remove dust, dirt, or water spots that may obstruct the view. Do not use harsh chemicals.
- NVR Ventilation: Ensure the NVR is placed in a well-ventilated area to prevent overheating. Keep vents clear of obstructions.
- Firmware Updates: Check the ANNKE official website regularly for firmware updates for your NVR and cameras. Updates can improve performance, add features, and enhance security. Follow the provided instructions carefully when performing updates.
- Password Security: Regularly change your NVR and app passwords to strong, unique combinations to protect against unauthorized access.
- Hard Drive Health: The 2TB hard drive is designed for continuous operation. The NVR system may include features to monitor HDD health. Replace the hard drive if errors are detected.
7. Troubleshooting
This section addresses common issues you might encounter with your ANNKE security system.
| Problem | Possible Cause | Solution |
|---|---|---|
| No image on monitor | NVR not powered on; monitor cable loose; incorrect input source on monitor. | Check NVR power adapter; ensure HDMI/VGA cable is securely connected; select correct input source on monitor. |
| Camera not displaying video | Network cable loose/damaged; camera not powered (PoE issue); camera fault. | Check network cable connection at both ends; verify PoE port status; try connecting camera to a different PoE port or cable. |
| No remote access via app | NVR not connected to internet; P2P service disabled; incorrect app settings; firewall blocking connection. | Verify NVR network connection; enable P2P in NVR settings; re-add device in app; check router firewall settings. |
| Poor night vision quality | Dirty camera lens; IR/spotlight obstructed; insufficient ambient light. | Clean camera lens; ensure no obstructions near IR LEDs or spotlights; adjust camera position if necessary. |
| Frequent false motion alerts | High motion sensitivity; environmental factors (e.g., moving branches, shadows, insects). | Reduce motion detection sensitivity; adjust detection zones to exclude problematic areas; utilize human/vehicle detection features. |
If the problem persists after attempting these solutions, please contact ANNKE customer support for further assistance.
8. Specifications
Below are the key technical specifications for the ANNKE 32-Channel 12MP NVR PoE Security Camera System:
| Feature | Detail |
|---|---|
| Brand | ANNKE |
| Model Number | AU-N931BB2-V1+JHJ014-K-5KEH |
| Connectivity Technology | Wired (PoE) |
| Number of Channels | 32 |
| Camera Resolution | 12MP (3K, 3072x1728) |
| NVR Storage Capacity | 2 TB HDD (Security-Grade) |
| Camera Special Features | Motion Sensor, Smart Dual-Light, Color Night Vision, IR Night Vision, Human & Vehicle Detection, Built-in Microphone, IP67 Weatherproof |
| Camera Lens | 2.8mm@F1.6 |
| Video Compression | H.265+ |
| Camera On-board Storage | Up to 256 GB (SD card slot) |
| Power Source | Corded Electric (NVR), Power over Ethernet (Cameras) |
| NVR Dimensions (L x W x H) | 18.9 x 18.11 x 11.81 inches |
9. Warranty and Support
ANNKE provides lifetime technical support for this product. For warranty information, technical assistance, or to report any issues, please contact ANNKE customer support through their official website or the contact information provided in your quick instruction guide.
You can visit the official ANNKE store for more information: ANNKE Store on Amazon.


