Introduction
This manual provides detailed instructions for the assembly, operation, and maintenance of your The Bubble Factory Motor Car Engine Workshop toy. Please read this manual thoroughly before use to ensure proper function and safety. This interactive toy allows children aged 3 and up to engage in mechanical play, featuring a take-apart and rebuild engine, lights, and sound effects.
Safety Information
- Adult Supervision: Always ensure adult supervision during play.
- Battery Safety:
- Use only the recommended battery type.
- Do not mix old and new batteries, or different types of batteries.
- Insert batteries with correct polarity (+ and -).
- Remove exhausted batteries promptly.
- Remove batteries if the toy will not be used for an extended period.
- Do not recharge non-rechargeable batteries.
- Keep batteries out of reach of small children.
- Small Parts: This toy contains small parts that could be a choking hazard for children under 3 years.
- Cleaning: Clean the toy with a damp cloth only. Do not immerse in water.
- Disposal: Dispose of batteries and electronic components responsibly according to local regulations.
Package Contents
Verify that all components listed below are present in your package:
- 1x Main Body
- 1x Steering Wheel
- 1x Handlebar
- 1x Engine Part (Top)
- 1x Engine Part (Middle)
- 1x Spark Chamber L
- 1x Spark Chamber R
- 1x Engine Part (Bottom)
- 1x Front Side Part
- 1x Protect Frame
- 1x License Plate
- 1x Drawer
- 2x Poles (Right and Left)
- 2x Wheels
- 2x Wheel Covers
- 2x Suspension Part
- 2x Foot Holder
- 1x Oil Dipstick
- 2x Six Angle of Sleeve (Split in 2 parts)
- 1x Spanner
- 31x Screws
- 1x Sticker Set
- 1x Instructions (this manual)

Image: All components of the Motor Car Engine Workshop toy.
Assembly Instructions
Follow these steps to assemble your Motor Car Engine Workshop toy. A screwdriver (spanner) is included for assembly.
- Install the Engine: Open the hood of the main body. Place the engine parts into the designated area and secure them using the provided screws and spanner.
- Attach Wheels and Rims: Secure the wheels and rims to the side of the main body using the screws. Ensure they are firmly attached but can still rotate.
- Mount Steering Wheel and Handlebar: Attach the steering wheel and handlebar to the front dashboard area.
- Apply Stickers: Use the included sticker set to decorate the dashboard, license plate, and other areas as desired.
- Insert Batteries: Locate the battery compartment, usually on the underside or rear of the toy. Insert the required batteries (not included) ensuring correct polarity. Close the compartment securely.
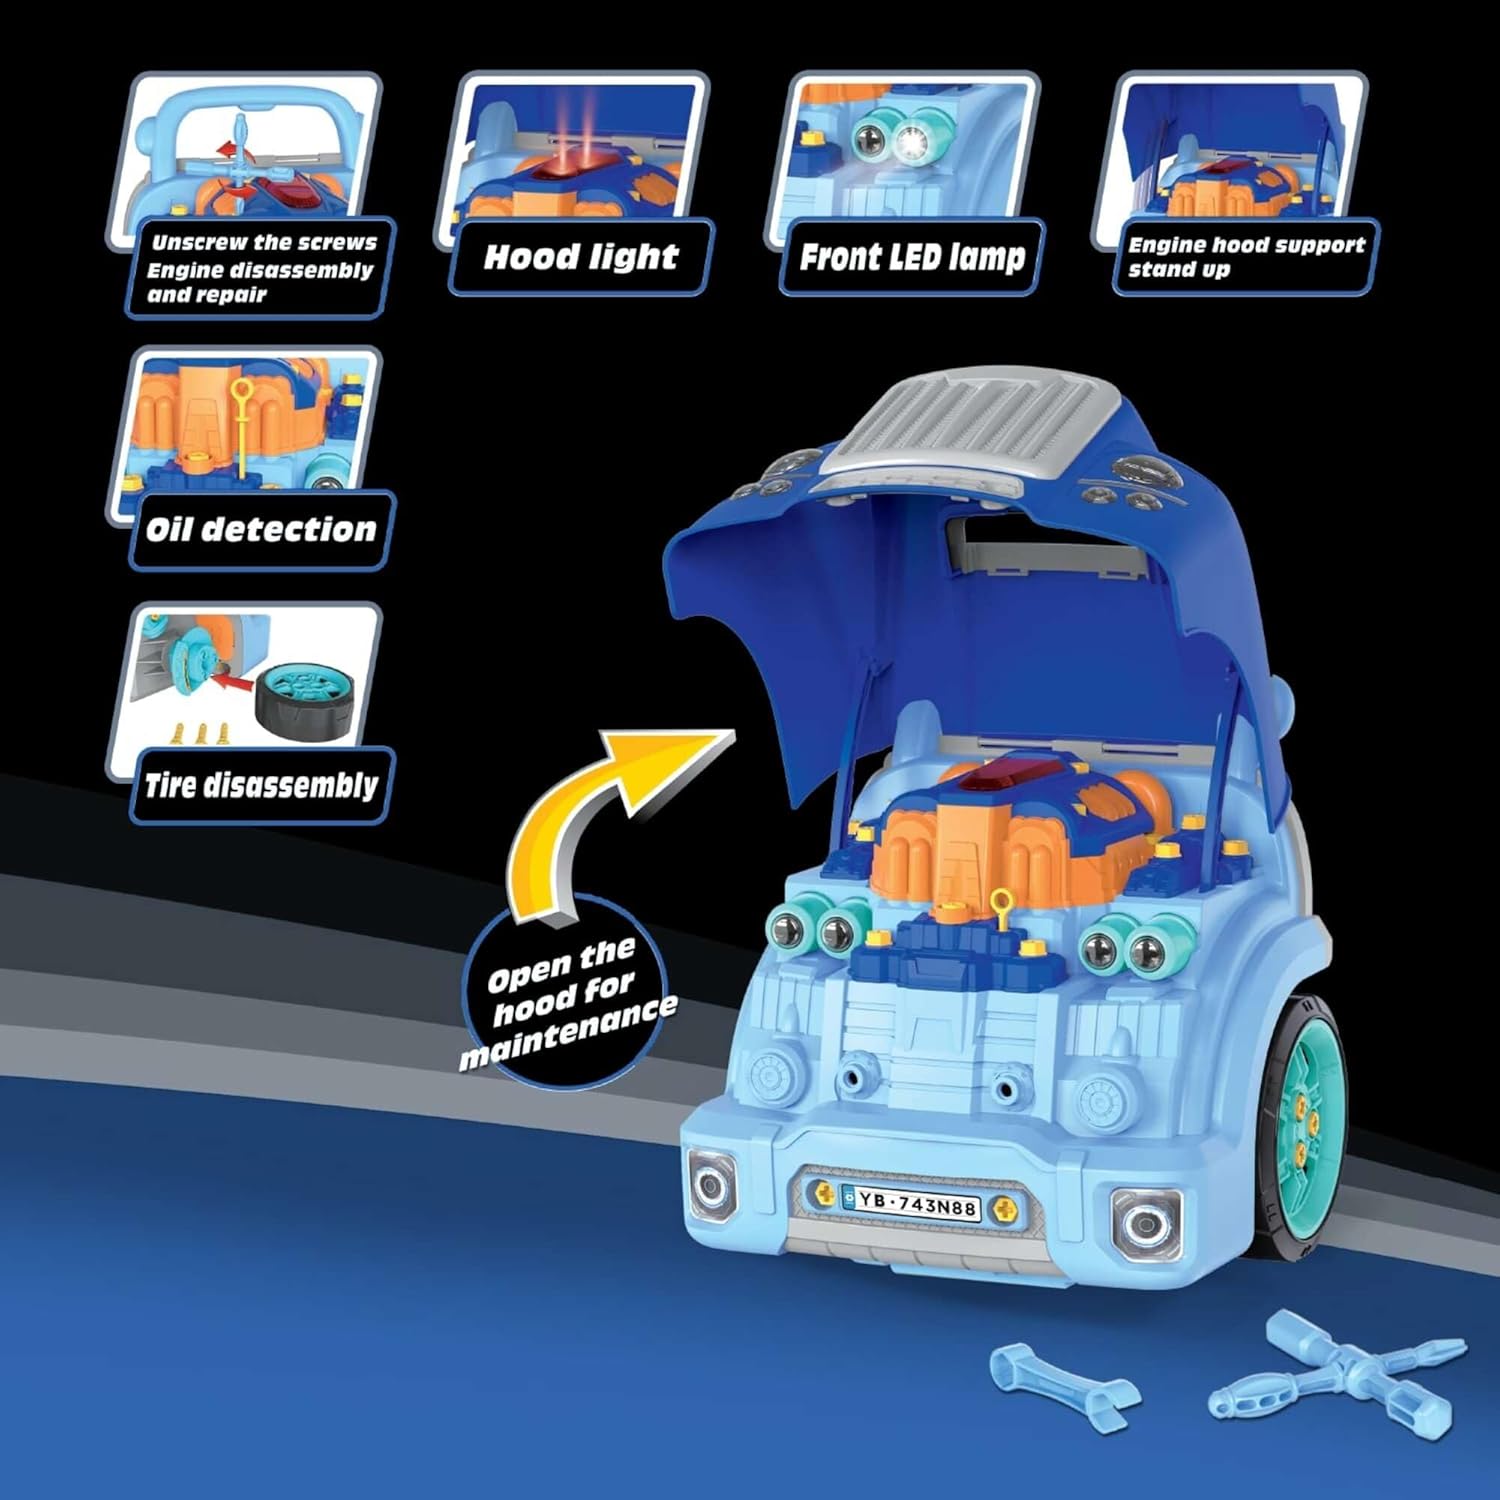
Image: Engine compartment with hood open, ready for assembly.

Image: Front view with hood open, showing engine details.
Video: Official assembly and feature demonstration for the Motor Car Engine Workshop. This video illustrates how to remove grill bolts, open the hood, install mounting screws, install the engine, install license plate screws, and install tires and hubs. It also shows the rotary jack bracket.
Operating Instructions
Your Motor Car Engine Workshop toy offers various interactive features:
- Engine Start: Press the "One Touch Start" button on the dashboard to activate engine sounds and lights.
- Steering Wheel: Rotate the steering wheel for simulated driving. Press the center button on the steering wheel to activate the horn.
- Gear Shifter: Move the gear shifter (P.R.N.D) to simulate changing gears.
- Headlights & Emergency Flashing: The toy features working LED headlights. Press the emergency double flashing light button on the dashboard to activate the hazard lights.
- Engine Maintenance: Open the hood to access the engine. Use the included tools to "check the oil" with the dipstick, "replace the battery," or "remove the engine" for pretend repairs.
- Wheel Removal: The wheels and rims are removable, allowing for simulated tire changes. Use the spanner to loosen and tighten the screws.
- Jack Stands: Utilize the working jack stands to "raise" the car for undercarriage inspection or wheel changes.
- Storage Compartments: The toy includes a built-in tool storage box and a money storage box.

Image: Dashboard view with interactive controls.

Image: Key operational features and their locations.
Maintenance
- Cleaning: Wipe the toy with a soft, damp cloth. Do not use harsh chemicals or abrasive cleaners. Ensure no water enters the electronic components.
- Storage: Store the toy in a cool, dry place away from direct sunlight when not in use.
- Battery Replacement: When sounds or lights become dim or stop working, replace the batteries as described in the "Safety Information" section.
Troubleshooting
| Problem | Possible Cause | Solution |
|---|---|---|
| Toy does not turn on or lights/sounds are weak. | Low or dead batteries; incorrect battery installation. | Replace batteries with new ones, ensuring correct polarity. |
| Sounds are distorted or intermittent. | Low batteries; loose connection. | Replace batteries. Check battery compartment for secure connection. |
| Parts do not fit together during assembly. | Incorrect orientation; wrong part. | Refer to the "Assembly Instructions" and images to ensure correct part identification and orientation. Do not force parts. |
Specifications
- Model Number: FR2021
- Product Dimensions: 12.99 x 12.99 x 14.56 inches
- Item Weight: 6.23 pounds
- Manufacturer Recommended Age: 36 months - 8 years
- Power Source: Battery-powered (batteries not included)
- Material: Durable quality plastic
Warranty and Support
For warranty information or product support, please contact The Bubble Factory customer service. Keep your purchase receipt as proof of purchase.
Note: Specific warranty terms and contact details may vary. Refer to the product packaging or manufacturer's website for the most current information.