
1. Introduction
This manual provides essential instructions for the safe installation, operation, and maintenance of your EAPRO 1450VA Solar Inverter, Model EGPL1P170012SOLAR. This device is a powerful solar inverter with an integrated 50A PWM solar charge controller, designed to convert DC power from a 12V battery and solar panels into stable AC power for various loads. It supports up to 1000W of solar panel input and has a load capacity of 1200W.
2. Safety Instructions
Please read all safety instructions carefully before installation and operation. Failure to follow these instructions may result in electric shock, fire, or serious injury.
- Electrical Safety: Ensure all electrical connections are secure and correctly polarized. Only qualified personnel should perform electrical wiring.
- Battery Safety: Work with batteries in a well-ventilated area. Wear protective eyewear and clothing. Avoid short-circuiting battery terminals.
- Solar Panel Safety: Solar panels generate electricity when exposed to light. Cover panels during installation to prevent electric shock.
- Installation Environment: Install the inverter in a dry, well-ventilated area, away from flammable materials, direct sunlight, and moisture.
- Grounding: The inverter must be properly grounded to prevent electric shock.
- Maintenance: Disconnect all power sources (AC, battery, solar) before performing any maintenance or cleaning.
3. Product Overview
3.1 Key Features
- Integrated 50A Powerful PWM Solar Charge Controller
- Supports up to 1000W Solar Panel Input
- Maximum Solar VOC (Open Circuit Voltage) Range of 25V
- Designed for Single 12V Battery Operation
- 1200W (5 Amps) Load Lifting Capacity
- Multiple operating modes including IPS and Power Saving
3.2 Components and Controls
The EAPRO 1450VA Solar Inverter features a user-friendly front panel for monitoring and control, and a rear panel for all electrical connections.
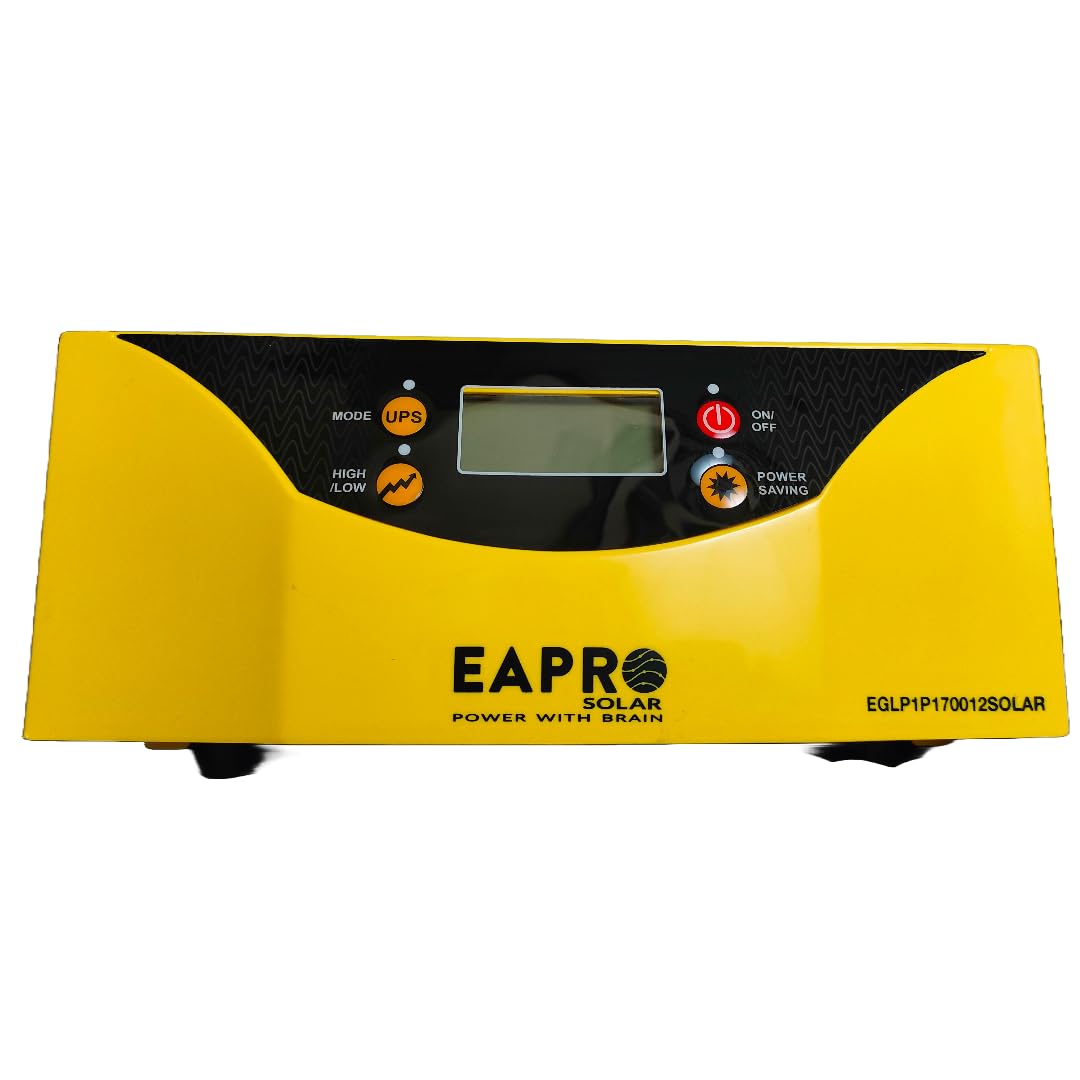
Figure 1: Front view of the EAPRO 1450VA Solar Inverter, showing the LCD display, mode selection buttons (MODE, IPS, HIGH/LOW), and power controls (ON/OFF, POWER SAVING).

Figure 2: Rear panel of the EAPRO 1450VA Solar Inverter, illustrating the AC input, AC output, solar input terminals, battery terminals, and a reset button.

Figure 3: Close-up view of the solar input terminals on the rear panel, clearly marked for Solar -VE and Solar +VE connections. This image also shows the product part code and a QR code for additional information.

Figure 4: Top-down view of the rear panel, highlighting a warning label regarding the maximum voltage of solar power. It states that the maximum VOC (Open Circuit Voltage) should not be more than 25 Volts, with 18 Volts (Vmpp) recommended.
4. Setup and Installation
4.1 Unpacking and Inspection
Carefully unpack the inverter and inspect it for any shipping damage. Report any damage to your supplier immediately.
4.2 Mounting
Mount the inverter vertically on a sturdy, non-flammable surface. Ensure adequate clearance around the unit for proper ventilation (at least 15 cm on all sides). Do not block the ventilation openings.
4.3 Battery Connection
- Ensure the inverter is OFF before connecting the battery.
- Connect the positive (+) terminal of a 12V battery to the red BATT (+) terminal on the inverter.
- Connect the negative (-) terminal of the battery to the black BATT (-) terminal on the inverter.
- Ensure connections are tight and secure.
4.4 Solar Panel Connection
The inverter supports up to 1000W of solar panels with a maximum VOC of 25V. Recommended Vmpp is 18V.
- Ensure solar panels are covered or disconnected to prevent power generation during connection.
- Connect the positive (+) output from your solar panel array to the SOLAR +VE terminal on the inverter.
- Connect the negative (-) output from your solar panel array to the SOLAR -VE terminal on the inverter.
- Verify polarity before making final connections.
4.5 AC Input/Output Connections
- Connect the mains AC power supply to the AC INPUT socket on the rear panel.
- Connect your AC loads (appliances) to the AC OUTPUT socket on the rear panel.
- Ensure that the total load connected does not exceed the inverter's 1200W capacity.
4.6 Grounding
Connect the inverter's grounding terminal to a reliable earth ground using appropriate gauge wire. This is crucial for safety.
5. Operating Instructions
5.1 Powering On/Off
- To Power On: Press the ON/OFF button on the front panel. The LCD display will illuminate, and the inverter will begin operation.
- To Power Off: Press and hold the ON/OFF button until the display turns off.
5.2 Mode Selection
Use the MODE button to cycle through different operating modes. The IPS (Inverter Power Supply) mode is typically for continuous power. The HIGH/LOW button allows adjustment of voltage sensitivity or charging parameters, depending on the specific model configuration.
5.3 Power Saving Function
Activate the POWER SAVING function by pressing the dedicated button. This mode reduces power consumption when no load or a very light load is detected, extending battery backup time.
5.4 LCD Display Indicators
The LCD display provides real-time information on battery status, load level, input voltage, output voltage, and operational mode. Refer to the display for system status and any error codes.
6. Maintenance
Regular maintenance ensures optimal performance and longevity of your inverter.
- Cleaning: Keep the inverter clean and free from dust. Use a dry cloth to wipe the exterior. Do not use liquid cleaners. Ensure ventilation openings are clear.
- Connection Checks: Periodically check all electrical connections (battery, solar, AC input/output) for tightness and corrosion. Tighten any loose connections.
- Battery Health: Monitor battery voltage and electrolyte levels (for flooded batteries) regularly. Ensure the battery terminals are clean.
- Environmental Check: Ensure the installation environment remains dry, cool, and well-ventilated.
7. Troubleshooting
If you encounter issues with your inverter, refer to the table below for common problems and solutions. For persistent issues, contact customer support.
| Problem | Possible Cause | Solution |
|---|---|---|
| Inverter does not turn on | Battery not connected or low voltage; ON/OFF button not pressed. | Check battery connections and voltage. Press ON/OFF button firmly. |
| No AC output | Overload; short circuit; inverter in fault mode. | Reduce load. Check for short circuits. Press the RESET button on the rear panel. |
| Solar charging not active | Solar panels not connected; insufficient sunlight; incorrect solar voltage. | Check solar panel connections and polarity. Ensure adequate sunlight. Verify solar panel VOC is within 25V. |
| Overload warning | Connected load exceeds inverter capacity. | Disconnect some loads to reduce total power consumption below 1200W. |
Note: A reset button is located on the rear panel (refer to Figure 2). Pressing this button can resolve certain operational issues by restarting the inverter's internal system.
8. Specifications
Technical specifications for the EAPRO 1450VA Solar Inverter, Model EGPL1P170012SOLAR.
| Parameter | Value |
|---|---|
| Brand | EAPRO |
| Model | EGPL1P170012SOLAR |
| Wattage | 1.5 KW (1500VA) |
| Load Capacity | 1200W / 5 Amps |
| Power Source | Solar and Battery Powered |
| Battery Voltage | 12V (Single Battery Operated) |
| Battery Capacity (Recommended) | 200 Amp Hours |
| Solar Charge Controller | 50A PWM |
| Max Solar Panel Support | 1000W |
| Max Solar VOC Range | 25V |
| Material | Polycarbonate |
| Product Dimensions (LxWxH) | 33 x 32.5 x 18.5 cm |
| Item Weight | 11.5 kg |
| Manufacturer | EAPRO GLOBAL PVT LTD |
9. Warranty and Support
For warranty information, technical support, or service inquiries, please contact EAPRO Global PVT LTD or your authorized dealer. You may also reach customer support at the number provided on the product label:
Customer Support: +91-9850115
For additional resources, you may refer to the following link: Product Support Information


