1. Introduction
Thank you for choosing the Deepwave 3L Cool Mist Humidifier. This manual provides essential information for the safe operation, setup, maintenance, and troubleshooting of your new humidifier. Please read these instructions carefully before use and retain them for future reference.
This humidifier is designed to add moisture to the air, helping to alleviate dry skin, congestion, and other discomforts caused by dry environments. It features a 3-liter capacity, cool mist output, and an integrated essential oil diffuser.
2. Product Overview
The Deepwave 3L Cool Mist Humidifier is equipped with advanced features for efficient and convenient humidification.
Key Features:
- 3-Liter Water Tank: Provides extended operation without frequent refills.
- Top-Fill Design: Easy and mess-free water refilling directly from the top.
- Cool Mist Technology: Safely humidifies the air without heat.
- 360° Dual Nozzles: Allows for adjustable mist direction and improved coverage.
- Adjustable Mist Levels: Three distinct mist output settings to suit your preference.
- Integrated Essential Oil Diffuser: A separate tray for adding essential oils to disperse fragrance.
- Sleep Mode: Operates quietly with the display dimmed for undisturbed rest.
- Automatic Shut-off: The unit powers off automatically when water levels are low for safety.
- Timer Function: Set the humidifier to operate for a specific duration.
Components:
Familiarize yourself with the main parts of your humidifier:
- Water Tank (transparent blue)
- Base Unit with Control Panel
- Mist Outlet Nozzles
- Essential Oil Tray (located at the back/side of the base)
- Water Purification Device (small white component inside the tank)
- Sponge Foam Filter (inside the base)

Image 2.1: The Deepwave 3L Humidifier, illustrating its top-fill design with water being poured into the reservoir. The control panel is visible at the front.
3. Setup
Follow these steps for initial setup:
- Unpack: Carefully remove all components from the packaging.
- Placement: Place the humidifier on a firm, flat, waterproof surface at least 6 inches (15 cm) away from walls and furniture. Ensure the mist outlet is not directed at walls or electronics.
- Water Purification Device: Locate the small white water purification device. Place it directly into the water tank. This device helps inhibit bacterial growth.
- Fill Water Tank: Open the top cover. Pour clean, cool tap water directly into the water tank. Do not exceed the maximum fill line. Distilled or demineralized water is recommended to prevent mineral buildup and white dust.
- Close Cover: Securely place the top cover back onto the unit.
- Connect Power: Plug the power cord into a suitable electrical outlet.

Image 3.1: A visual guide to the internal components, including the filters and the water purification device. It also shows how to remove the sponge foam filter and clean the nebulizer tablets.
4. Operation
Your Deepwave humidifier is now ready for use. Use the control panel to adjust settings.

Image 4.1: An annotated image of the intelligent screen display, highlighting the functions of each button and indicator, such as Power On/Off, Mist Level, Humidity Setting, Timer, and Sleep Mode.
Control Panel Functions:
- ON/OFF Button (⏻): Press to turn the humidifier on or off.
- Mist Level Adjustment (MIST+ / MIST-): Use the '+' and '-' buttons to cycle through three mist output levels (1, 2, 3). Level 1 is the lowest, Level 3 is the highest. The display will show the current mist level.
- Humidity Button (⤳): Press this button to view or set a desired humidity percentage. While the display shows a humidity value, it primarily serves as an indicator. The humidifier will continue to operate at the selected mist level until manually turned off or the water runs out.
- Timer Button (◷): Press to set an operating timer. Each press cycles through preset hours (e.g., 1H, 2H, up to 12H). The humidifier will automatically turn off once the set time expires.
- Sleep Mode Button (☾): Press to activate Sleep Mode. The display lights will dim, and the humidifier will operate at a low noise level. Press any button to exit Sleep Mode.
Using the Essential Oil Diffuser:
- Locate the essential oil tray, usually a small drawer or compartment on the side or back of the base unit.
- Pull out the tray.
- Add a few drops of your preferred essential oil onto the aroma pad inside the tray. Do not add essential oils directly into the water tank.
- Push the tray back into place. The humidifier will now diffuse the aroma along with the mist.
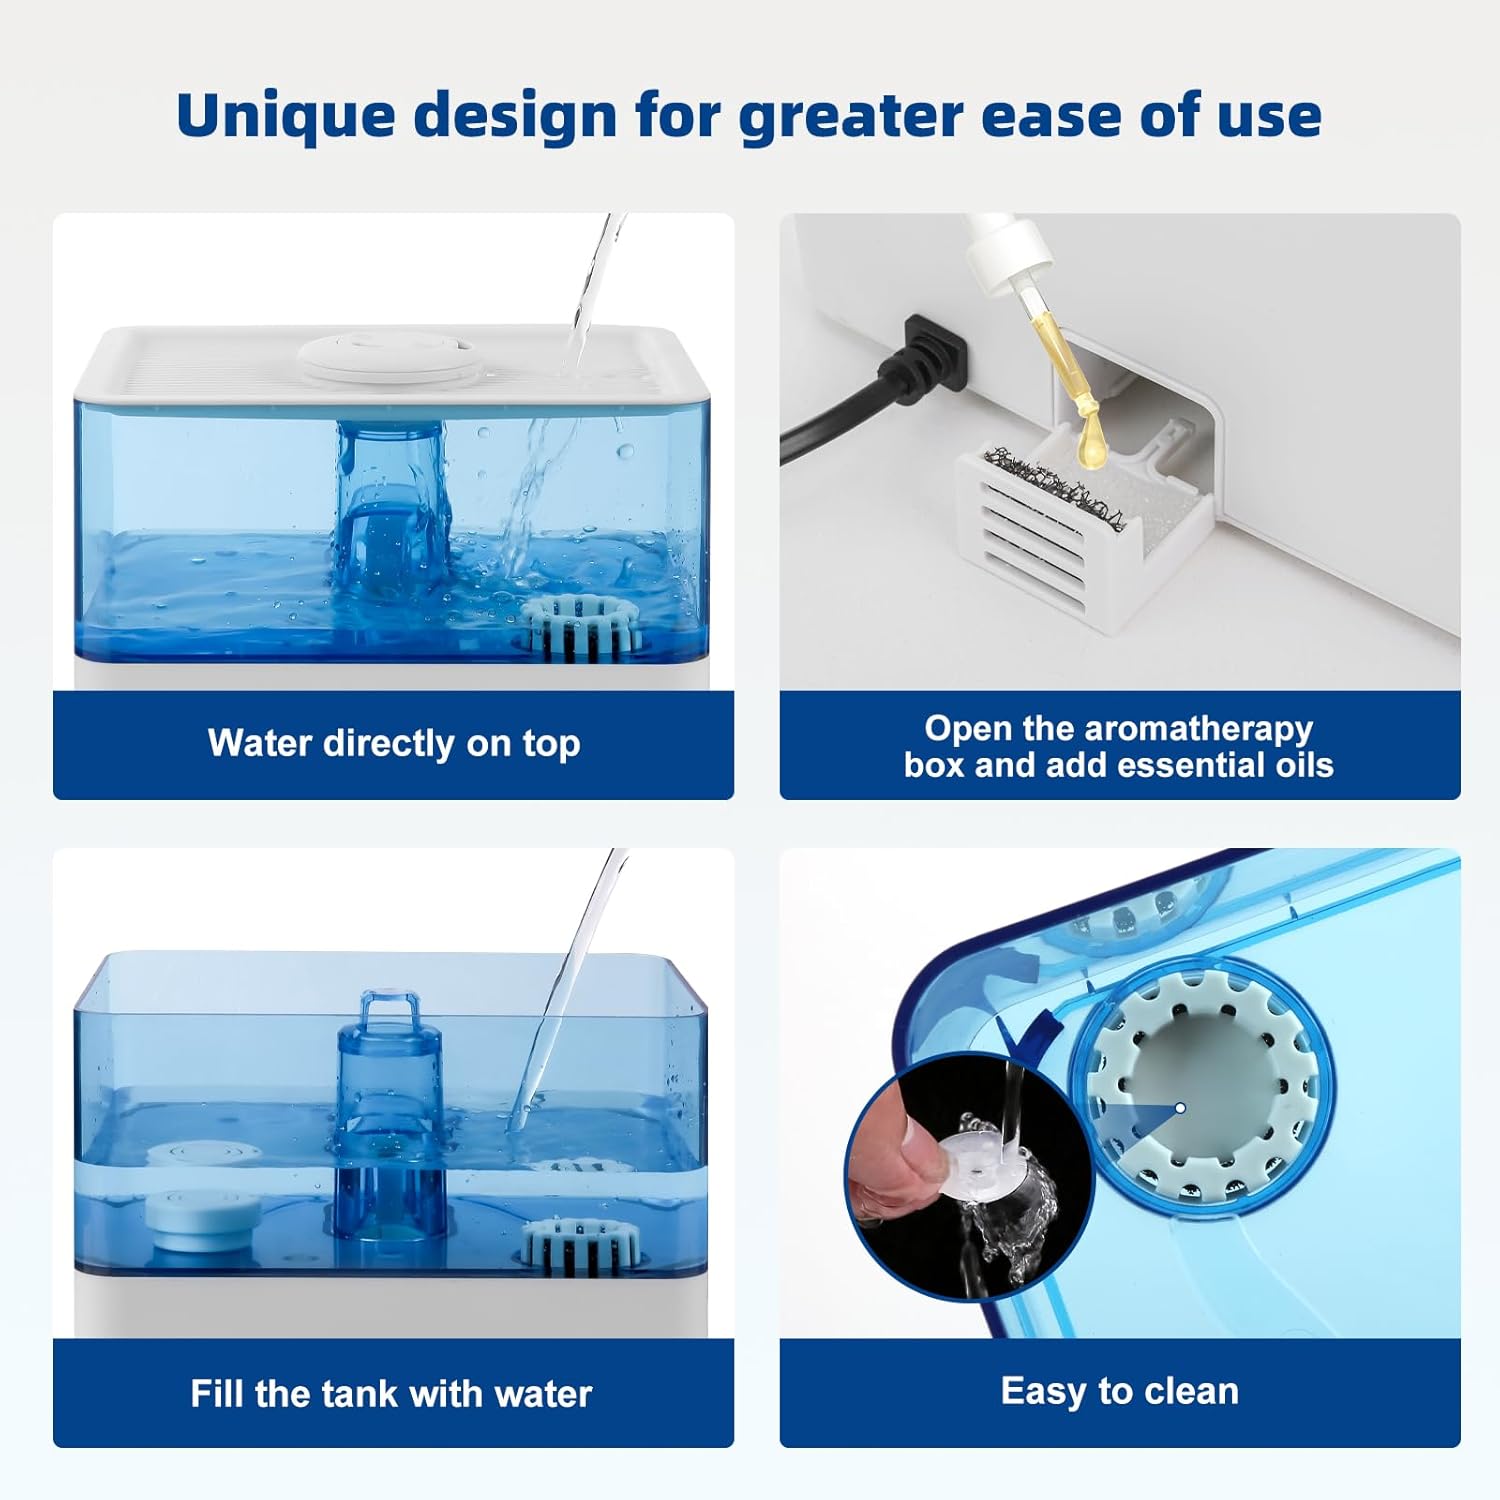
Image 4.2: This image demonstrates the user-friendly design, including direct top-fill, adding essential oils to the dedicated tray, and the ease of cleaning the tank.
5. Maintenance
Regular cleaning is crucial for maintaining the efficiency and hygiene of your humidifier. Neglecting cleaning can lead to mineral buildup and bacterial growth.
Daily Maintenance:
- Empty and rinse the water tank daily.
- Wipe the inside of the tank with a clean cloth.
- Refill with fresh, cool water.
Weekly Cleaning:
- Unplug: Always unplug the humidifier before cleaning.
- Empty Water: Remove the top cover and empty any remaining water from the tank and base.
- Descaling the Tank: Fill the water tank halfway with a mixture of equal parts white vinegar and water. Let it sit for 30 minutes.
- Clean Nebulizer/Atomizer: Use a soft brush or cotton swab to gently clean the nebulizer (the small disc that produces mist) in the base unit. Do not use abrasive materials.
- Clean Water Purification Device: Rinse the water purification device under running water.
- Rinse: Thoroughly rinse the tank and base with clean water until the vinegar smell is gone.
- Dry: Wipe all surfaces dry with a clean cloth before reassembling.
Sponge Foam Filter:
The humidifier contains a sponge foam filter in the base. This should be checked periodically and rinsed under running water if dirty. Replace if it shows signs of wear or damage.
6. Troubleshooting
If you encounter issues with your Deepwave humidifier, refer to the following common problems and solutions:
| Problem | Possible Cause | Solution |
|---|---|---|
| No mist is being produced. | No water in the tank. Power cord not connected. Nebulizer is dirty or scaled. | Refill the water tank. Ensure the power cord is securely plugged in. Clean the nebulizer as per maintenance instructions. |
| Unusual odor from mist. | Stagnant water or dirty tank. New unit odor. | Clean the water tank and replace water daily. The odor should dissipate after a few uses. |
| White dust around the humidifier. | Hard water used. | Use distilled or demineralized water to reduce mineral content. Clean the unit regularly. |
| Humidifier display shows humidity, but it doesn't seem accurate or control the output. | The built-in humidity sensor provides a local reading, which may be influenced by the mist itself. The 'Humidity' button primarily displays a target rather than actively regulating output. | Adjust mist levels manually based on your comfort. Consider using an external hygrometer for precise room humidity monitoring. |
| Unit automatically shuts off. | Water tank is empty. Timer function activated. | Refill the water tank. Check if the timer was set. |
7. Specifications
- Brand: Deepwave
- Model: B0CHW7F5LD
- Capacity: 3 Liters
- Product Dimensions: 22.99 x 19 x 20.98 cm
- Mist Output: Up to 360 ml/h
- Features: Top-fill, Cool Mist, Essential Oil Diffuser, Sleep Mode, Auto Shut-off, Timer, 3 Mist Levels, 360° Nozzle
8. Warranty and Support
Specific warranty details are not provided in the product information. For warranty claims, technical support, or any questions regarding your Deepwave 3L Cool Mist Humidifier, please contact Deepwave customer service directly through your purchase platform or the contact information provided with your product packaging.