SXBCyan A9
SXBCyan A9 WiFi Mini Camera User Manual
Model: A9 | Brand: SXBCyan
Introduction
This manual provides comprehensive instructions for the setup, operation, and maintenance of your SXBCyan A9 WiFi Mini Camera. This compact device is designed for security monitoring, offering HD 1080p video recording and wireless connectivity for remote viewing.
Package Contents
- 1 x SXBCyan A9 Mini Camera
- 1 x Charging Cable
- 1 x Adjustable Support
- 1 x English Manual (this document)
- (Note: Micro SD Card not included)
Product Overview

Front view of the SXBCyan A9 Mini Camera mounted on its adjustable stand.

Diagram showing the camera's dimensions (25mm height, 35mm width) and key components: Lens, ON/OFF button, Mode/Reset button, and Micro USB charging port.

Side view of the SXBCyan A9 Mini Camera, highlighting the Micro SD card slot.

Image illustrating the magnetic mounting capability of the SXBCyan A9 Mini Camera, showing it attached to a metal surface.
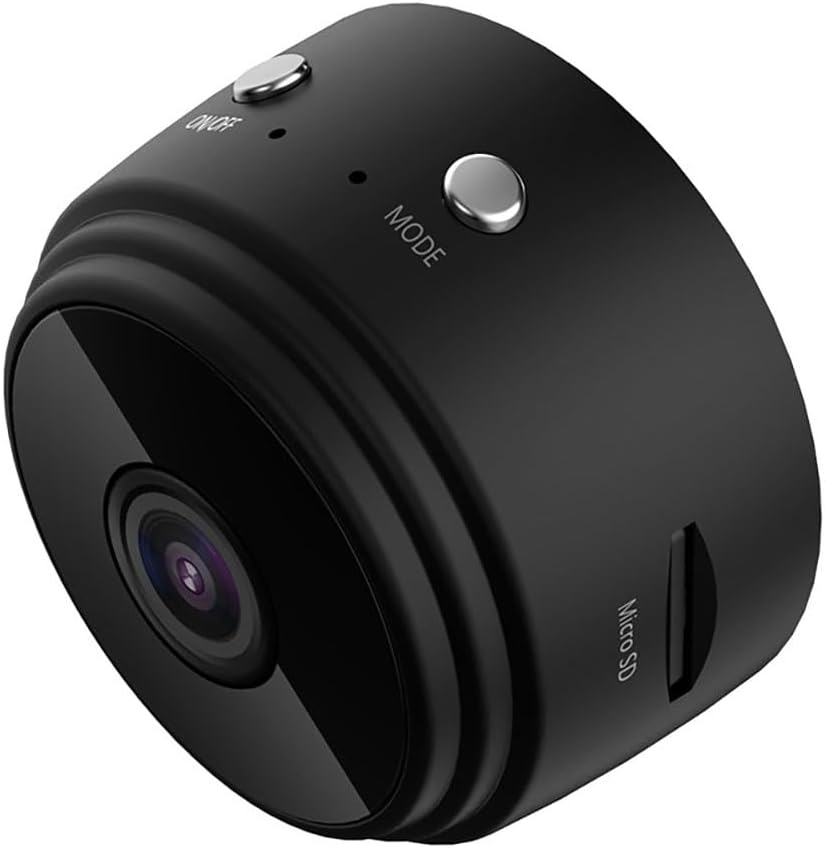
Image demonstrating the camera's built-in WiFi hotspot, allowing direct connection to a mobile phone for real-time video viewing.

Collage showing the SXBCyan A9 Mini Camera used for monitoring infants, in an office setting, and for general home security.

Visual summary of camera features including TF card support, long standby time, wide angle, motion detection, easy installation, stable performance, HD 1080p, and IR night vision.

Examples of multiple ways to use the camera: wire-free with magnet and bracket, recording while charging, and its magnetic body.

Image showing the SXBCyan A9 Mini Camera alongside its charging cable and adjustable stand.
Specifications
| Feature | Detail |
|---|---|
| Resolution | HD 1080p |
| Frames Per Second | 30 FPS |
| Video Format | ASF, MP4 |
| Angle of View | 150 degrees |
| Continuous Recording Time | More than 1 hour |
| Dimensions | 4.3 x 4.3 x 2.5 cm (approx. 35mm x 25mm) |
| Compression Format | H.264 |
| Recording Range | 5m² |
| Power Consumption | 240MA | 3.7V |
| Memory Support | Micro SD Card (TF Card) up to 64GB |
| Battery Type | High capacity polymer lithium battery |
| Wireless Technology | Wi-Fi |
| IP Rating | IP65 |
Setup
1. Charging the Camera
Before first use, fully charge the camera. Connect the provided charging cable to the Micro USB port on the camera and plug the other end into a USB power adapter (not included) or a computer's USB port. The charging indicator light will show the charging status.
2. Inserting a Micro SD Card
The camera supports Micro SD cards (TF cards) up to 64GB for video storage. Locate the Micro SD card slot on the side of the camera. Gently insert the card with the gold contacts facing down until it clicks into place.
Important: If you intend to save video recordings, please format the Micro SD card before using it with the camera. Refer to the "Operating Instructions" section for formatting steps via the app.
3. Mounting the Camera
The camera comes with an adjustable support and features a magnetic body for flexible placement.
- Use the adjustable support to position the camera on a flat surface or attach it to a wall.
- The magnetic base allows direct attachment to metal surfaces like refrigerators or metal shelves.
Operating Instructions
1. Powering On/Off
To turn on the camera, press and hold the ON/OFF button for approximately 3 seconds. To turn off, press and hold the ON/OFF button again until the indicator light turns off.
2. Connecting to Wi-Fi
The camera offers two methods for Wi-Fi connection:
- Direct Wi-Fi Hotspot Connection:
- Turn on the camera.
- On your mobile phone or tablet, go to the WLAN (Wi-Fi) settings.
- Find and connect to the camera's Wi-Fi hotspot (usually named something like "A9-XXXXXX" or similar).
- Once connected, open the dedicated camera application (refer to the packaging or included quick start guide for app name/QR code) to view the live video feed.
- Home Wi-Fi Network Connection (for remote monitoring):
- Ensure the camera is powered on.
- Scan the QR code provided with the camera (usually on the packaging or a small card) to download and install the official camera application on your smartphone.
- Open the app and follow the in-app instructions to add a new device.
- In the app's Wi-Fi configuration settings, select your home's 2.4GHz Wi-Fi network and enter the password. The camera will then connect to your home network, allowing remote access.
3. Video Recording
Once connected and a formatted Micro SD card is inserted, the camera can begin recording. Specific recording modes (e.g., continuous, motion-activated) are typically configured within the mobile application.
The camera supports both video and voice recording.
4. Viewing Recordings
Recorded video files are saved to the Micro SD card. You can view these recordings directly through the mobile application or by removing the Micro SD card and inserting it into a computer with a card reader.
Maintenance
- Keep the camera clean by wiping it with a soft, dry cloth. Avoid using liquid cleaners or solvents.
- Ensure the lens is free of dust and smudges for clear video quality.
- Store the camera in a cool, dry place when not in use.
- Avoid exposing the camera to extreme temperatures, direct sunlight, or high humidity.
- Regularly back up important recordings from the Micro SD card to prevent data loss.
Troubleshooting
- Camera does not turn on:
- Ensure the camera is fully charged. Connect it to a power source and wait a few minutes before attempting to turn it on again.
- Cannot connect to Wi-Fi:
- 1. Ensure the camera is within range of the Wi-Fi router.
- 2. Verify that you are connecting to a 2.4GHz Wi-Fi network, as the camera may not support 5GHz networks.
- 3. Double-check the Wi-Fi password.
- 4. Try resetting the camera by pressing the Mode/Reset button (refer to product overview image for location) for a few seconds with a pin.
- No video recording:
- 1. Ensure a Micro SD card is inserted correctly.
- 2. Format the Micro SD card using the camera app.
- 3. Check if the Micro SD card is full. Delete old recordings or replace the card.
- Poor video quality:
- 1. Clean the camera lens.
- 2. Ensure adequate lighting in the monitoring area.
- 3. Check your Wi-Fi signal strength if streaming live video.
Warranty and Support
For warranty information and technical support, please refer to the contact details provided on the product packaging or the official SXBCyan website. Keep your purchase receipt as proof of purchase.
Ask a question about this manual
Ask about setup, troubleshooting, compatibility, parts, safety, or missing instructions. Manuals+ will review the question and use this page’s manual context to help answer it.