Raysfung 20' x 20'
Raysfung 20 x 20Ft Party Tent Instruction Manual
Comprehensive guide for assembly, operation, and maintenance of your Raysfung Party Tent.
1. Introduction
Thank you for choosing the Raysfung 20 x 20Ft Party Tent. This heavy-duty outdoor tent is designed to provide a spacious and reliable shelter for various events, including weddings, parties, and corporate gatherings. Constructed with an upgraded galvanized frame and durable materials, it offers stability and protection for your outdoor activities. This manual provides detailed instructions to ensure proper assembly, safe operation, and effective maintenance of your tent.

Figure 1: Fully assembled Raysfung 20 x 20Ft Party Tent.
2. Safety Information
Please read and understand all safety warnings and instructions before assembling or using the tent. Failure to follow these guidelines may result in injury or damage to the product.
- Weather Conditions: Do not leave this item up for extended periods of time in extreme weather conditions, including strong winds, blizzards, or storms.
- Snow Accumulation: In winter, promptly clear any accumulated snow from the tent canopy to prevent structural damage.
- Stability: For long-term use and safety, ensure the tent is properly secured using ropes, ground anchors, and sandbags for enhanced stability.
- Permanent Installation: If you intend to place the tent on grass for an extended period, it is recommended to pour cement around the legs and fix them with expansion screws for maximum stability. (Note: Expansion screws are not included and must be purchased separately.)
- Fire Safety: Keep all flame and heat sources away from the tent fabric. The fabric is not fireproof.
- Assembly Personnel: Assembly should be performed by at least two adults to ensure safety and ease of installation.
3. Package Contents
Your Raysfung Party Tent is shipped in multiple boxes (typically 3). Please verify that all components listed below are present before beginning assembly. If any parts are missing or damaged, please contact customer support.
- Galvanized Steel Frame Pipes (various lengths and types for roof, legs, and ground bars)
- Connectors (joints for frame assembly)
- Heavy Duty Feet Pads
- Main Canopy Cover (Waterproof and UV-resistant)
- Removable Sidewalls (with transparent PVC windows)
- Zippered Doors (typically 2, roll-up design)
- Ground Stakes
- Ropes
- Elastic Ball Straps
- Assembly Instructions Manual

Figure 2: Illustration of the heavy-duty galvanized steel frame components.
4. Setup Instructions
Assembly of the Raysfung Party Tent requires careful attention to detail and is best performed with at least two people. Follow these steps for a secure and stable setup.
4.1 Assembly Video Guide
For a visual guide to the assembly process, please watch the official product video below. This video demonstrates the step-by-step construction of the tent frame and canopy installation.
Video 1: Raysfung Party Tent Assembly Guide. This video demonstrates the complete setup process, from frame construction to canopy and sidewall attachment.
4.2 Step-by-Step Assembly
- Prepare the Area: Choose a flat, level surface for assembly. Ensure the area is clear of debris and sharp objects. Lay out all components and organize them by type and size.
- Assemble the Base Frame: Connect the horizontal and vertical pipes to form the rectangular base of the tent. Ensure all connections are secure and the frame is square.
- Install Roof Supports: Attach the roof support pipes and connectors to create the triangular roof structure. The triangular frame structure at the top reinforces stability.
- Attach Feet Pads: Securely attach the heavy-duty feet pads to the bottom of each leg pipe.
- Drape the Canopy: Carefully unfold the main canopy cover and drape it over the assembled frame. Ensure the canopy is centered and evenly distributed.
- Secure the Canopy: Use the elastic ball straps to secure the canopy to the frame at all designated attachment points. Ensure it is taut to prevent water pooling.
- Install Sidewalls and Doors: Attach the removable sidewalls and zippered doors using the provided fasteners. The sidewalls feature transparent PVC windows.
- Anchor the Tent: Use the provided ground stakes and ropes to anchor the tent securely to the ground. For additional stability, especially in windy conditions, consider using sandbags or permanent ground anchors as described in the Safety Information section.

Figure 3: Upgraded Galvanized Frame structure.

Figure 4: Removable Sidewalls and Zippered Doors.
5. Operating Instructions
The Raysfung Party Tent offers versatile configurations to suit your event needs and weather conditions.
- Ventilation and Airflow: The tent features 2 zipper doors that can be rolled up or completely removed to provide excellent ventilation and airflow, especially on hot days.
- Removable Sidewalls: All sidewalls are removable, allowing you to customize the tent's openness. You can choose to have no sidewalls, some panels removed, or all sidewalls installed for full enclosure.
- Access: The dual smooth zippers on the doors ensure easy entry and exit.

Figure 5: Multiple usage configurations of the tent, including options for sidewalls and doors.
6. Maintenance
Proper maintenance will extend the lifespan of your Raysfung Party Tent.
- Cleaning: Clean the canopy and sidewalls with mild soap and water. Do not use harsh chemicals or abrasive cleaners, as they may damage the fabric. Rinse thoroughly and allow to air dry completely before storage.
- Frame Inspection: Periodically inspect the galvanized steel frame for any signs of rust or damage. Clean and treat any rust spots promptly.
- Storage: When not in use, disassemble the tent and store all components in a dry, cool place, away from direct sunlight and extreme temperatures. Ensure the fabric is completely dry to prevent mold and mildew.
- Snow Removal: During winter, if the tent is erected, ensure snow is cleared promptly from the roof to prevent excessive weight and potential collapse.

Figure 6: The tent's waterproof and sun-resistant properties.
7. Troubleshooting
Here are solutions to common issues you might encounter:
- Tent Instability: If the tent feels unstable, ensure all frame connections are fully engaged and tightened. Verify that ground stakes are driven deep into the ground and ropes are taut. Consider adding sandbags to the legs for extra weight, especially in moderate wind conditions. For long-term placement, permanent anchoring with cement and expansion screws is highly recommended.
- Water Pooling on Roof: Ensure the canopy is stretched tightly and evenly over the frame. Adjust the elastic ball straps if necessary to remove any slack that could cause water to collect.
- Difficulty with Assembly: Refer to the step-by-step instructions and the assembly video. Ensure you have all parts laid out and identified correctly. Having at least two people for assembly is crucial.
- Missing or Damaged Parts: If you find any parts missing or damaged upon delivery, please contact Raysfung customer service immediately for assistance.
8. Specifications
Key specifications for the Raysfung 20 x 20Ft Party Tent:
| Feature | Detail |
|---|---|
| Brand | Raysfung |
| Model | 20' x 20' Party Tent |
| Material | Alloy Steel (Frame), PE Cloth (Canopy) |
| Frame Material | Alloy Steel (Upgraded Galvanized) |
| Product Dimensions (L x W x H) | 240"L x 240"W x 121.2"H (20'L x 20'W x 10.1'H) |
| Item Weight | 218.3 Pounds |
| Water Resistance Level | Waterproof |
| Ultraviolet Light Protection | Yes |
| Assembly Required | Yes |
| Style | Garden / Event Gazebo |
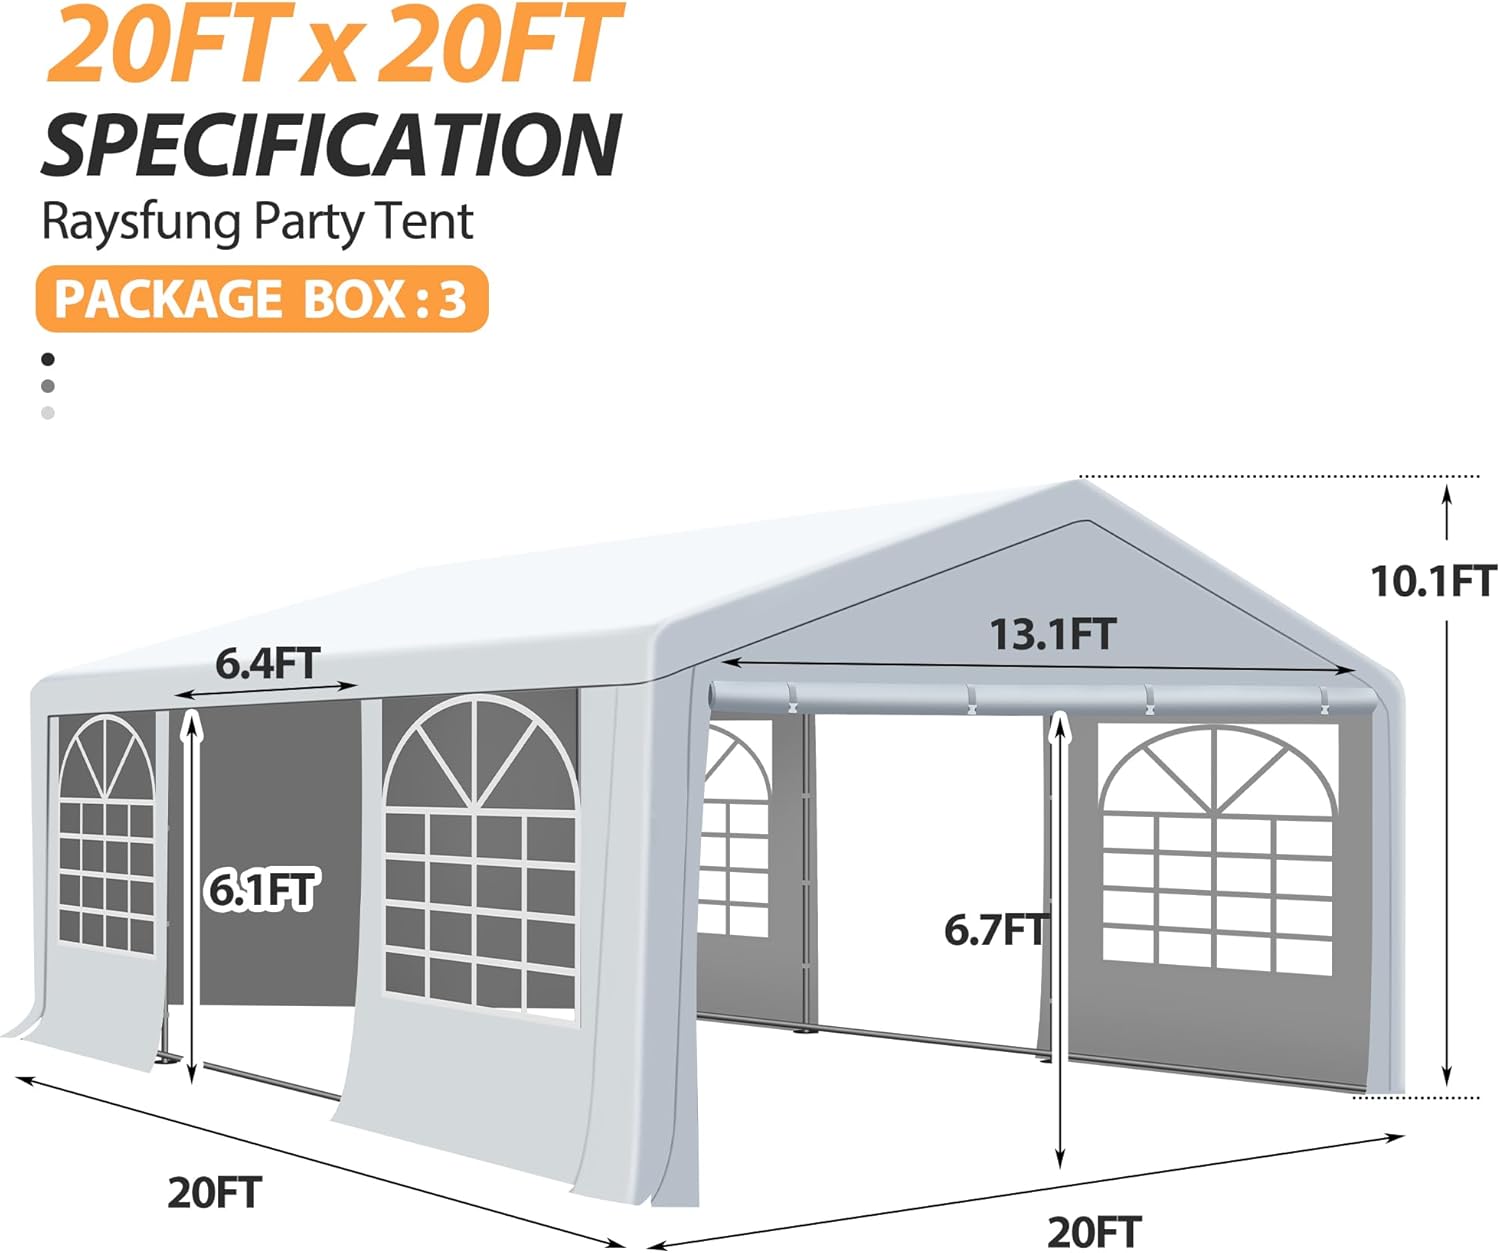
Figure 7: Detailed dimensions of the 20 x 20Ft Party Tent.
9. Warranty and Support
Raysfung is committed to providing quality products and customer satisfaction. While specific warranty details are not provided in this manual, if you have any questions, concerns, or require assistance with your 20 x 20Ft Party Tent, please do not hesitate to contact Raysfung customer service. They are available to provide support and answers to your inquiries.
For the most up-to-date support information, please refer to the seller's contact details on the platform where you purchased the product.
Ask a question about this manual
Ask about setup, troubleshooting, compatibility, parts, safety, or missing instructions. Manuals+ will review the question and use this page’s manual context to help answer it.