1. Introduction
Thank you for choosing the UOKRR Table Saw Miter Gauge Fence. This precision tool is designed to enhance the accuracy and safety of your table saw operations, enabling precise angled cuts. Please read this manual thoroughly before assembly and operation to ensure proper use and to maximize the performance and longevity of your miter gauge.
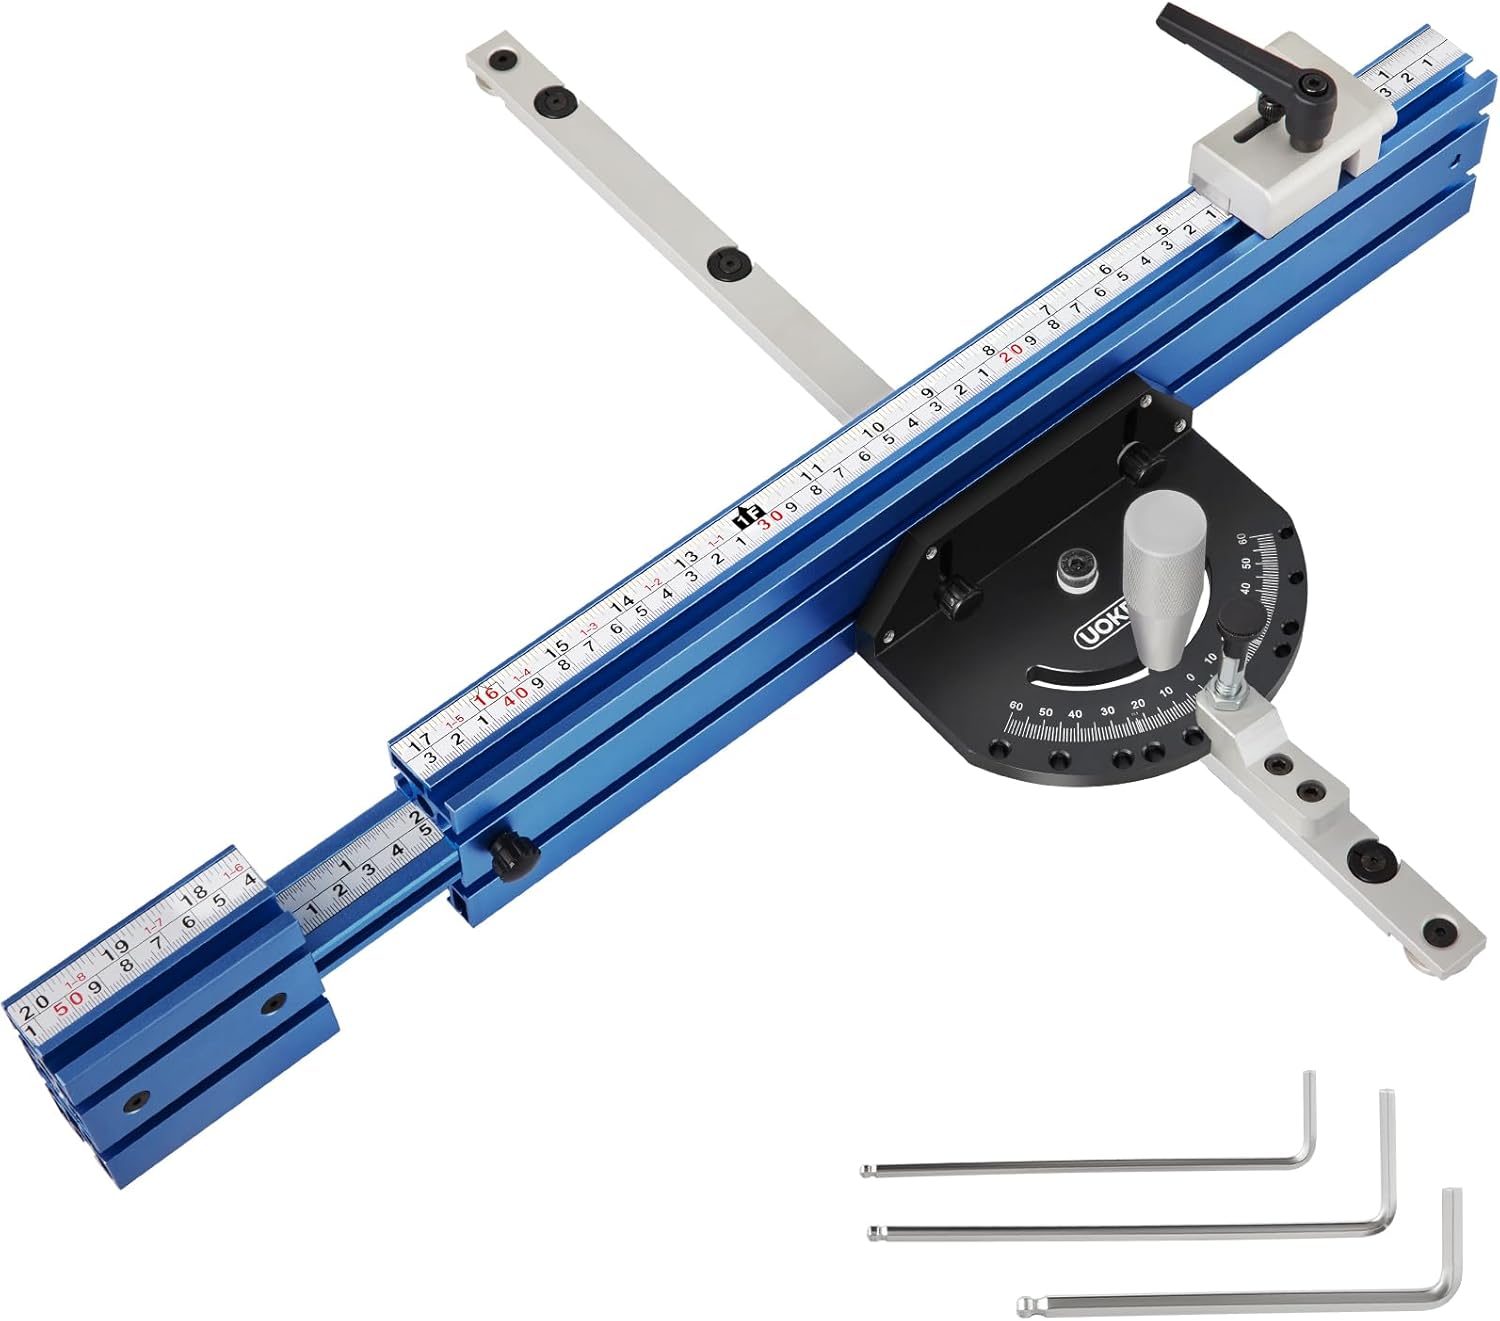
Figure 1: UOKRR Table Saw Miter Gauge Fence, showing the main components including the protractor, telescoping fence, and miter bar.
2. Safety Information
Always prioritize safety when working with power tools. Failure to follow safety instructions can result in serious injury or damage to the equipment.
- Read all instructions: Familiarize yourself with your table saw's manual and this miter gauge manual before use.
- Wear appropriate safety gear: Always wear safety glasses, hearing protection, and a dust mask.
- Ensure a stable work environment: Work on a clean, well-lit, and stable surface.
- Disconnect power: Always disconnect the table saw from the power source before making any adjustments, changing blades, or performing maintenance.
- Secure workpiece: Ensure the workpiece is firmly held against the fence and table before making a cut.
- Keep hands clear: Never place hands in the path of the saw blade. Use push sticks or push blocks when necessary.
- Check for compatibility: Ensure the miter gauge is compatible with your table saw's miter slot (standard 3/4" x 3/8").
3. Package Contents
Verify that all components are present and undamaged upon unpacking.
- 1 x Precision Miter Gauge (Aluminum alloy protractor)
- 1 x Aluminum Fence with 60° Angled Ends
- 1 x Aluminum Flip Stop
- 1 x Aluminum Miter Bar
- 3 x Allen Wrenches (2mm, 4mm, 6mm)
- 1 x Instruction Manual
- 1 x Clamp Handle
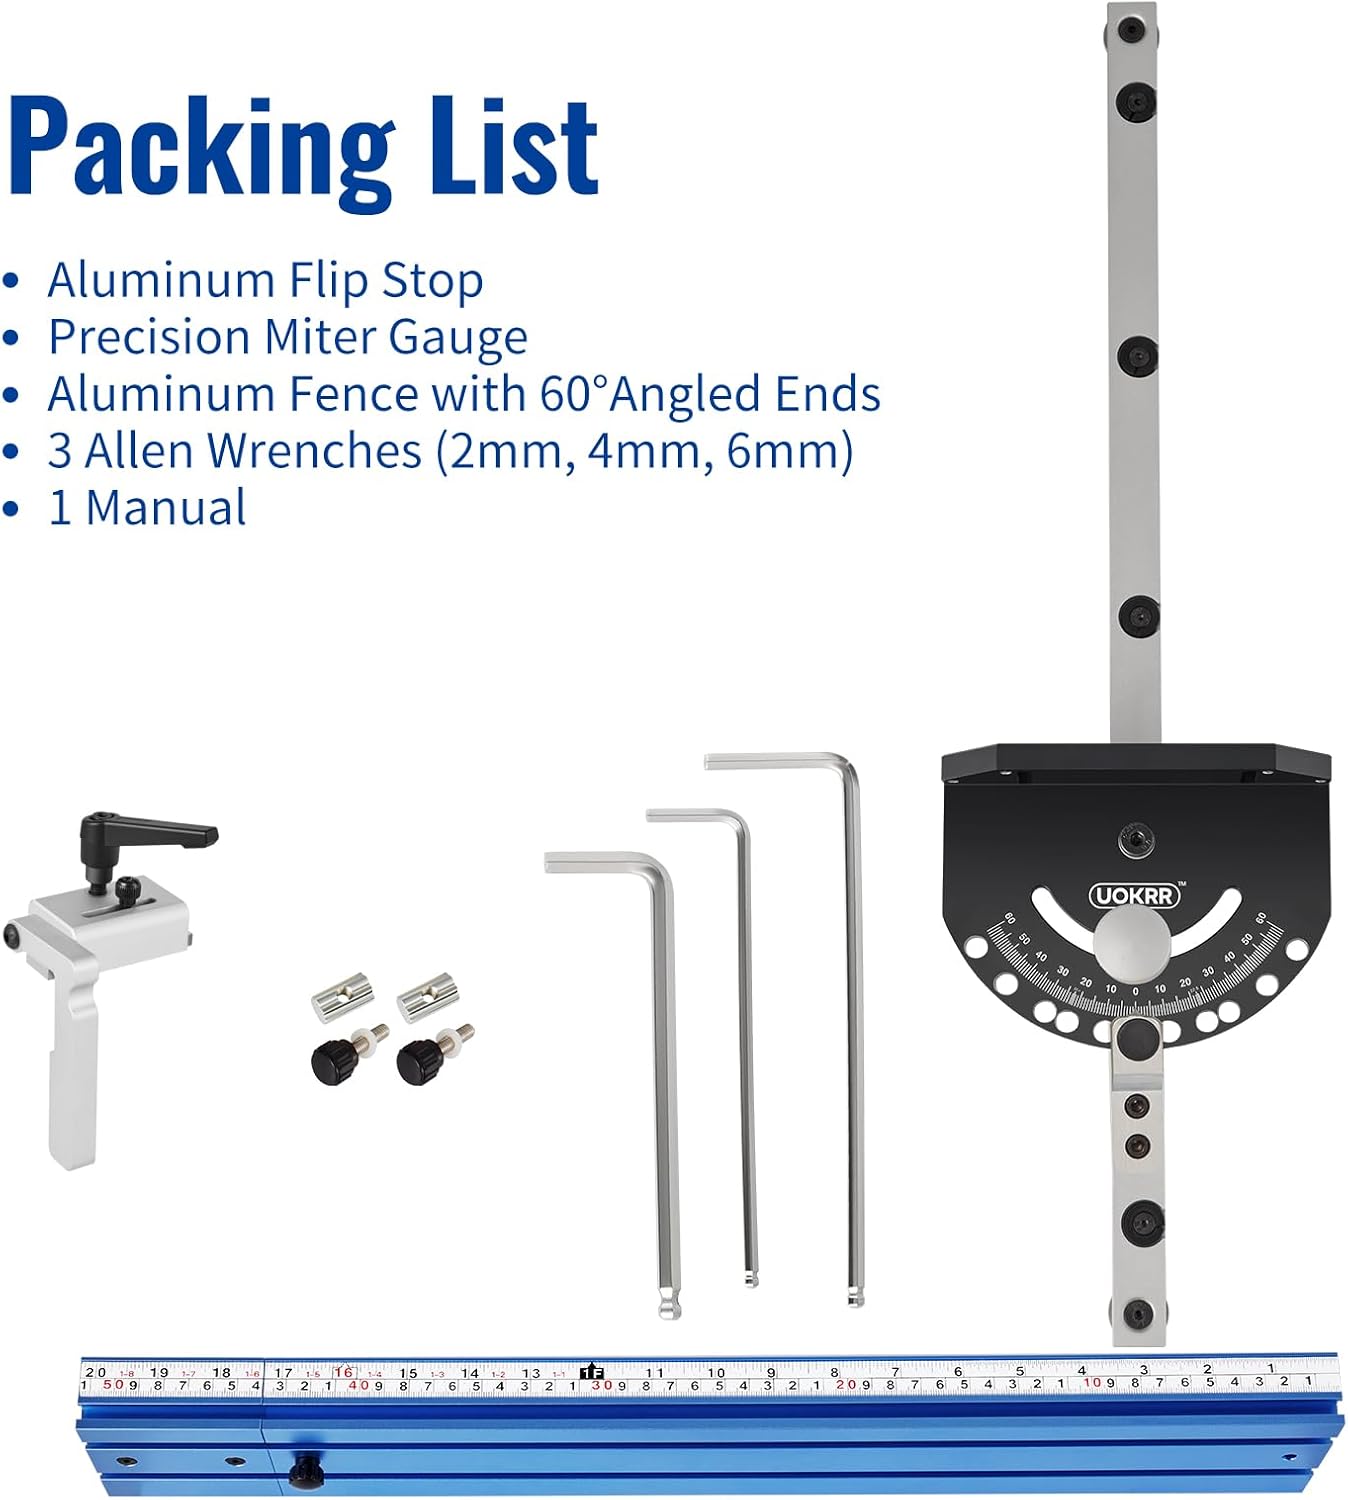
Figure 2: Visual representation of the included components in the package.
4. Product Features
The UOKRR Miter Gauge Fence offers several features designed for precision and durability:
- Durable Construction: Integrated aluminum alloy protractor with laser-engraved scale and 9mm thick plate. CNC-machined anodized oxidation surface for wear resistance.
- Telescoping Aluminum Fence: Expands from 20 inches to 36 inches (51cm to 92cm) overall length, providing extended support for various workpiece sizes.
- Precision Angle Stops: Features a spring-loaded pin for quick and accurate changes between preset angles at 0°, 10°, 22.5°, 30°, 45°, and 60° (left or right).
- Flip Stop: Aids in securing workpieces and ensures repeatable angled cuts.
- Standard Miter Slot Compatibility: Designed to work with standard 3/4" x 3/8" miter slots, with or without T-slots.
5. Setup and Assembly
5.1 Miter Bar Compatibility
The miter gauge is designed for standard 3/4" x 3/8" miter slots. It is compatible with both T-shaped and rectangular miter slots. Ensure your table saw's miter slot matches these dimensions.
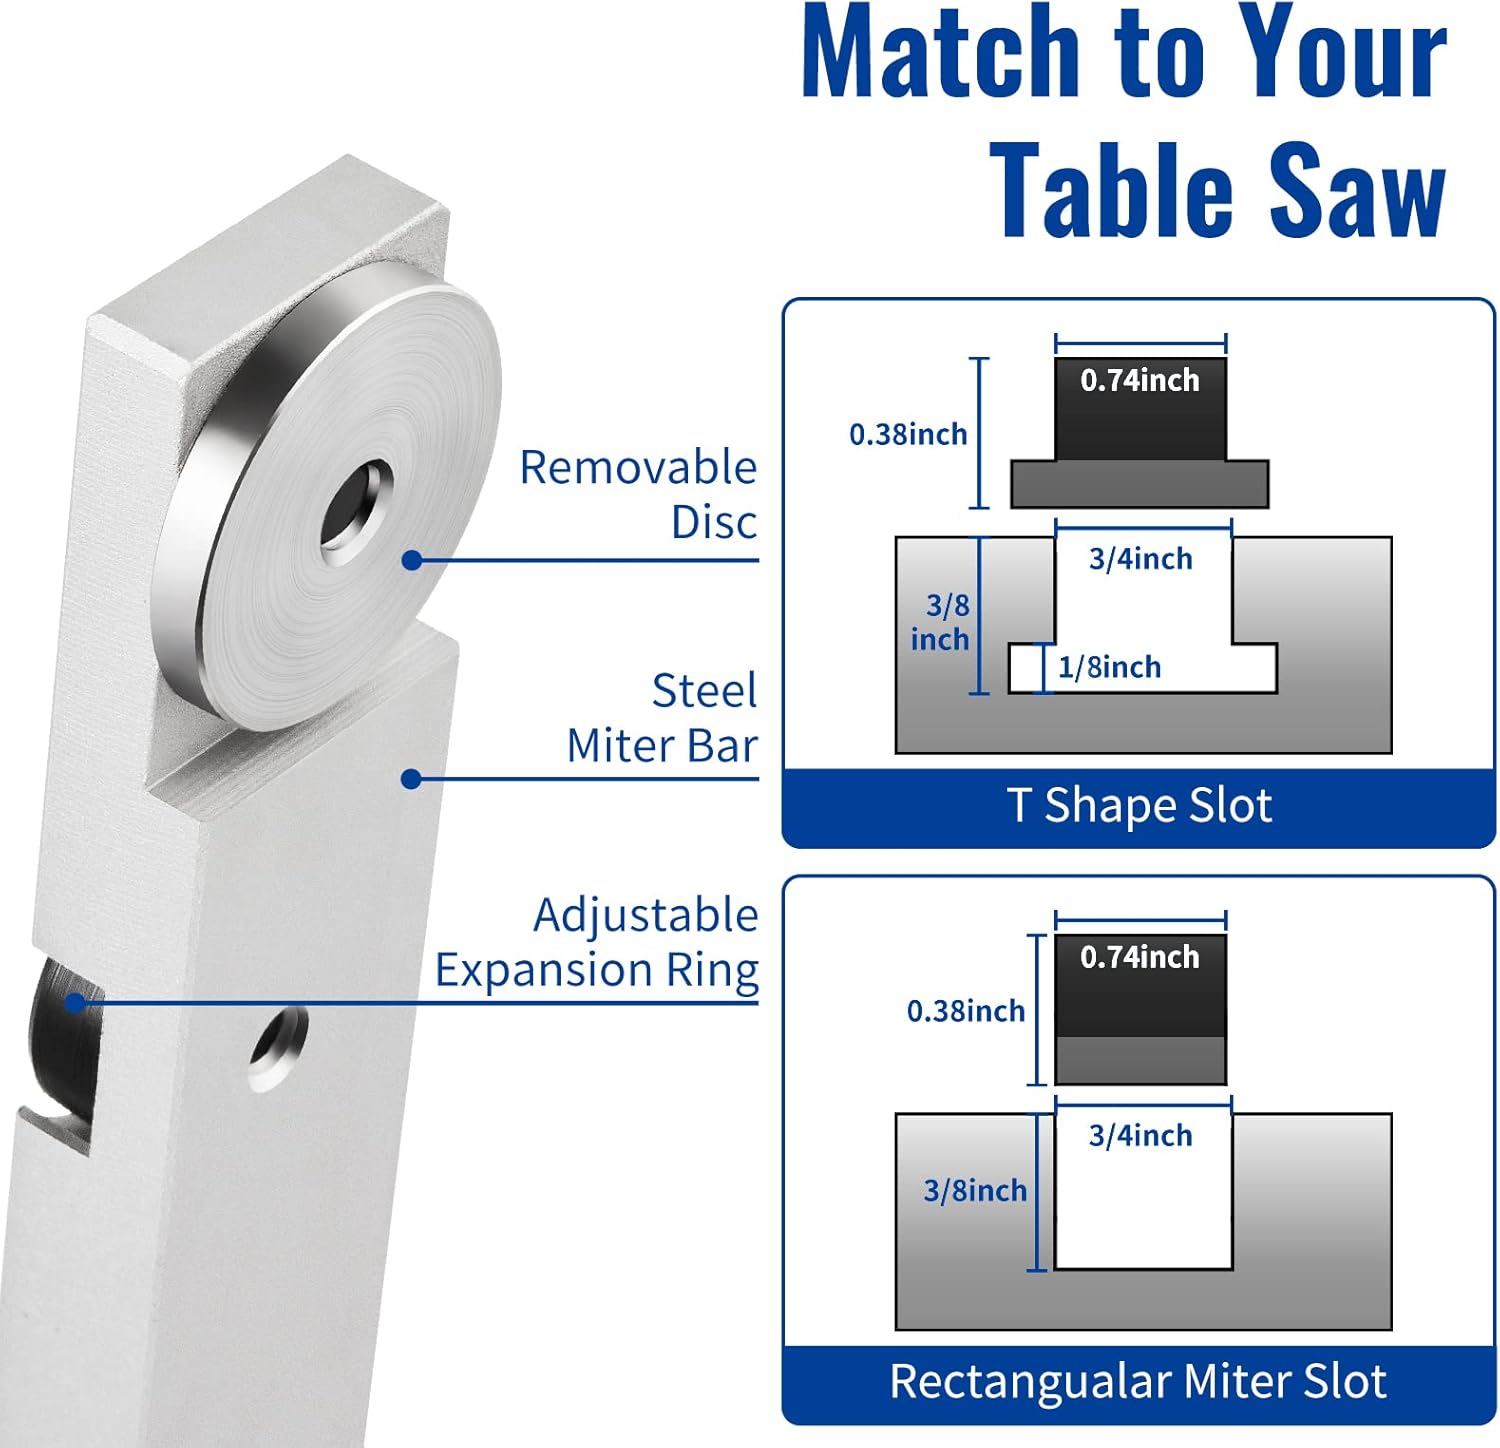
Figure 3: Diagram illustrating compatibility with T-shaped and rectangular miter slots, showing dimensions of the miter bar and slots.
5.2 Adjusting Miter Bar Clearance
For optimal performance, the miter bar should slide smoothly in the miter slot with minimal play. If the fit is too loose or too tight, adjust the clearance:
- Locate the small screws on the side of the miter bar.
- Use the appropriate Allen wrench (included) to adjust these screws.
- Turn clockwise to tighten the fit (reduce clearance) or counter-clockwise to loosen the fit (increase clearance).
- Test the slide in your table saw's miter slot and adjust until a smooth, snug fit is achieved.
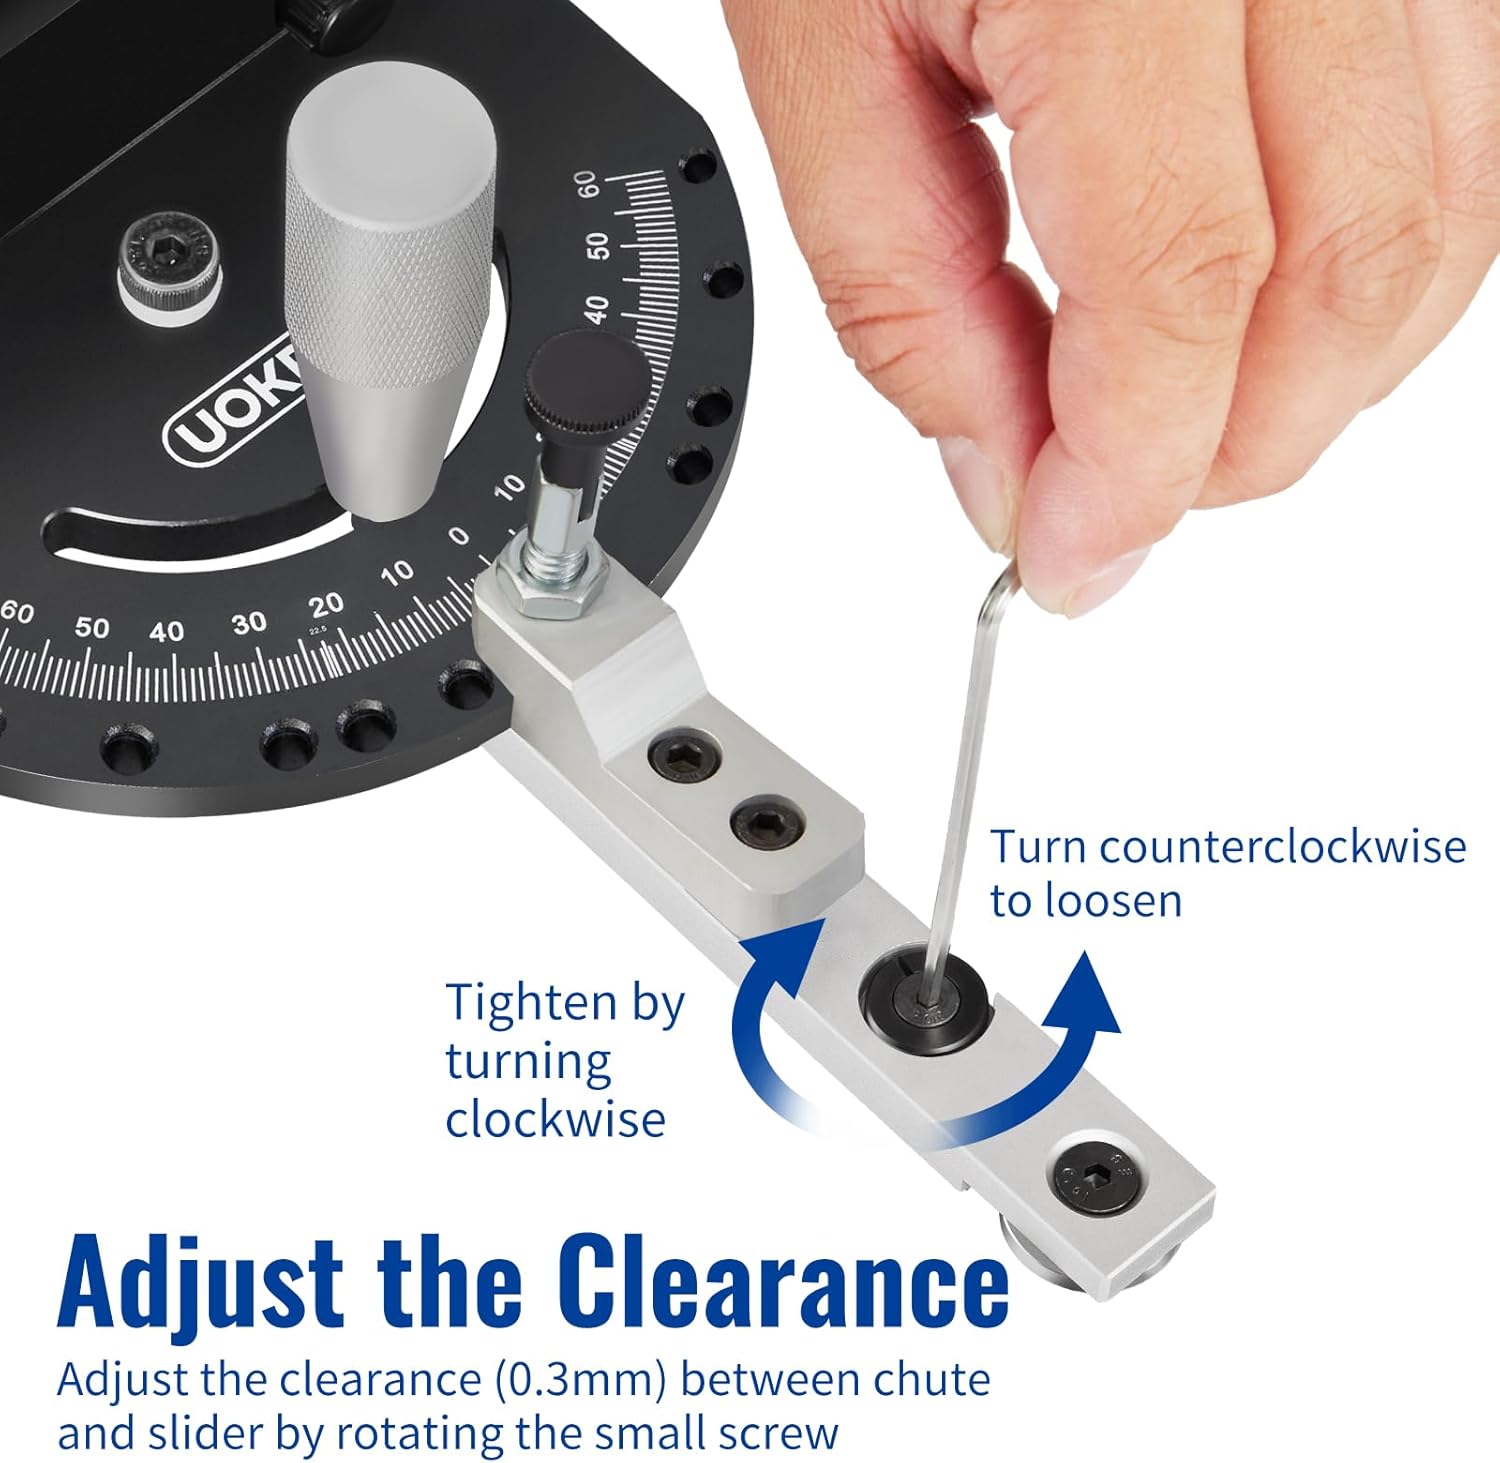
Figure 4: Image demonstrating how to adjust the clearance of the miter bar using an Allen wrench. Turning clockwise tightens, counter-clockwise loosens.
5.3 Attaching the Fence and Flip Stop
- Slide the aluminum fence onto the miter gauge body.
- Secure the fence using the provided fasteners.
- Attach the flip stop to the aluminum fence. The flip stop can be positioned along the fence to set the desired cut length.
6. Operation
6.1 Angle Adjustment
The miter gauge allows for angle adjustments from -60° to +60° with positive stops for common angles.
- Loosen the clamp handle on the protractor head.
- Depress the spring-loaded pin and rotate the protractor head to the desired angle. The pin will engage in the preset stops (0°, 10°, 22.5°, 30°, 45°, 60°).
- For angles not covered by the preset stops, align the indicator with the desired degree on the laser-engraved scale.
- Once the angle is set, tighten the clamp handle firmly to lock the protractor head in place.
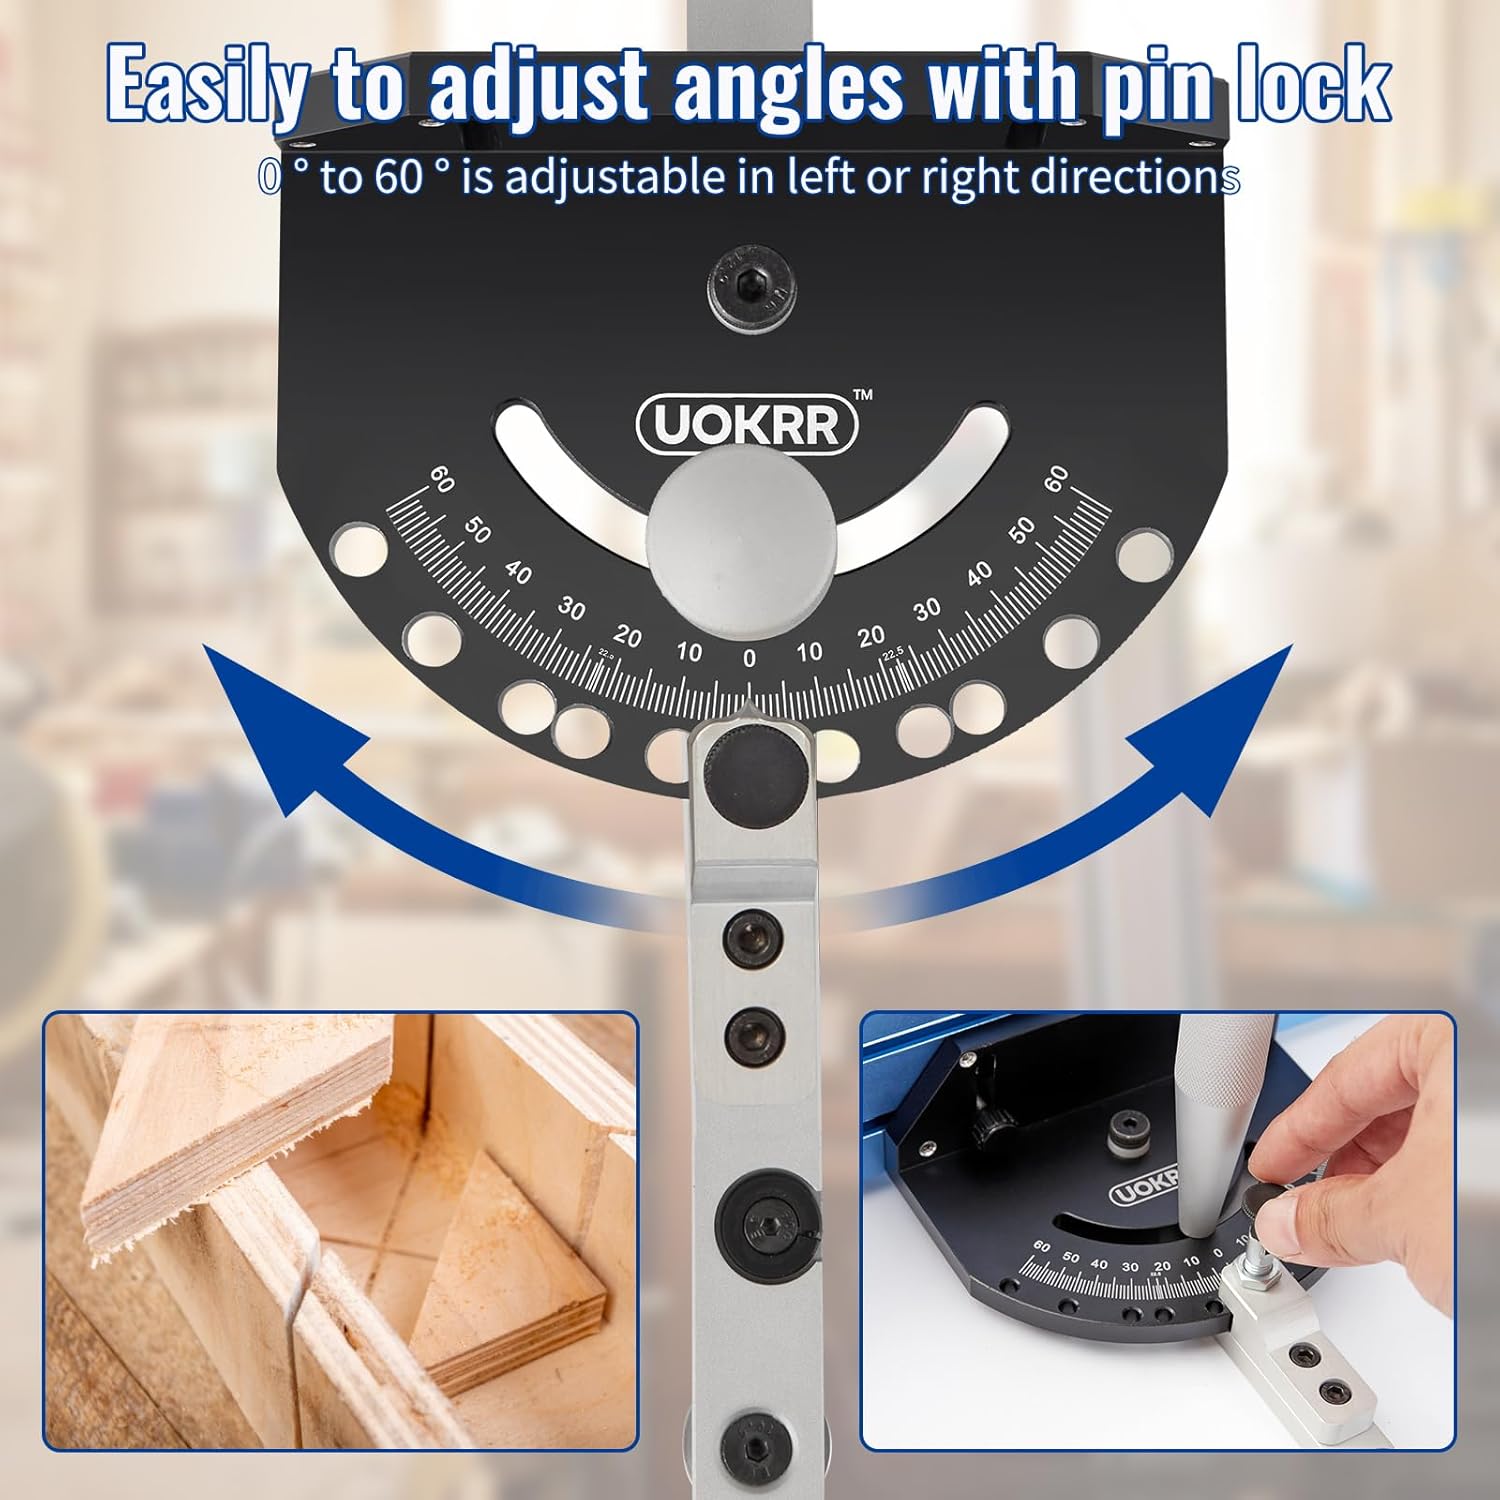
Figure 5: Image showing the protractor head with its scale and spring-loaded pin for adjusting angles from 0° to 60° in both left and right directions.
6.2 Fence Extension
The aluminum fence can be extended to accommodate wider workpieces.
- Loosen the locking knobs on the telescoping fence sections.
- Slide the fence sections outwards to extend the fence to the desired length (up to 36 inches).
- Tighten the locking knobs to secure the fence at the extended position.
6.3 Using the Flip Stop
The flip stop is used for making repetitive cuts of the same length.
- Position the flip stop along the fence to the desired measurement using the integrated scale.
- Lock the flip stop in place.
- Place your workpiece against the flip stop and the fence before making a cut.
- After the cut, the flip stop can be flipped up to allow the workpiece to pass without obstruction for subsequent cuts or adjustments.
7. Maintenance
Regular maintenance ensures the longevity and accuracy of your miter gauge.
- Cleaning: After each use, wipe down the miter gauge and fence with a clean, dry cloth to remove sawdust and debris.
- Lubrication: Periodically apply a light coat of dry lubricant to the miter bar and sliding fence components to ensure smooth operation. Avoid excessive lubrication that can attract dust.
- Inspection: Regularly inspect all fasteners and moving parts for wear or damage. Tighten any loose screws.
- Storage: Store the miter gauge in a dry, clean environment to prevent corrosion and damage.
8. Troubleshooting
If you encounter issues with your UOKRR Miter Gauge, refer to the following common problems and solutions:
- Miter bar sticks or has excessive play: Adjust the miter bar clearance screws as described in Section 5.2. Ensure the miter slot is clean and free of debris.
- Inaccurate angle cuts: Verify that the protractor head is securely locked at the desired angle. Check for any debris preventing the spring-loaded pin from fully engaging in the preset stops. Ensure your table saw blade is square to the table.
- Fence not extending smoothly: Clean the telescoping fence channels and apply a dry lubricant if necessary. Check for any bent or damaged components.
- Flip stop not holding position: Ensure the flip stop's locking mechanism is tightened correctly.
9. Specifications
| Specification | Detail |
|---|---|
| Model Number | UO036 |
| Manufacturer | UOKRR |
| Material | Aluminum |
| Miter Slot Compatibility | Standard 3/4" x 3/8" (with or without T-slots) |
| Angle Range | -60° to +60° |
| Preset Angle Stops | 0°, 10°, 22.5°, 30°, 45°, 60° |
| Fence Length (Telescoping) | 20 inches to 36 inches (51cm to 92cm) |
| Product Dimensions | Approximately 36 x 20 x 2.63 inches (92 x 51 x 7 cm) |
| Item Weight | 4.1 pounds |
| Included Components | Miter Gauge, Aluminum Fence & Bar, Aluminum Flip Stop, 3 Allen Wrenches (2mm, 4mm, 6mm), Clamp Handle |

Figure 6: Diagram showing the key dimensions of the UOKRR Table Saw Miter Gauge Fence, including overall length and height.
10. Warranty and Support
UOKRR stands behind the quality of its products. For warranty information, technical support, or assistance with your miter gauge, please refer to the contact information provided with your purchase or visit the official UOKRR website. Please have your model number (UO036) available when contacting support.