1. Introduction
The BAISHUN HDMI KVM USB Extender (Model CJX-062-US) allows for the transmission of high-definition video (up to 1080p@60Hz) and USB keyboard/mouse signals over a single Cat5e/6/7 Ethernet cable. This device extends control of a computer or other HDMI source up to 164 feet (50 meters) with zero latency, making it suitable for home theaters, gaming setups, and multi-room offices. It consists of a Transmitter (TX) unit and a Receiver (RX) unit.

Image 1.1: The BAISHUN HDMI KVM USB Extender includes a Transmitter (TX) and a Receiver (RX) unit, shown with a USB cable.
2. Package Contents
Please verify that all items are present in your package:
- KVM Transmitter (TX) Unit: 1 PCS
- KVM Receiver (RX) Unit: 1 PCS
- USB Cable: 1 PCS
- Power Adapter: 1 PCS
- User Manual: 1 PCS
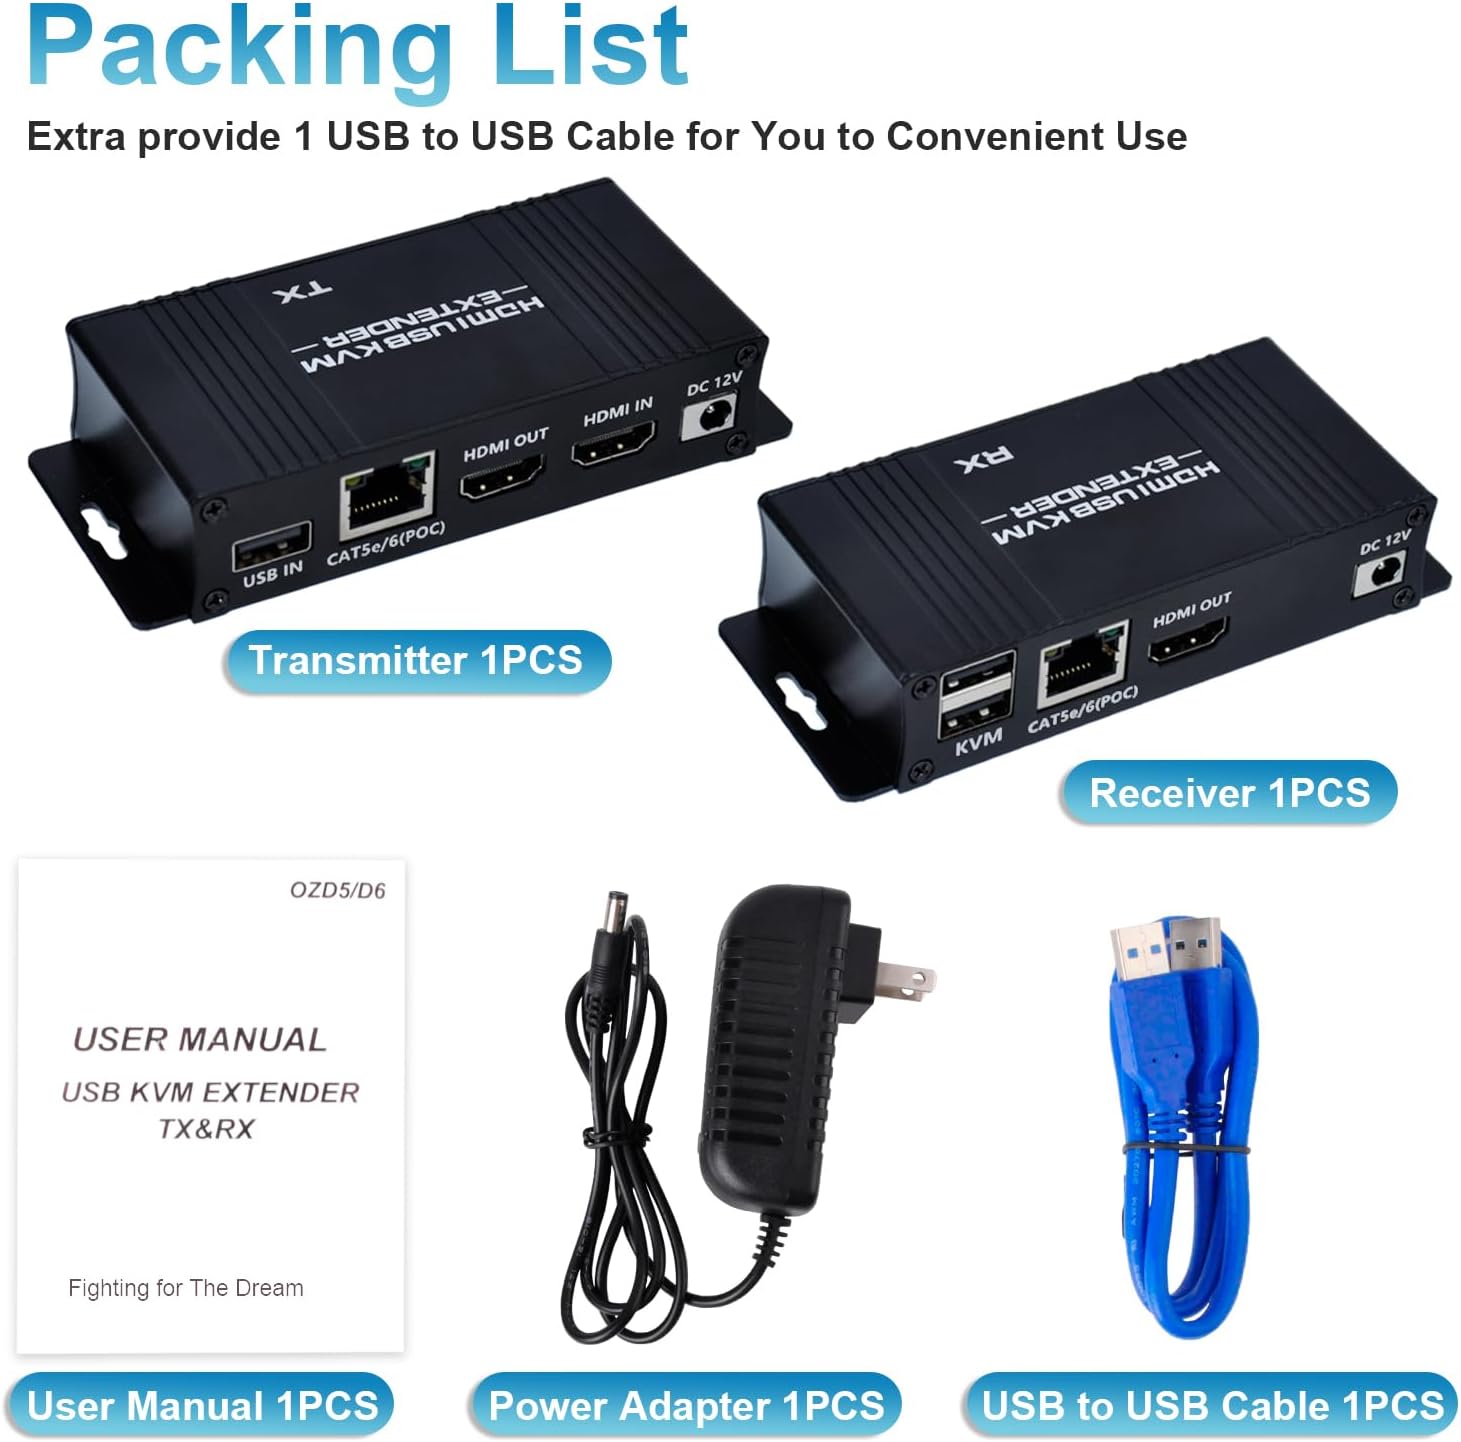
Image 2.1: The package includes the Transmitter, Receiver, USB cable, power adapter, and user manual.
3. Product Overview
The extender system comprises two main units:
3.1 Transmitter (TX) Unit
Connects to the source device (e.g., PC, laptop). It features:
- USB IN Port: Connects to the source PC's USB port for KVM functionality.
- CAT5e/6/7 (POC) Port: Connects to the Receiver unit via an Ethernet cable. Supports Power Over Cable (POC).
- HDMI IN Port: Connects to the source device's HDMI output.
- HDMI OUT Port: For local display monitoring (optional).
- DC 12V Port: For power input.
3.2 Receiver (RX) Unit
Connects to the display and KVM peripherals. It features:
- KVM Ports (2x USB 2.0): Connects to USB keyboard and mouse.
- CAT5e/6/7 (POC) Port: Connects to the Transmitter unit via an Ethernet cable.
- HDMI OUT Port: Connects to the display device (e.g., monitor, TV).
- DC 12V Port: For power input (only one power adapter is needed for the system, typically connected to the TX unit due to POC).

Image 3.1: Detailed view of the input/output ports on both the Transmitter (TX) and Receiver (RX) units.
4. Setup Instructions
Follow these steps to set up your HDMI KVM USB Extender:
- Connect the Source: Connect an HDMI cable from your source device (e.g., PC, laptop) to the HDMI IN port on the Transmitter (TX) unit.
- Connect USB to Source: Connect the provided USB-A to USB-A cable from a USB port on your source device to the USB IN port on the Transmitter (TX) unit.
- Connect Ethernet Cable: Run a single Cat5e/6/7 Ethernet cable (up to 164ft / 50m) between the CAT5e/6/7 (POC) port on the Transmitter (TX) unit and the CAT5e/6/7 (POC) port on the Receiver (RX) unit. Ensure the cable is properly terminated.
- Connect Display: Connect an HDMI cable from the HDMI OUT port on the Receiver (RX) unit to your display device (e.g., monitor, TV).
- Connect KVM Peripherals: Connect your USB keyboard and mouse to the KVM USB 2.0 ports on the Receiver (RX) unit.
- Apply Power: Connect the provided 12V DC power adapter to the DC 12V port on the Transmitter (TX) unit. Due to Power Over Cable (POC) functionality, only one power adapter is required for the entire system.
- Power On: Power on your source device and display. The extender system should automatically establish connection and display the video.

Image 4.1: Connection diagram illustrating how to connect the Transmitter (TX) to the source PC and local display, and the Receiver (RX) to the remote display, keyboard, and mouse via a Cat5e/6/7 cable.

Image 4.2: The Power Over Cable (POC) function allows the entire system to be powered by a single adapter connected to the Transmitter (TX) unit.
5. Operating Instructions
Once properly set up, the BAISHUN HDMI KVM USB Extender operates automatically:
- Automatic Detection: The extender will automatically detect the HDMI input and output resolutions.
- KVM Control: The keyboard and mouse connected to the Receiver (RX) unit will control the source device as if they were directly connected.
- Zero Latency: The system is designed for zero latency transmission, ensuring smooth video and responsive keyboard/mouse control.
- Local HDMI Output: The Transmitter (TX) unit includes an HDMI OUT port, allowing for a local display to be connected for monitoring the source device simultaneously.

Image 5.1: The extender provides zero latency video and audio transmission, allowing for remote control of a PC with a keyboard and mouse.

Image 5.2: Keyboard input and mouse movement are smoothly synchronized over distances up to 164 feet.
6. Maintenance
To ensure optimal performance and longevity of your extender:
- Keep the units in a cool, dry, and well-ventilated area.
- Avoid exposing the units to direct sunlight, high temperatures, or excessive humidity.
- Clean the units with a soft, dry cloth. Do not use liquid or aerosol cleaners.
- Ensure all cable connections are secure and free from damage.
7. Troubleshooting
If you encounter issues, please refer to the following common solutions:
- No Video Output:
- Ensure all HDMI cables are securely connected to both the source and display, and to the extender units.
- Verify that the Cat5e/6/7 Ethernet cable is properly connected between the TX and RX units and is not damaged.
- Confirm that the power adapter is connected to the TX unit and the unit is receiving power.
- Test with a shorter, known-good Ethernet cable to rule out cable issues.
- Ensure your display is set to the correct HDMI input.
- Keyboard/Mouse Not Responding:
- Check that the USB cable is securely connected from your source PC to the USB IN port on the TX unit.
- Ensure your keyboard and mouse are connected to the KVM USB 2.0 ports on the RX unit.
- Avoid using 5.8GHz wireless keyboards/mice, as they may not be compatible. Wired or 2.4GHz wireless peripherals are recommended.
- Try connecting the keyboard and mouse directly to the source PC to confirm they are functional.
- Restart both the source PC and the extender units.
- Intermittent Signal/Flickering Video:
- Ensure the Cat5e/6/7 cable is of good quality and meets specifications for the distance.
- Check for any sources of electromagnetic interference near the Ethernet cable.
- Verify that the HDMI cables are not excessively long or damaged.
For further assistance, please contact BAISHUN customer support. Lifetime troubleshooting support is available for this product.
8. Specifications
| Feature | Description |
|---|---|
| Model Number | CJX-062-US |
| Brand | BAISHUN |
| Transmission Distance | Up to 164ft (50m) over Cat5e/6/7 Ethernet cable |
| Video Resolution | Max 1080p@60Hz, supports 3D |
| Latency | Zero Latency |
| USB Ports | 2x USB 2.0 (on Receiver for KVM) |
| Power Supply | DC 12V (Single power adapter with Power Over Cable - POC) |
| Control Method | Remote (Keyboard/Mouse) |
| Connectivity Protocol | Ethernet |
| Color | Black |
| Dimensions (L x W x H) | 4.56 x 1.96 x 0.95 inches (per unit) |
| Item Weight | 12.6 ounces |
| Material | Copper (Contact Material) |
| Certification | ETL |

Image 8.1: The dimensions of a single extender unit are 4.56 inches in length, 1.96 inches in width, and 0.95 inches in height.
9. Warranty and Support
BAISHUN provides lifetime troubleshooting support for the HDMI KVM USB Extender. For any technical issues, questions, or support needs, please contact BAISHUN customer service through your purchase platform or the official BAISHUN website.