1. Introduction
This manual provides essential information for the safe and efficient operation, setup, and maintenance of the XINCHENG PRECISION LJW-200 with CCD Laser Jewelry Welder. This precision instrument is designed for micro-processing tasks such as patching holes, spot welding grit holes, repairing seams, and spot-welding inlaid parts in gold and silver jewelry, as well as applications in dental, instrumentation, and electronic equipment industries.

Figure 1.1: Overview of the XINCHENG PRECISION LJW-200 with CCD Laser Jewelry Welder.
2. Safety Information
Operating laser welding equipment requires strict adherence to safety protocols to prevent injury and equipment damage. Read and understand all safety warnings before operation.
2.1 General Safety Precautions
- Eye Protection: Always wear appropriate laser safety goggles that block the 1064nm wavelength during operation. Never look directly into the laser beam or its reflection.
- Electrical Safety: Ensure the machine is properly grounded. Do not operate with wet hands or in damp environments. Disconnect power before performing any maintenance.
- Ventilation: Operate the machine in a well-ventilated area to dissipate fumes generated during welding.
- Work Area: Keep the work area clean and free of flammable materials. Ensure adequate space around the machine for safe operation and cooling.
- Emergency Stop: Familiarize yourself with the location and operation of the emergency stop button.
3. Product Overview
The LJW-200 with CCD is a high-performance laser jewelry welder featuring advanced technology for precise and efficient welding.
3.1 Key Features
- High-Power Efficiency: Delivers a maximum power of 200W and pulse energy of 60J, with a 1064nm wavelength and adjustable pulse width (0-20ms) for smooth weld joints.
- Advanced Cooling System: Features a built-in water cooler and digital control system for stability and extended service life. The ceramic cavity ensures high photoelectric efficiency and corrosion resistance.
- Enhanced Precision with CCD Image Sensor: Integrated microscope with CCD configuration allows for precise observation of welding joints on a screen, facilitating micro-size processing. Adjustable binocular pupil distance and rotatable direction enhance user convenience.
- Versatile Welding Modes: Supports multiple welding process modes with adjustable pulse width, frequency, and spot size. Includes universal wheels for easy movement and automatic water pumping with a one-button start.
3.2 Components
The LJW-200 with CCD includes several key components for its operation:

Figure 3.1: The integrated microscope with CCD configuration for precise observation.
- Microscope with CCD: For magnified viewing and digital display of the welding area.
- Control Switch: Main power and emergency stop controls.
- Key Switch: For securing the machine against unauthorized use.
- Display Screen: Sensitive color capacitive touch screen for operating the digital control system.
- Observation Port: Protected viewing window for the welding process.
- Working Capsule: Enclosed area where welding takes place.
- Temperature Control: Integrated cooling system with digital display.
- LED Ring Shadowless Light: Provides 360-degree illumination of the welding position.
- Automatic Water Pumping: One-button start for the cooling system, stops automatically when the water tank is full.
- Reserved Air Port: For connecting protective gas to prevent oxidation and discoloration of welds.
- Foot Switch: For initiating the laser pulse during welding.
- Universal Wheels: For easy repositioning of the machine.

Figure 3.2: The digital control system for setting welding parameters.

Figure 3.3: Emergency stop and key switch for power control.

Figure 3.4: The foot switch used to trigger the laser pulse.
4. Specifications
Detailed technical specifications for the LJW-200 with CCD Laser Jewelry Welder:

Figure 4.1: Visual representation of key product specifications.
| Parameter | Value |
|---|---|
| Model | LJW-200 with CCD |
| Laser Wavelength | 1064nm |
| Laser Frequency | 0-50Hz |
| Condenser Reflector | Imported ceramic condensing cavity |
| Maximum Laser Power | 200W |
| Energy | 60J |
| Voltage | 220V 1 phase / 380V 3 phase (Voltage customized is needed if for 110V) |
| Pulse Width | 0-20ms |
| Spot Adjustment Range | 0.3-2.5mm |
| Cooling System | Built-in water cooler |
| Rated Power | 6.9KW |
| Packaging Size | 1100*700*1300 mm |
| Gross Weight | 180 kg |
| Usage Environment | 10-30°C |
5. Setup
Follow these steps to set up your LJW-200 with CCD Laser Jewelry Welder.
5.1 Unpacking and Placement
- Carefully unpack the machine and all accessories from the packaging.
- Place the welder on a stable, level surface in a well-ventilated area, ensuring sufficient space for air circulation around the cooling vents.
- Lock the universal wheels to prevent accidental movement.

Figure 5.1: Universal wheel for machine mobility.
5.2 Power Connection
- Ensure the main power switch is in the OFF position.
- Connect the power cable to the machine's power input port and then to a compatible electrical outlet (220V 1 phase or 380V 3 phase, depending on your model).
5.3 Cooling System Setup
- Locate the water inlet and outlet ports for the built-in water cooler.
- Fill the water tank with distilled or deionized water. Use the automatic water pumping function by pressing the designated button; the pump will stop automatically when the tank is full.
- Regularly check the water level and quality.
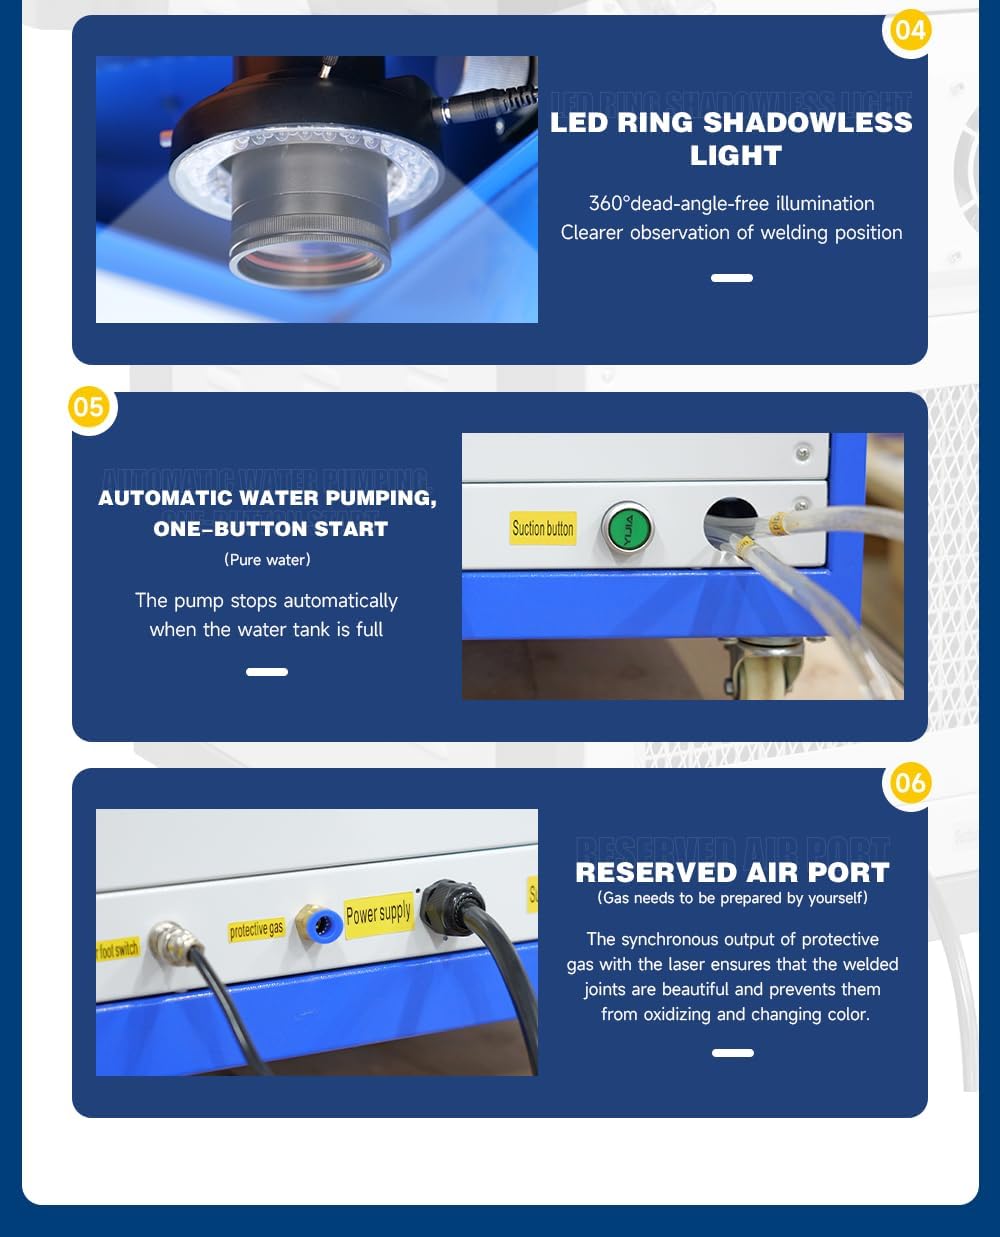
Figure 5.2: The integrated cooling system with water input.
5.4 Protective Gas Connection (Optional)
- If using protective gas (e.g., argon) to prevent oxidation, connect the gas supply line to the reserved air port on the machine.
- Ensure the gas pressure is set according to recommended guidelines for your application.

Figure 5.3: Rear connections including power, protective gas, and water suction button.
6. Operating Instructions
This section outlines the basic steps for operating the LJW-200 with CCD Laser Jewelry Welder.
6.1 Power On and Initial Setup
- Insert the key into the key switch and turn it to the ON position.
- Press the main power button to power on the machine. The digital control system display will illuminate.
- Allow the cooling system to stabilize for a few minutes before starting welding operations.
6.2 Adjusting Welding Parameters
- Use the touch screen interface to navigate through the settings menu.
- Adjust parameters such as laser power (W), pulse energy (J), pulse width (ms), and frequency (Hz) according to the material and desired weld characteristics.
- Adjust the spot size using the appropriate controls to match the precision required for your task (0.3-2.5mm).
6.3 Welding Procedure
- Place the workpiece securely within the working capsule.
- Look through the microscope or observe the CCD display to position the laser spot accurately on the welding joint. Adjust the microscope's binocular pupil distance and rotation for comfort and clarity.
- Activate the LED ring shadowless light for optimal illumination of the work area.
- Ensure all safety precautions, especially eye protection, are in place.
- Press the foot switch to initiate the laser pulse and perform the weld. Release the foot switch to stop the laser.
- Inspect the weld quality and adjust parameters as needed for subsequent welds.
6.4 Power Off
- After completing welding tasks, release the foot switch.
- Turn the key switch to the OFF position.
- Disconnect the main power cable from the electrical outlet.
7. Maintenance
Regular maintenance ensures the longevity and optimal performance of your laser welder.
- Cleaning: Regularly clean the exterior of the machine with a soft, dry cloth. Keep the microscope lenses and CCD camera free of dust and debris.
- Cooling Water: Check the cooling water level daily and replace the water every 1-3 months, or more frequently if operating in dusty environments. Use only distilled or deionized water.
- Air Filters: Inspect and clean or replace air filters on the cooling system regularly to ensure proper airflow and prevent overheating.
- Laser Cavity: Periodically inspect the ceramic laser cavity for any signs of damage or contamination. This should ideally be performed by qualified personnel.
- Work Area: Keep the welding chamber clean to prevent contamination of optical components.
8. Troubleshooting
This section addresses common issues you might encounter with the LJW-200 with CCD Laser Jewelry Welder.
| Problem | Possible Cause | Solution |
|---|---|---|
| No laser output | Emergency stop engaged; Key switch off; Power cable disconnected; System error. | Release emergency stop; Turn key switch on; Check power connections; Consult manual for error codes or contact support. |
| Poor weld quality (weak, porous, discolored) | Incorrect welding parameters (power, pulse width, frequency); Insufficient protective gas; Contaminated workpiece; Improper focus. | Adjust welding parameters; Ensure protective gas is connected and flowing; Clean workpiece thoroughly; Adjust microscope focus. |
| Cooling system alarm/overheating | Low water level; Clogged filter; Ambient temperature too high; Pump malfunction. | Check and refill water; Clean or replace air filters; Ensure adequate ventilation; Contact support if pump is faulty. |
| CCD display is blurry or dark | Microscope lens dirty; CCD camera settings incorrect; Insufficient illumination. | Clean microscope lenses; Adjust CCD display settings; Activate LED ring light. |
9. Warranty and Support
XINCHENG PRECISION products are manufactured to high-quality standards. For specific warranty terms and conditions, please refer to the warranty card included with your product or contact XINCHENG PRECISION customer service. For technical support, spare parts, or service inquiries, please reach out to your authorized dealer or the manufacturer directly.